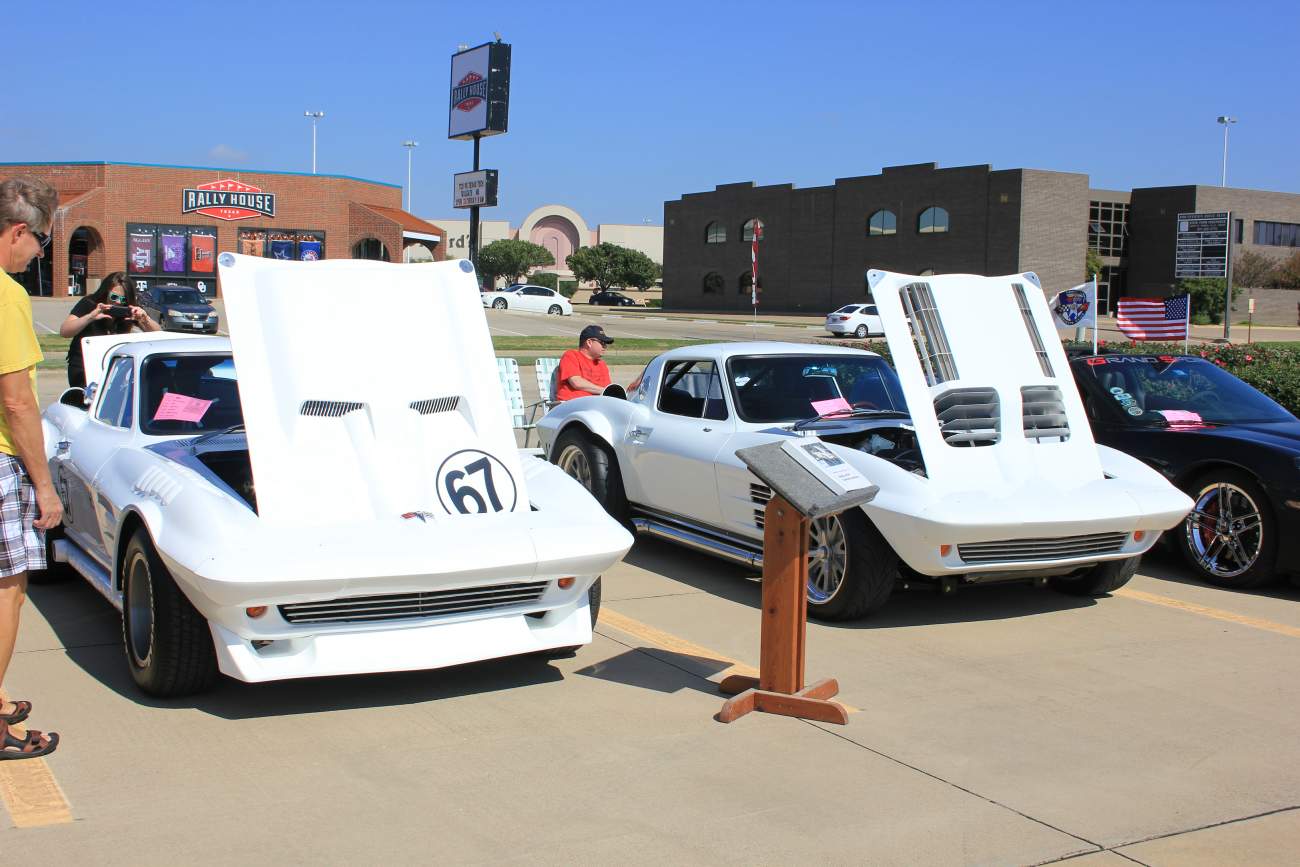
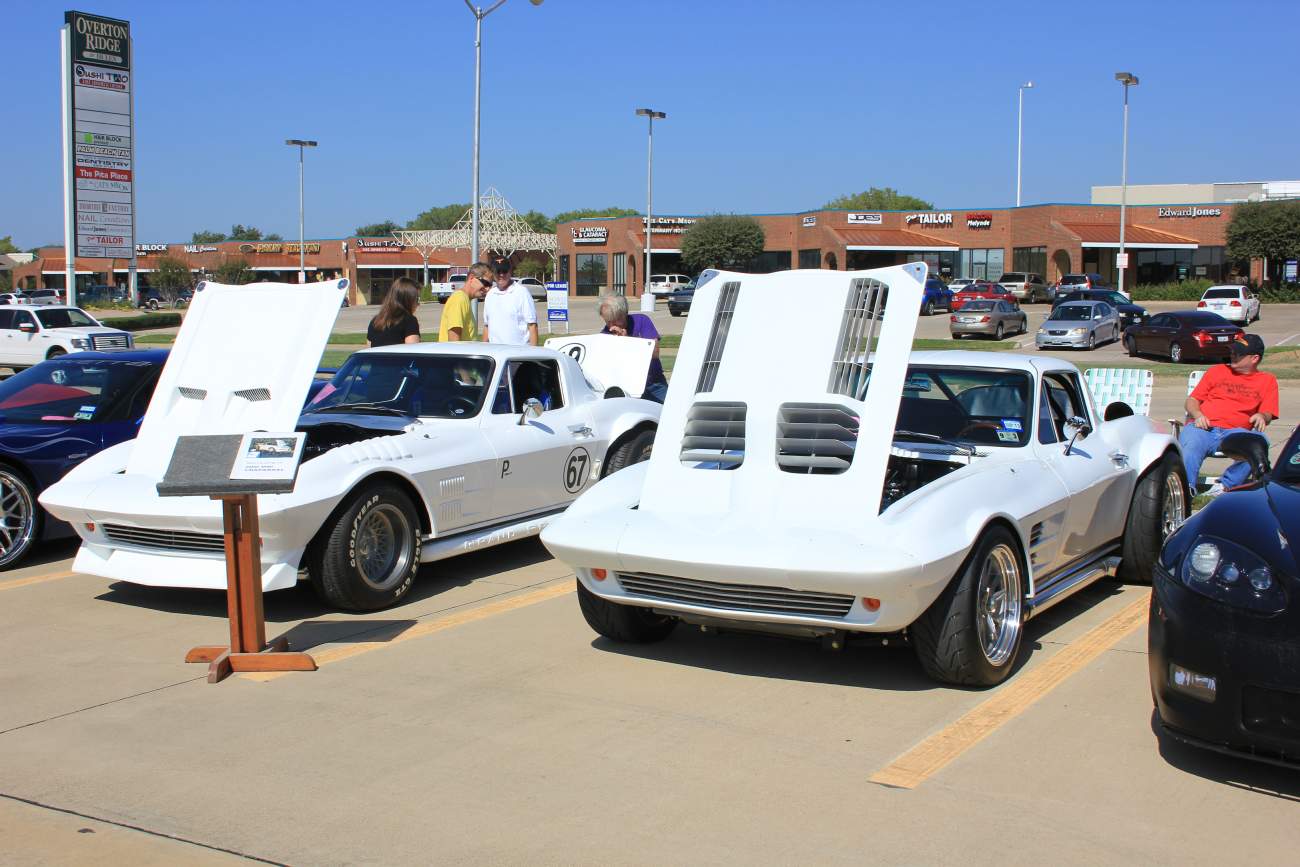
Grand Sport Corvette
The first race car that really knocked my lights out.
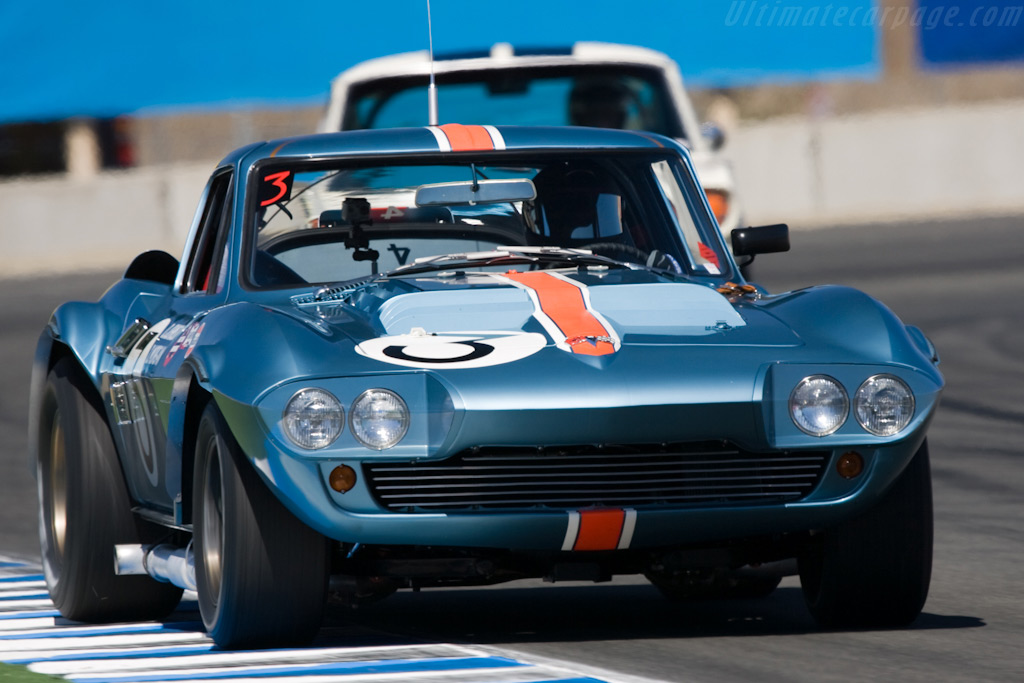
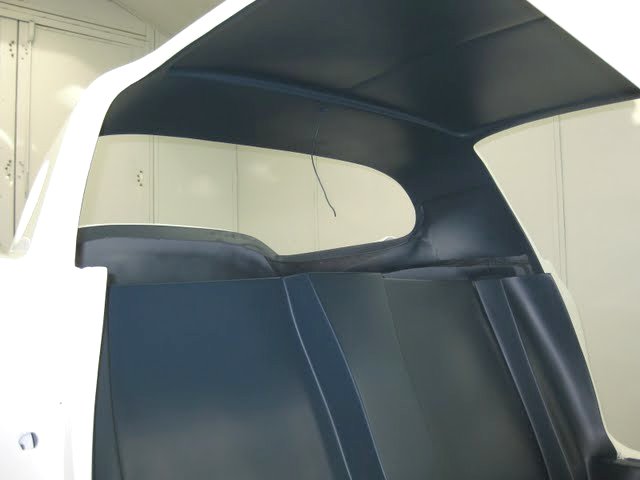
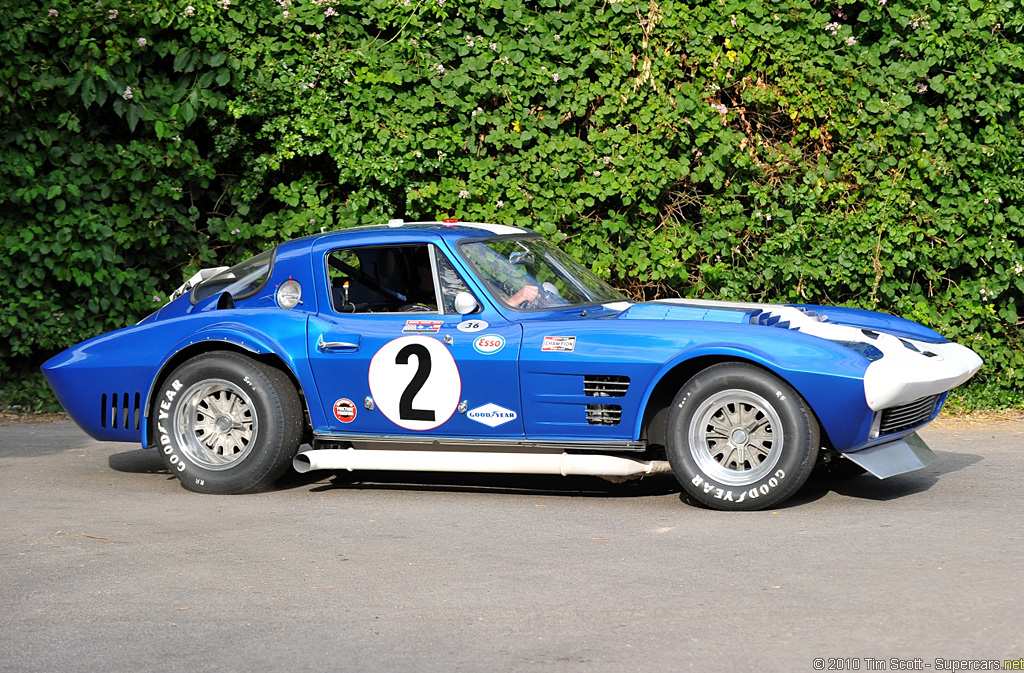
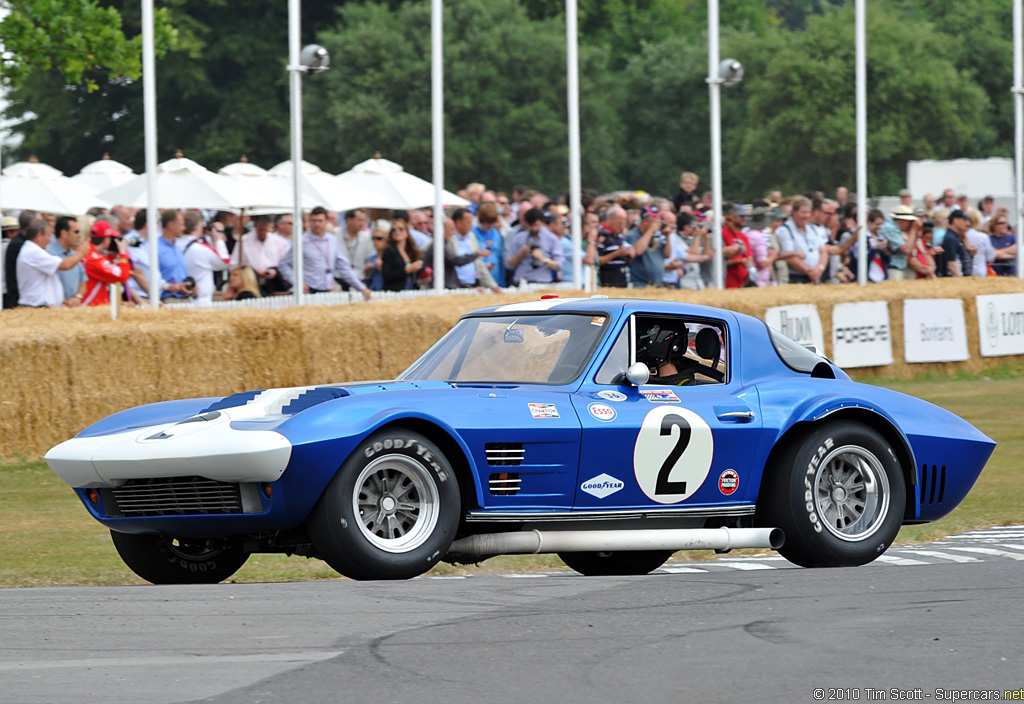
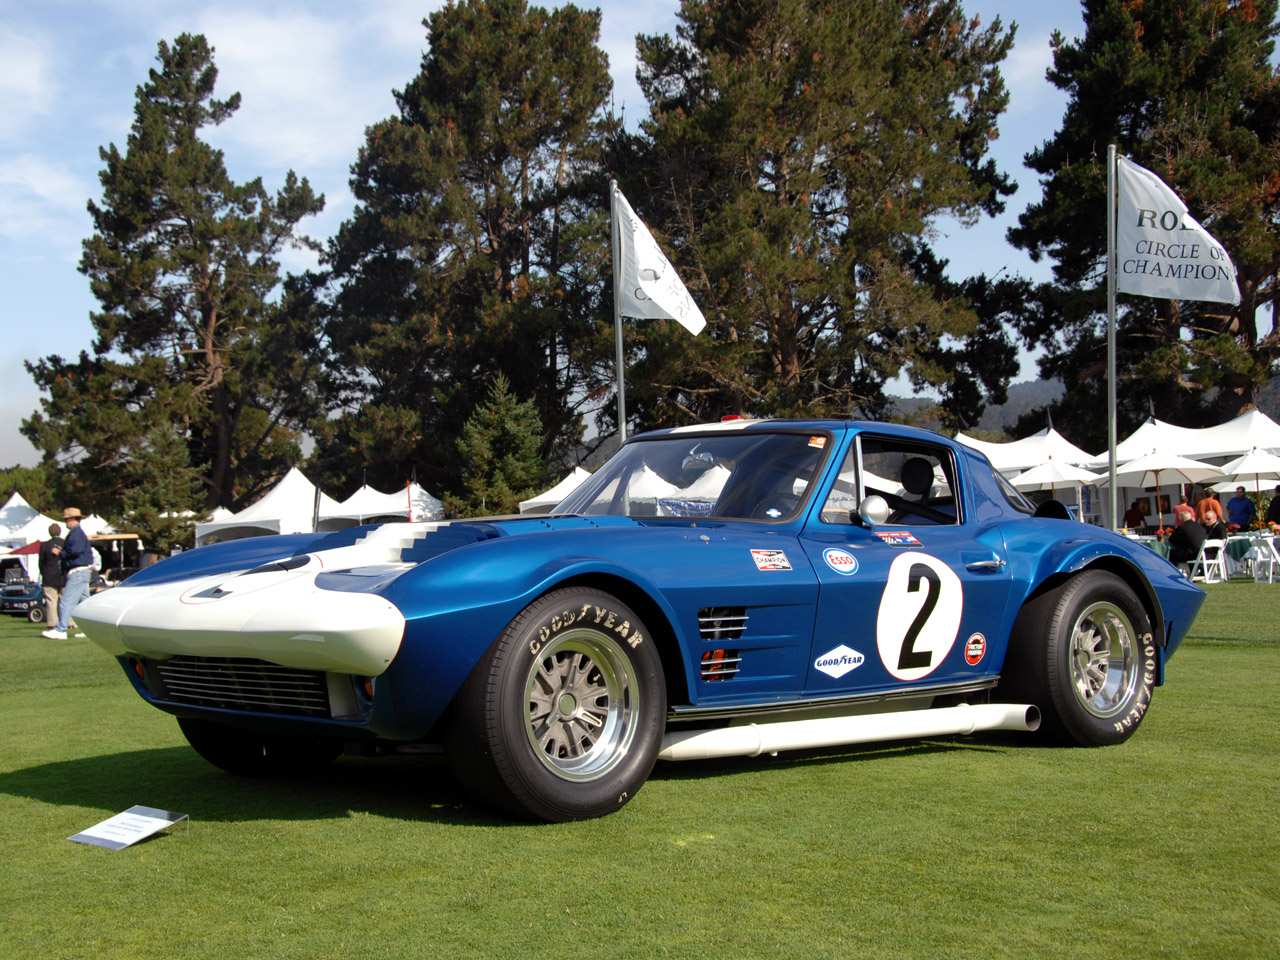
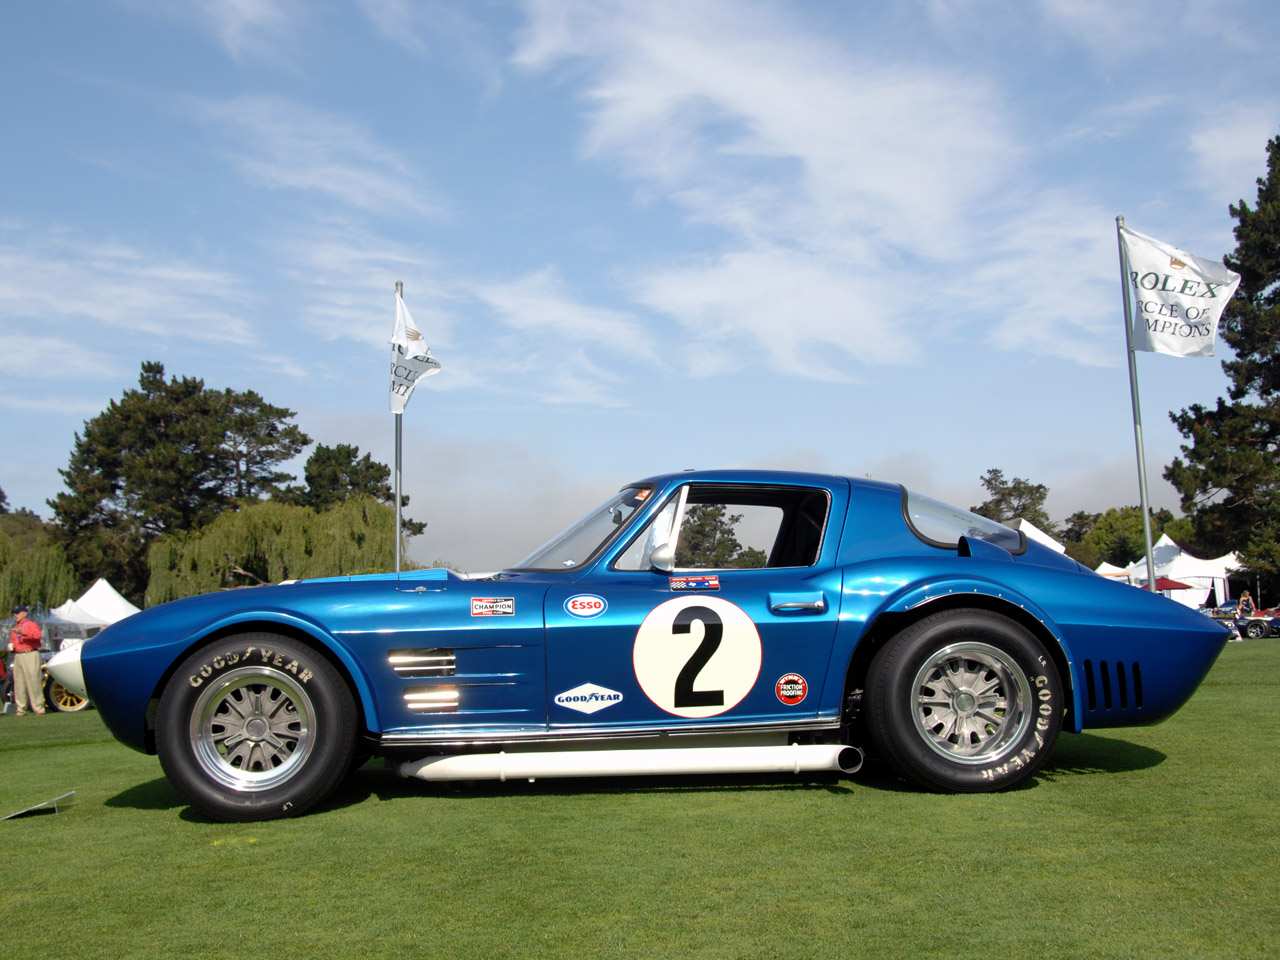
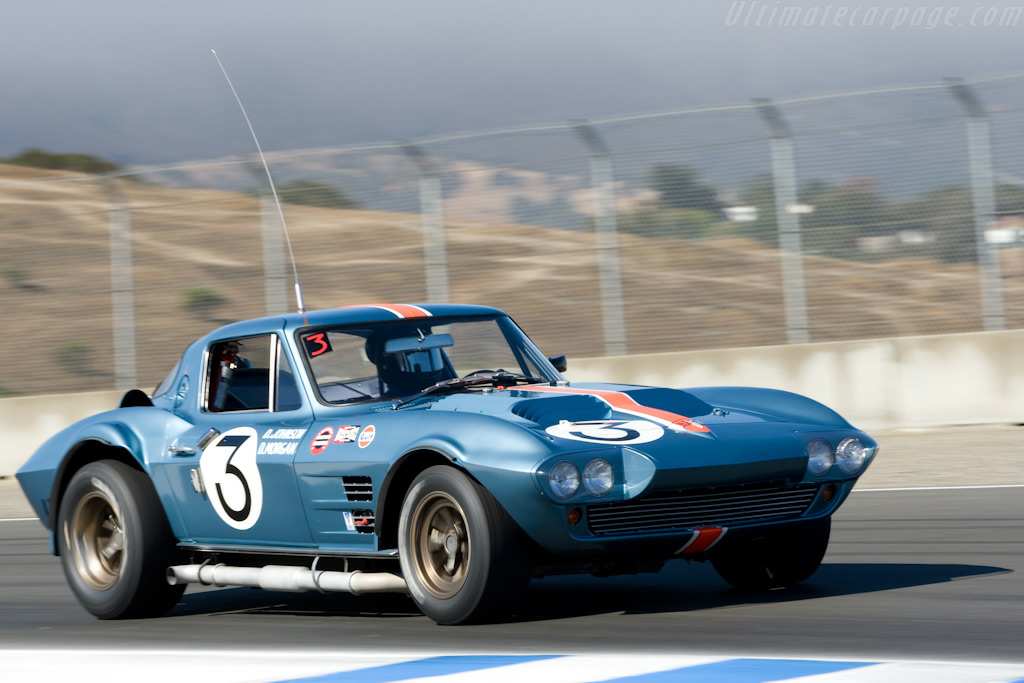
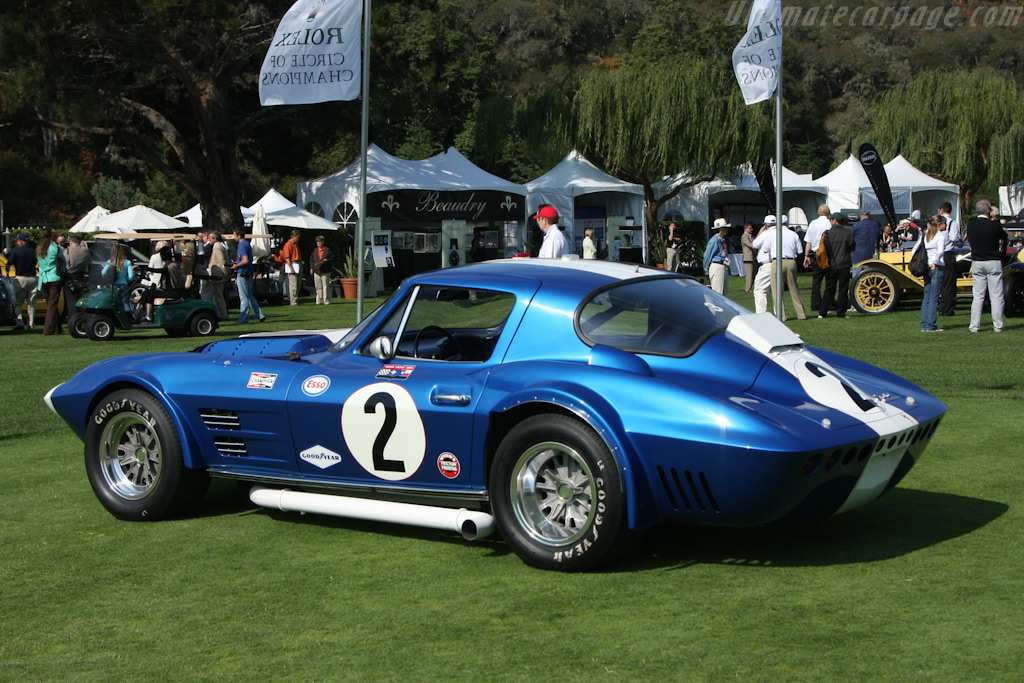
Restored #3 Grand Sport Corvette pictured in vintage racing competition
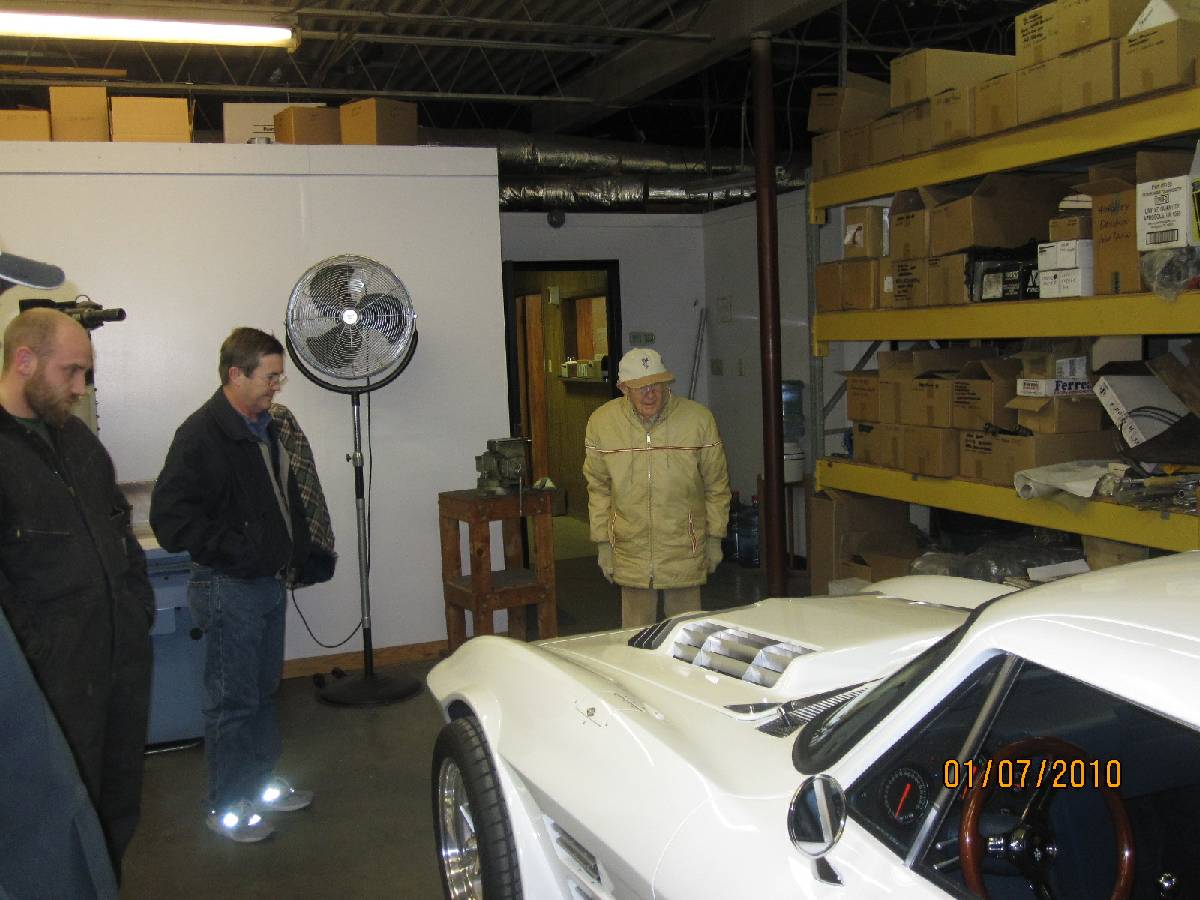
My Dad was a sport’s car enthusiast back in the 50’s and 60’s, owning a ’54 Jaguar XK120M and then an XKE Couple when they became available in ’63.
In February 1964 the two of us attended the “Polar Prix” SCCA sports car race at Green Valley Raceway in Northeast Fort Worth Texas. Our trip to the races was prompted by the fact that there were to be several “good” Jaguars running in one of the production classes, and more importantly, Carroll Shelby was also attending with the Cobra race team, including the Cooper (small-block Ford powered) King Cobra with Bob Holbert at the wheel.
When we arrived at the pits, there was a good-sized crowd around the Cobra team, as well as another equal-sized gathering surrounding around two other strange cars. These other cars were finished in slivery-blue paint and displayed small decals stating “Mecom Racing”.
One of the cars was a 39” tall Lola Chevrolet coupe driven by Augie Papst and the other was what appeared to be a Corvette Stingray coupe (on steroids).
The Lola was significant because Eric Broadly had built two of them, one powered by a small-block Ford, and this Chevy motivated car. Ford Motor Company was so impressed by their design and performance that they hired Broadly (and Lola) to build the original Ford GT Mk1’s.
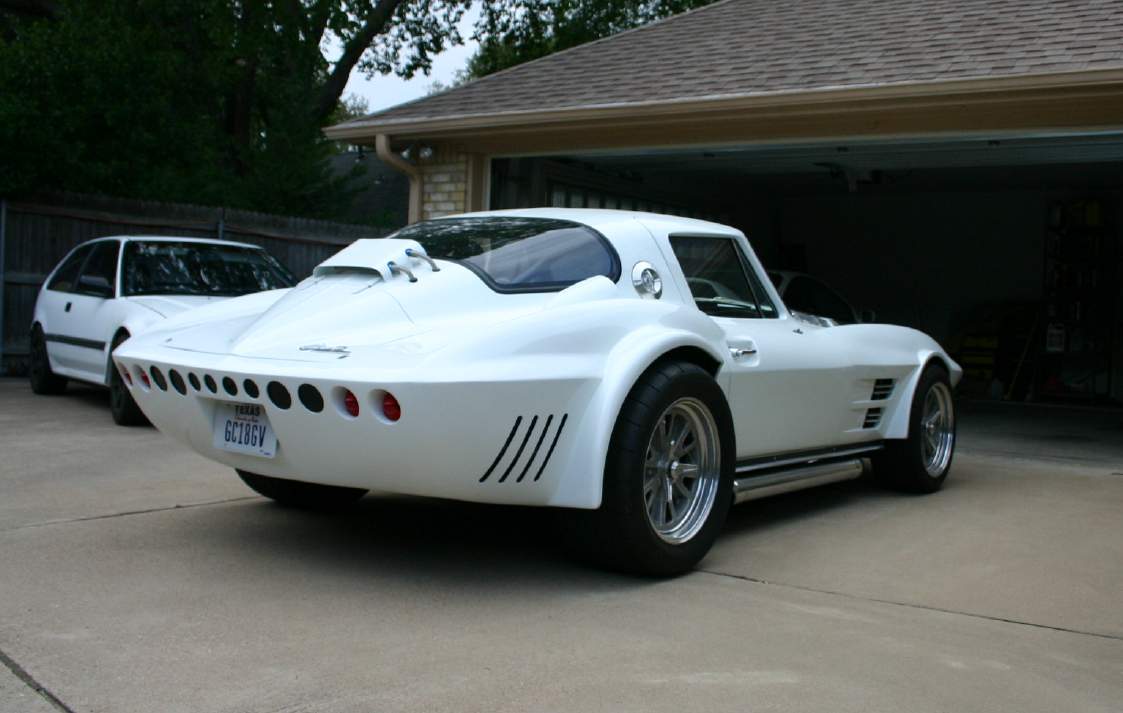
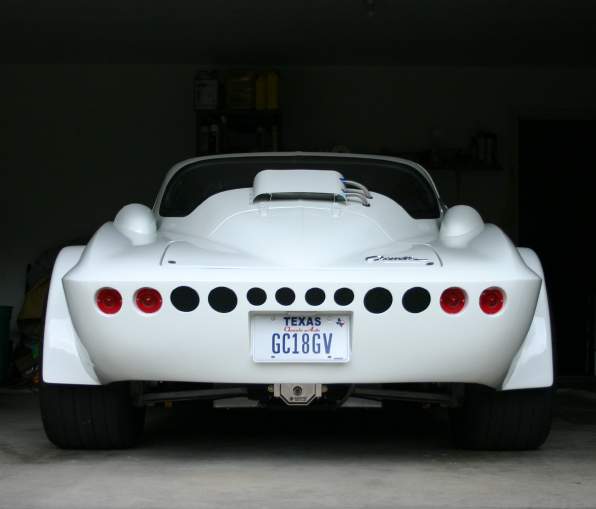
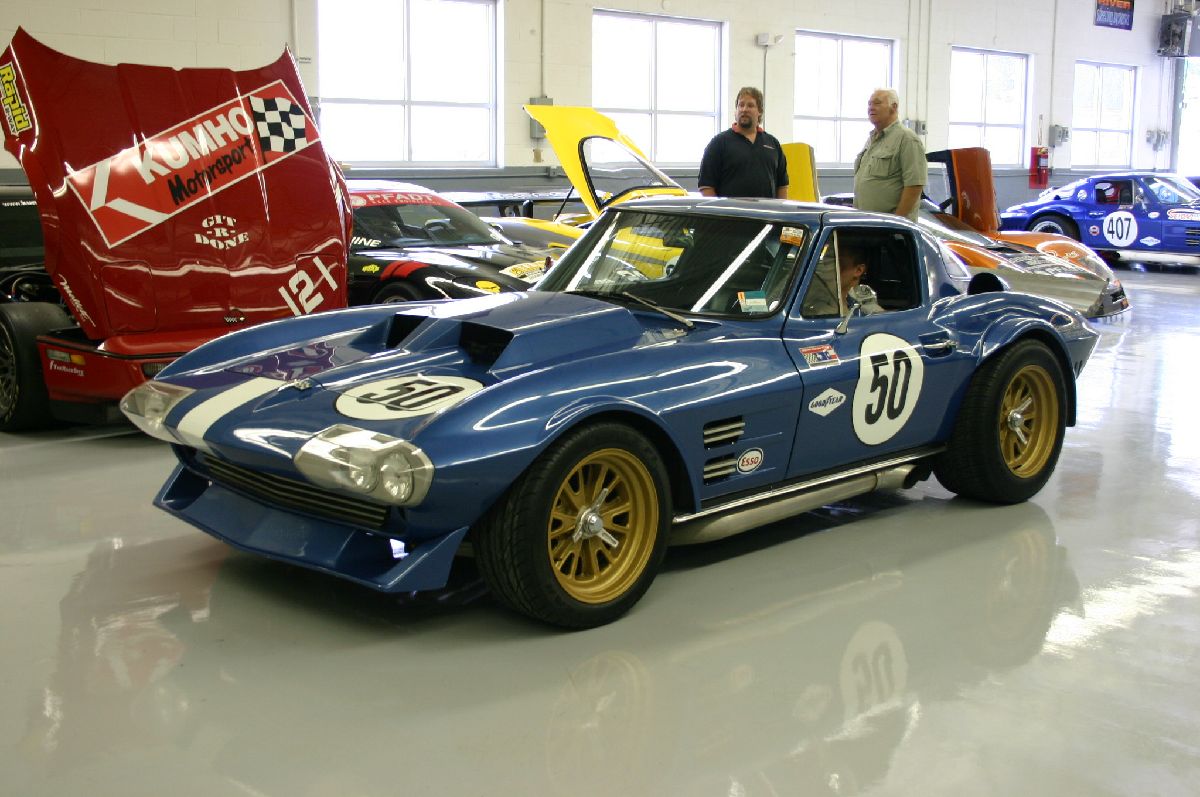
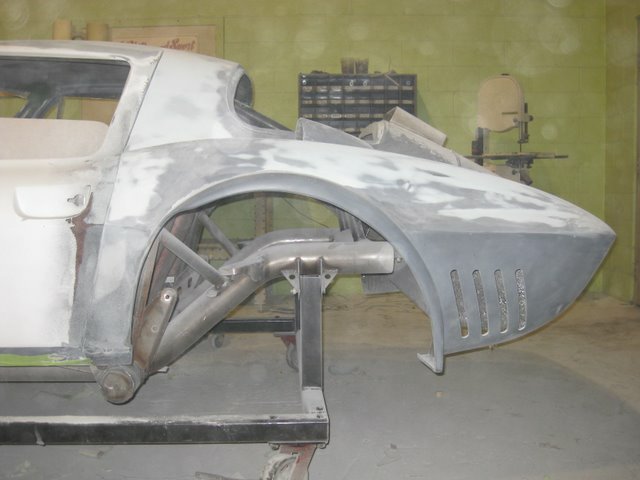
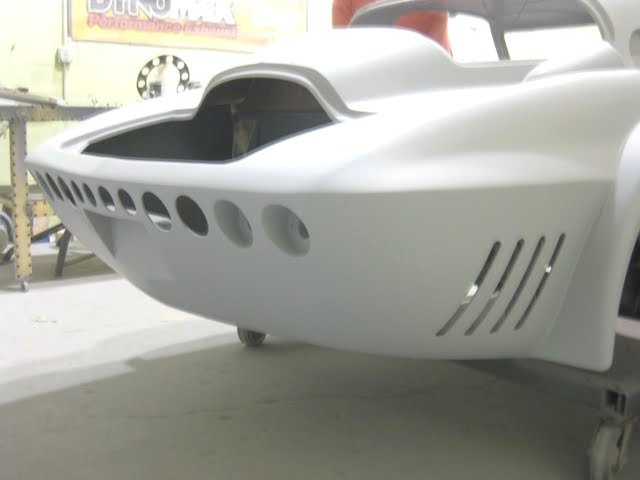
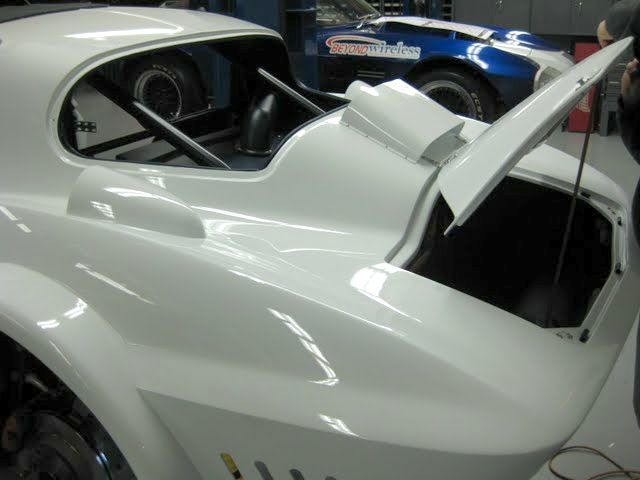
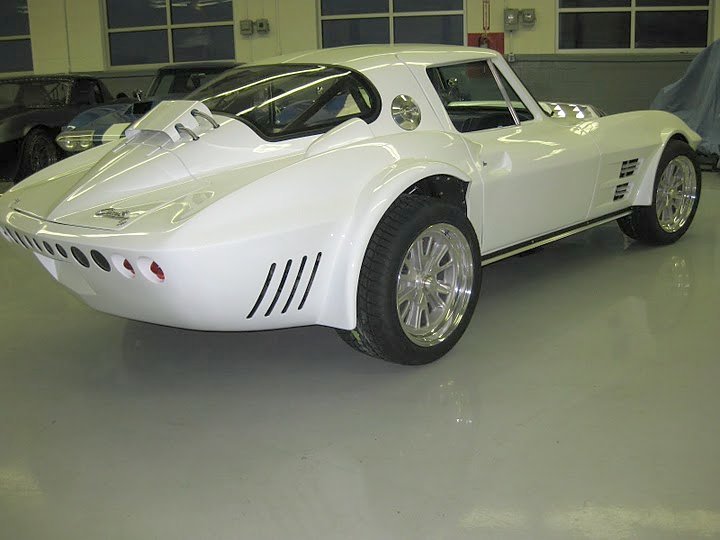
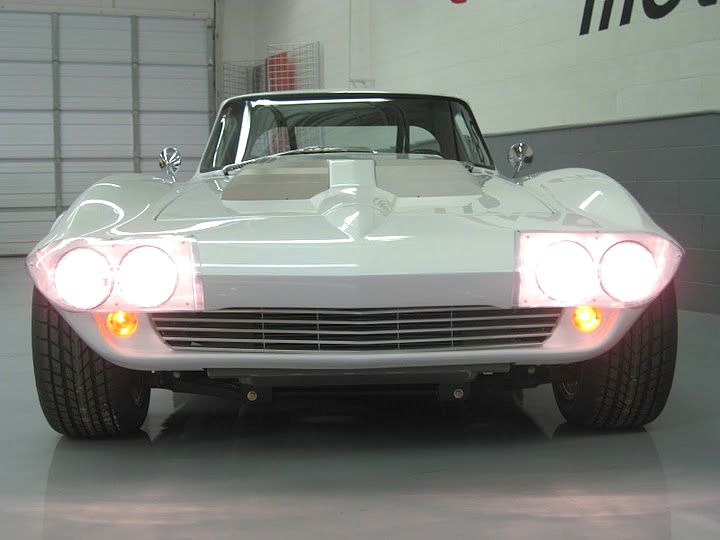
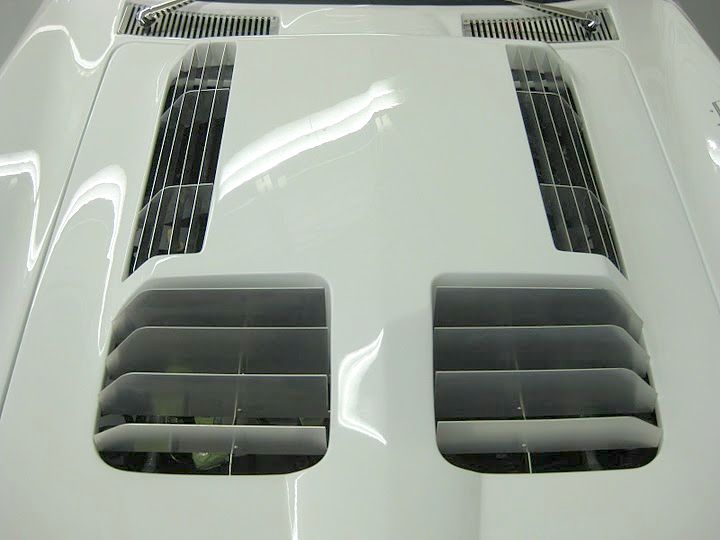
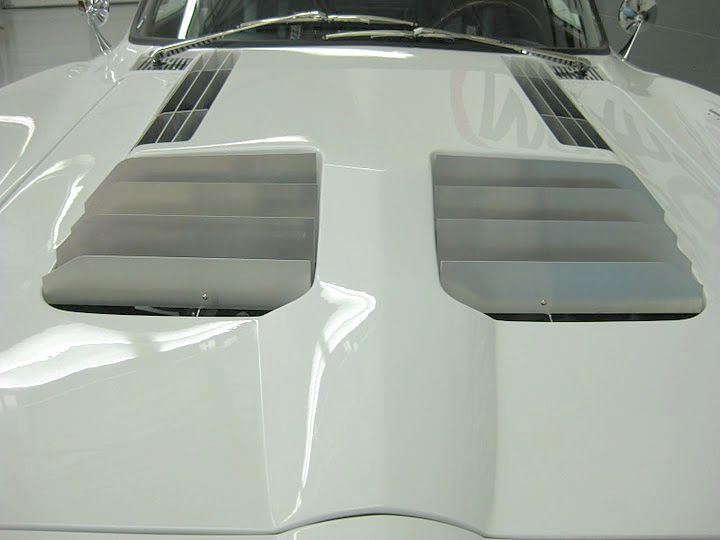
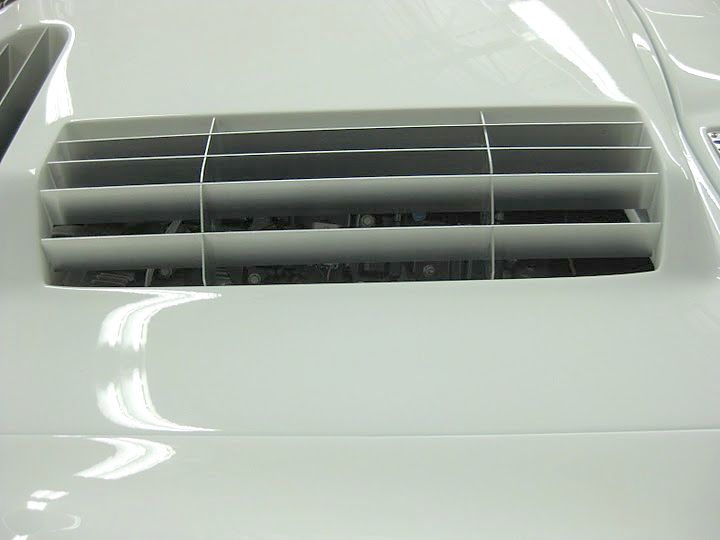
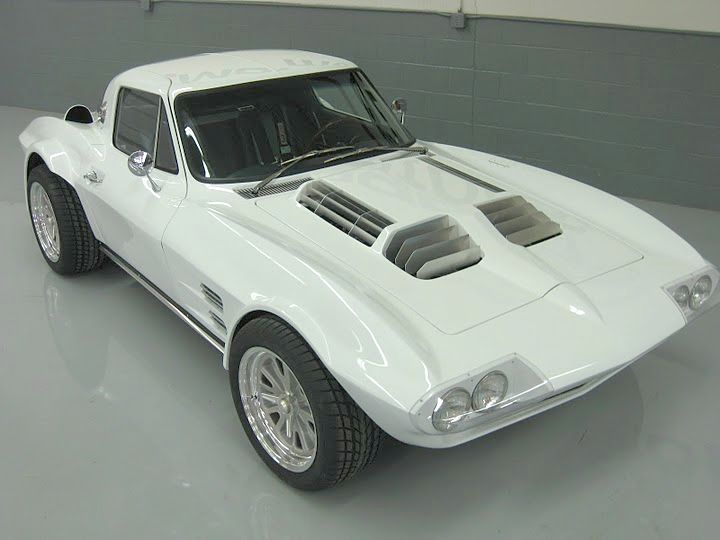
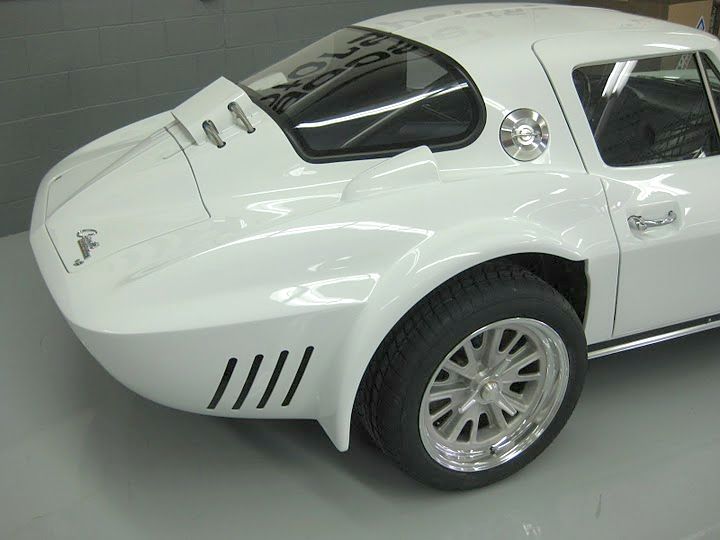
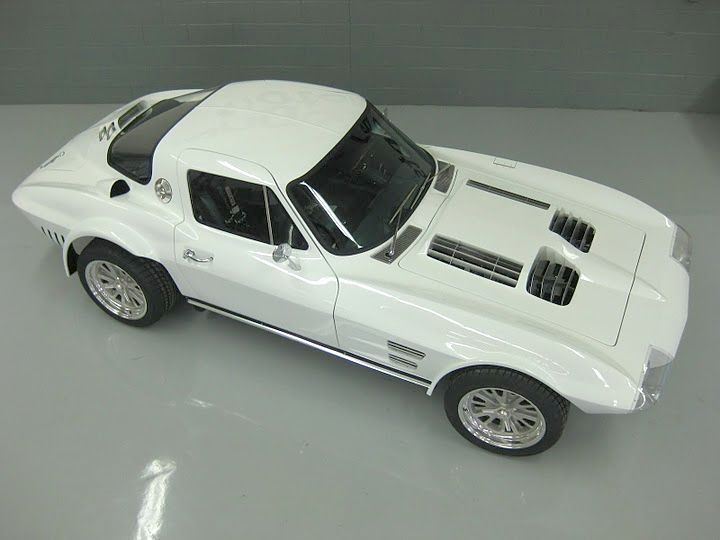
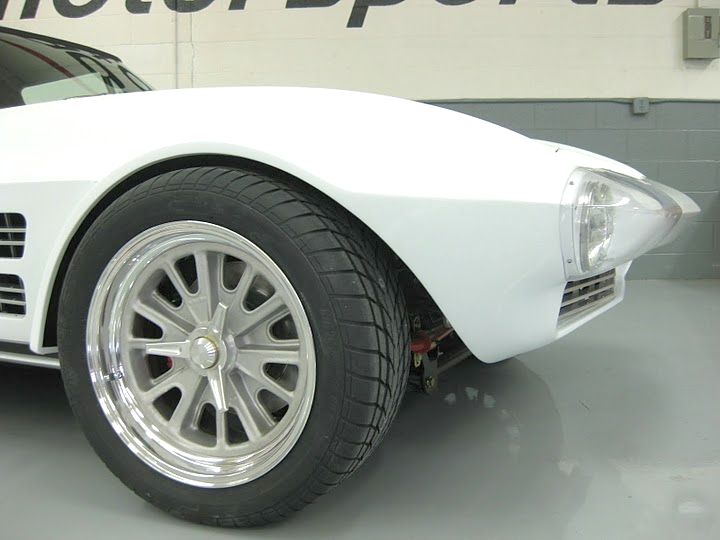
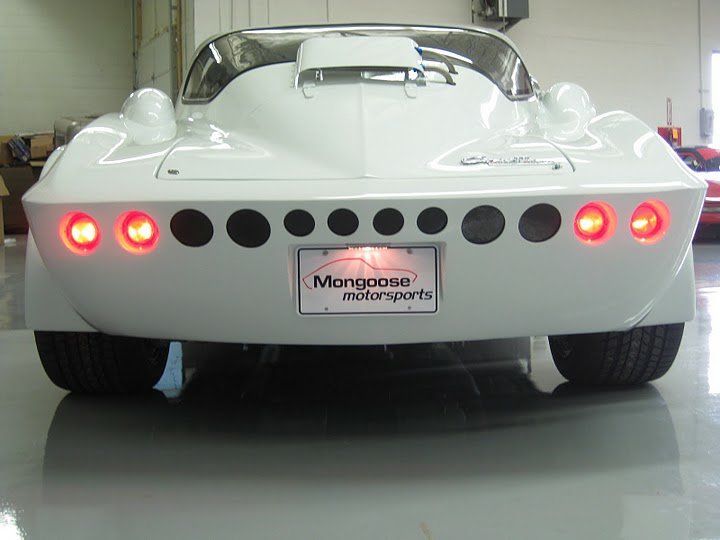
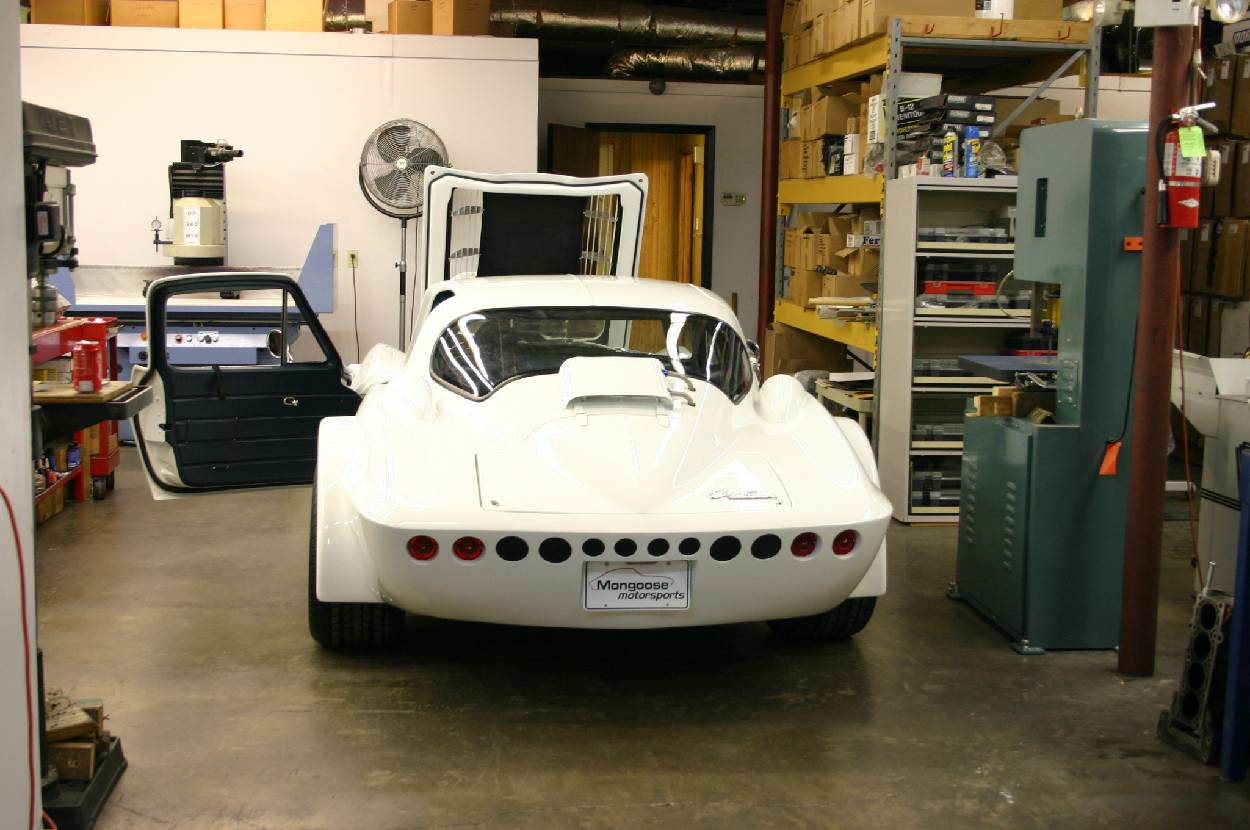
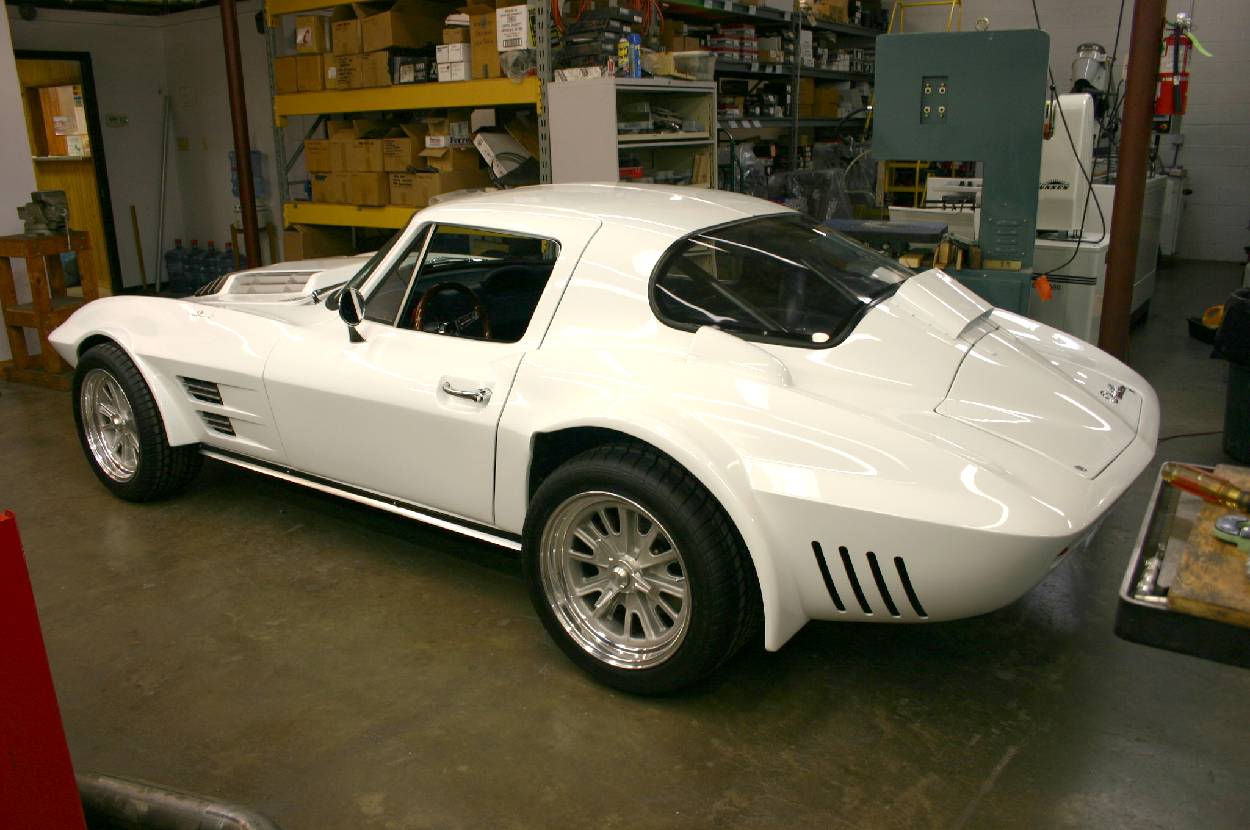
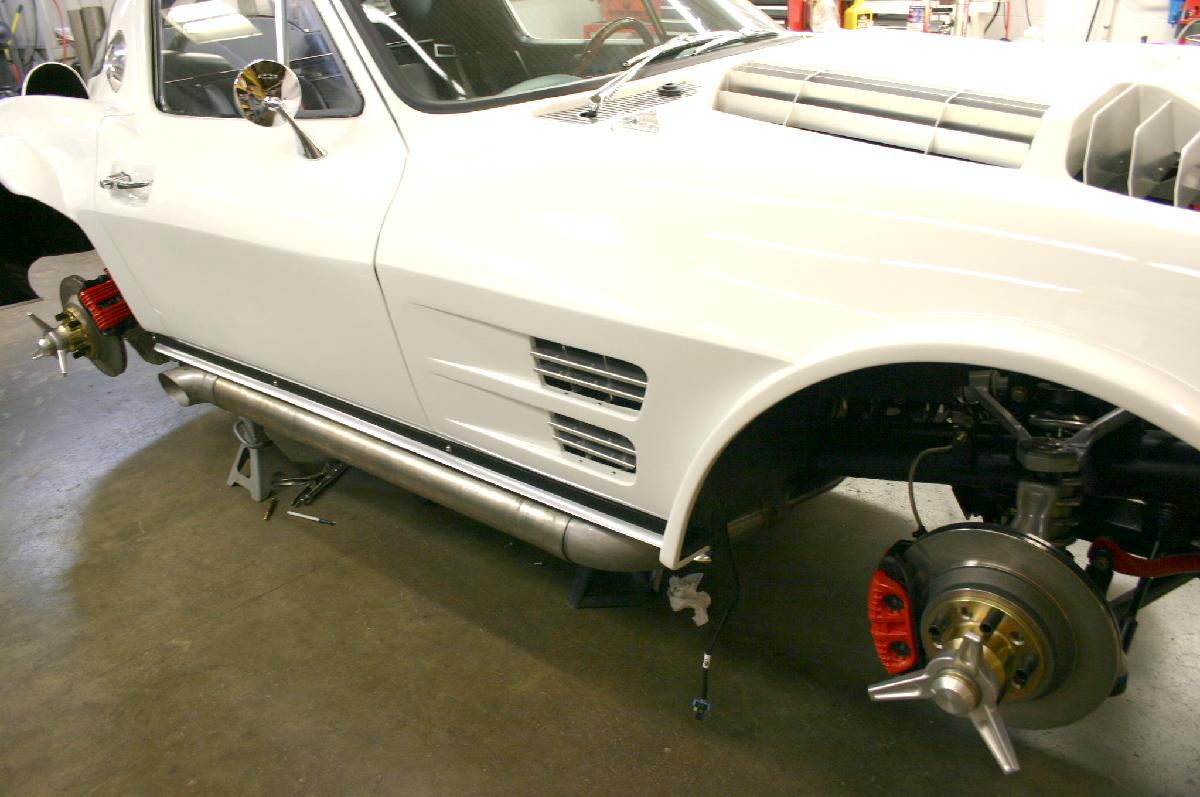
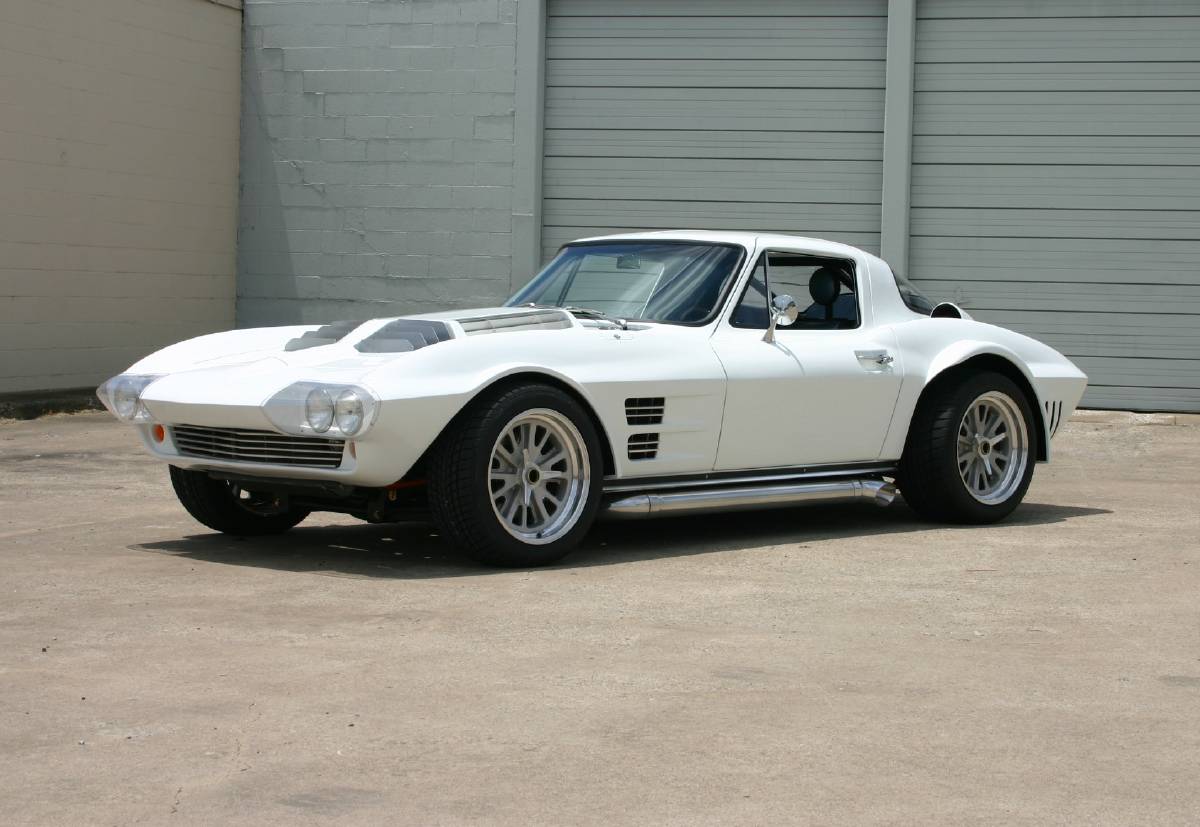
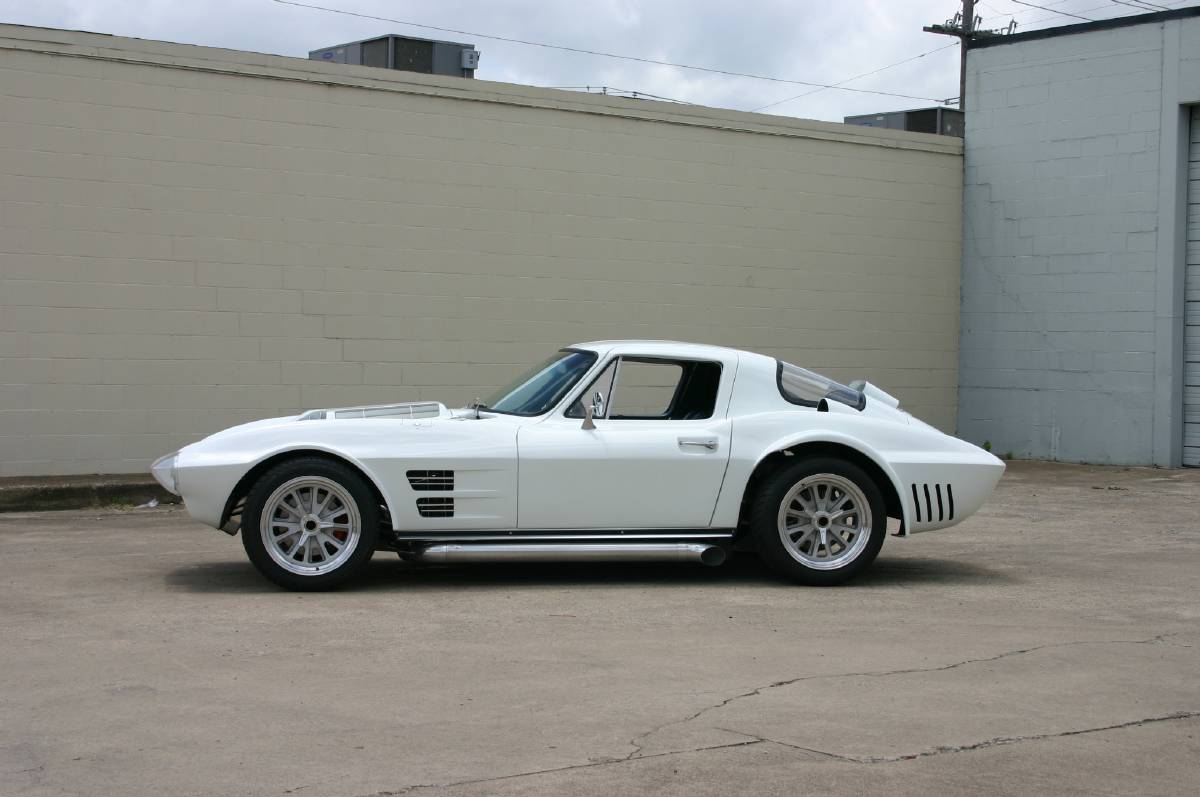
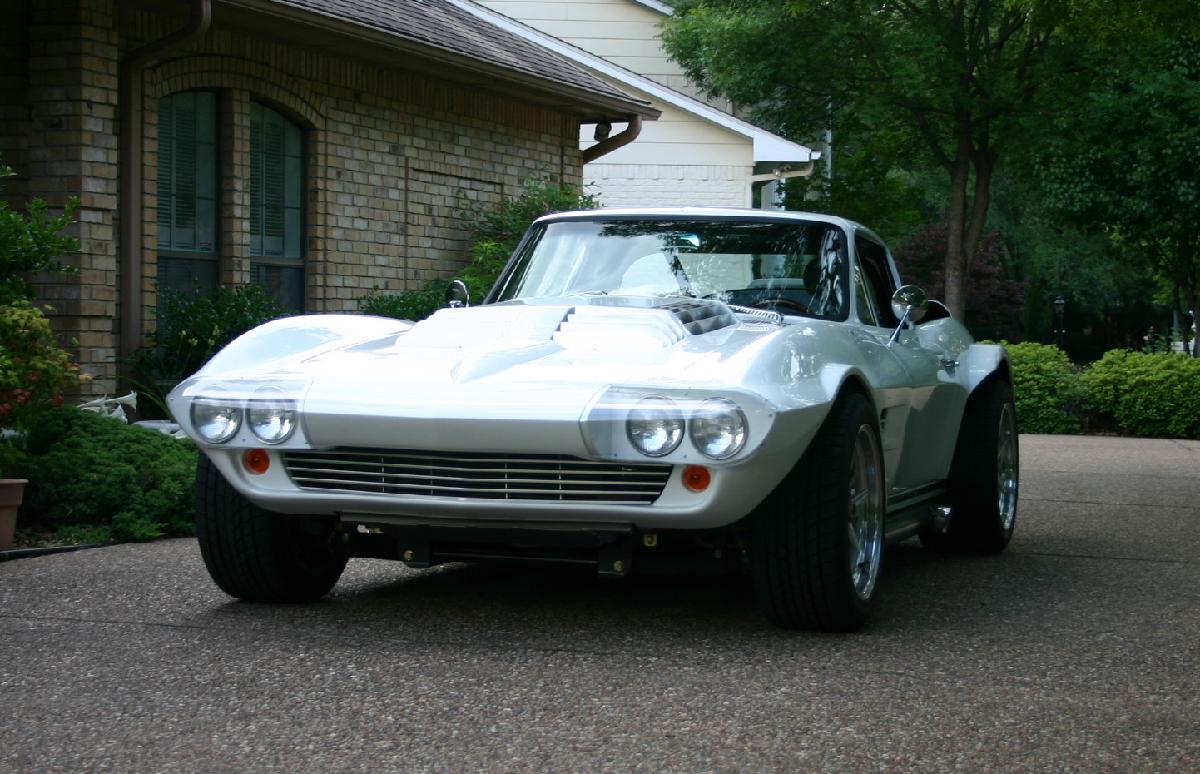
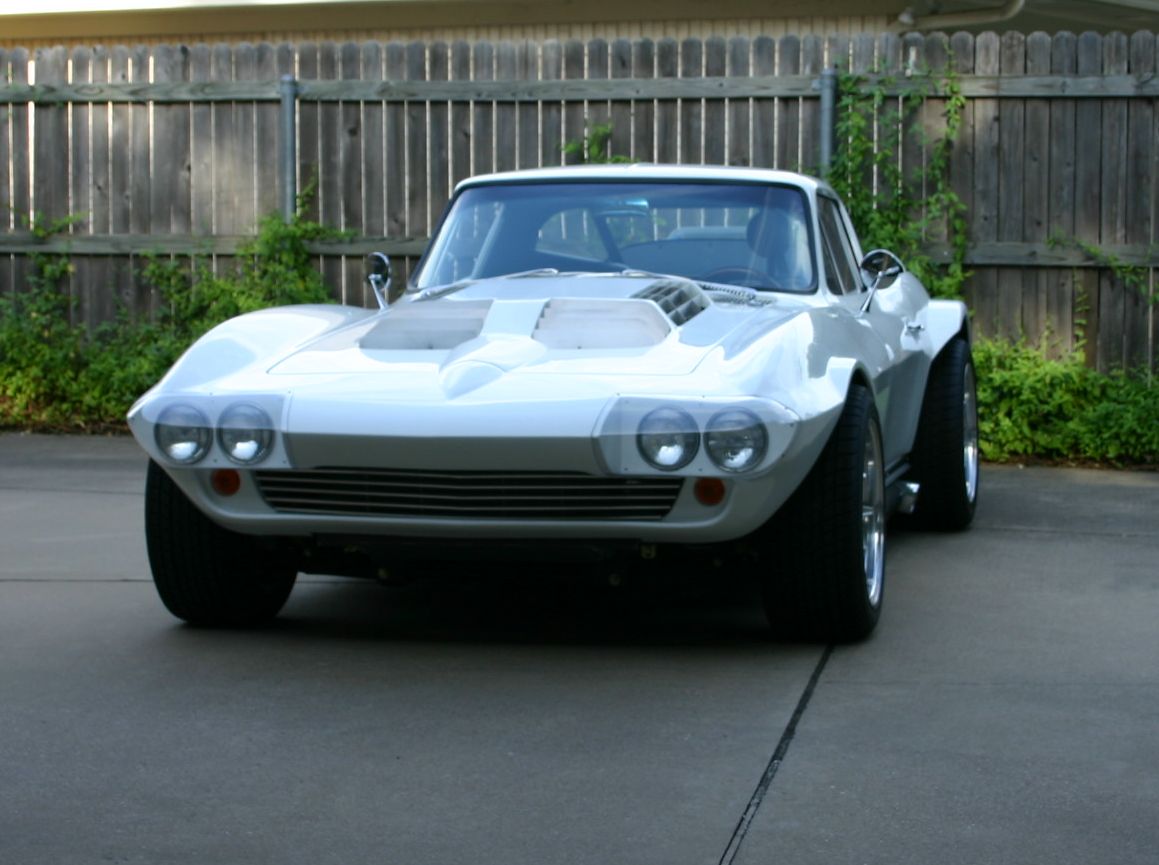
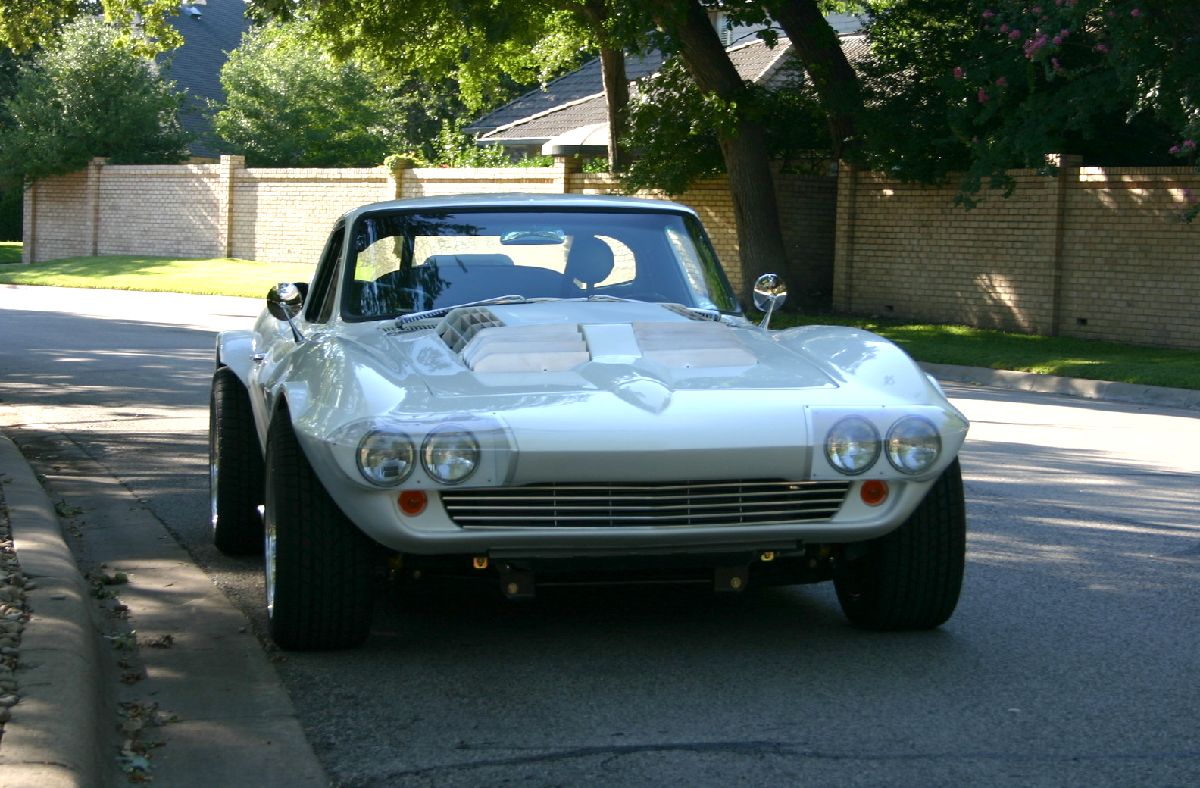
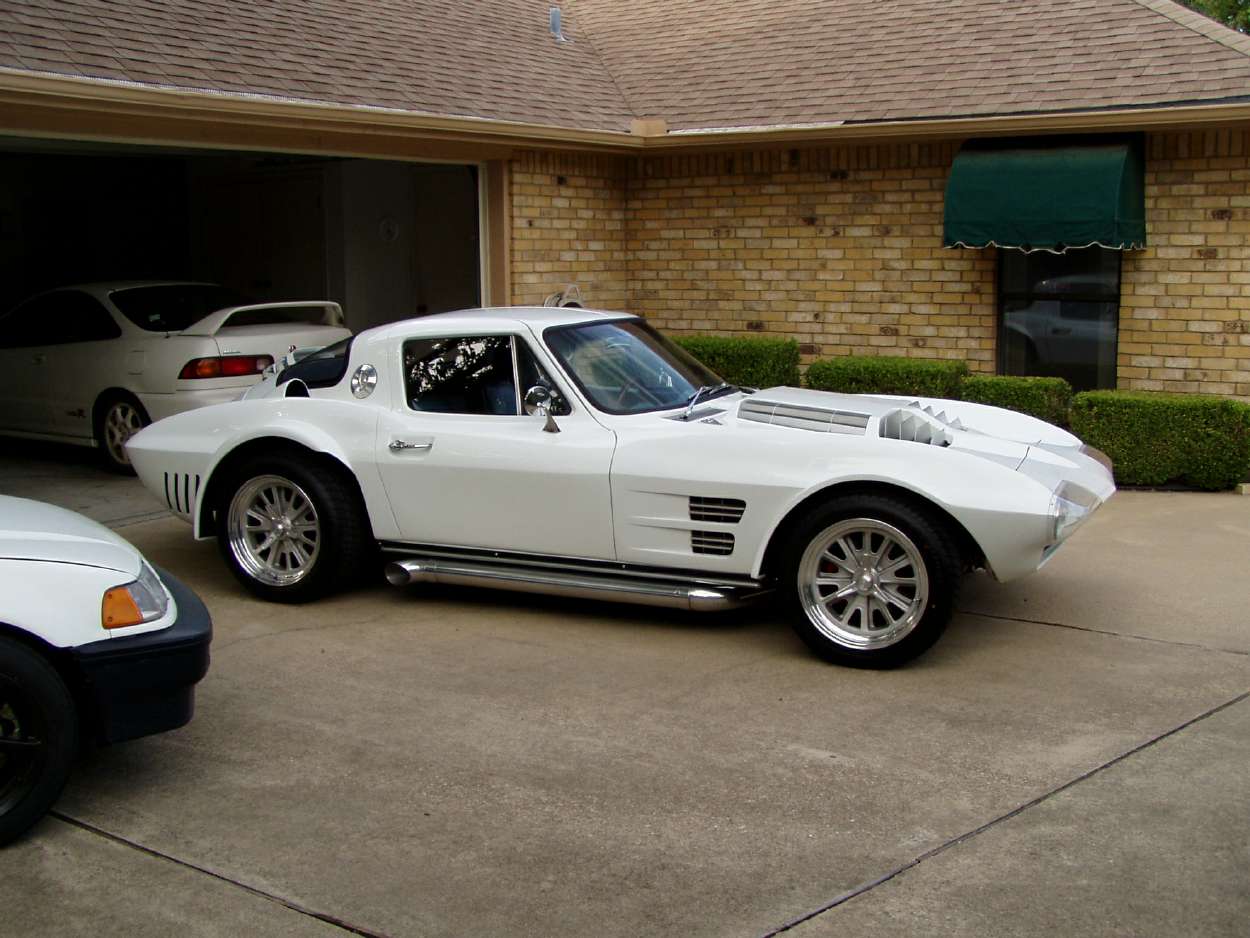
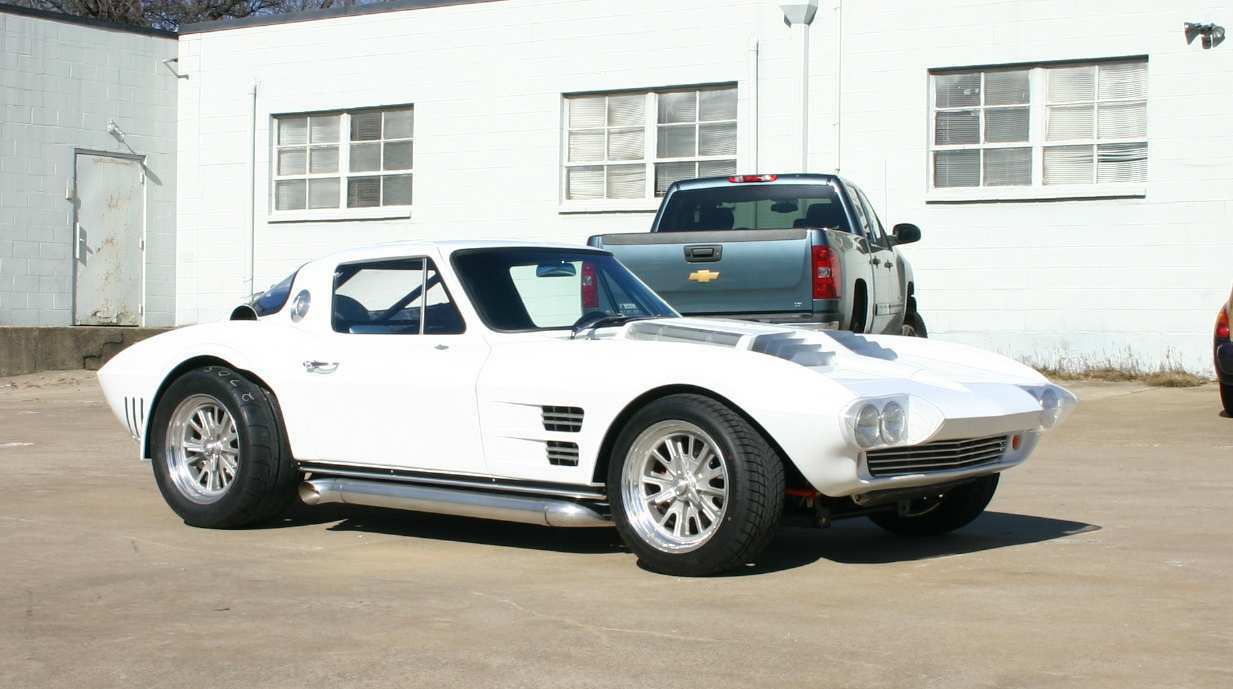
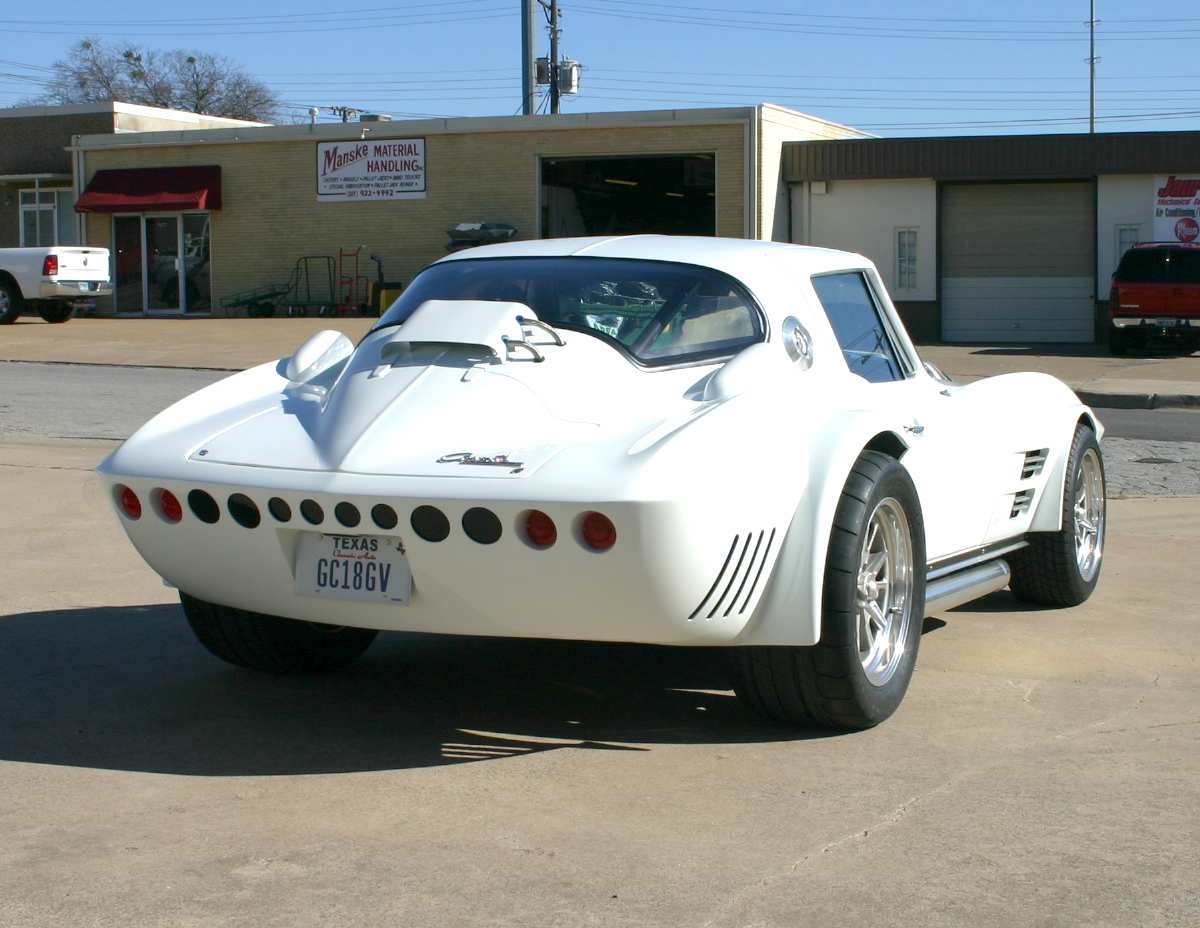
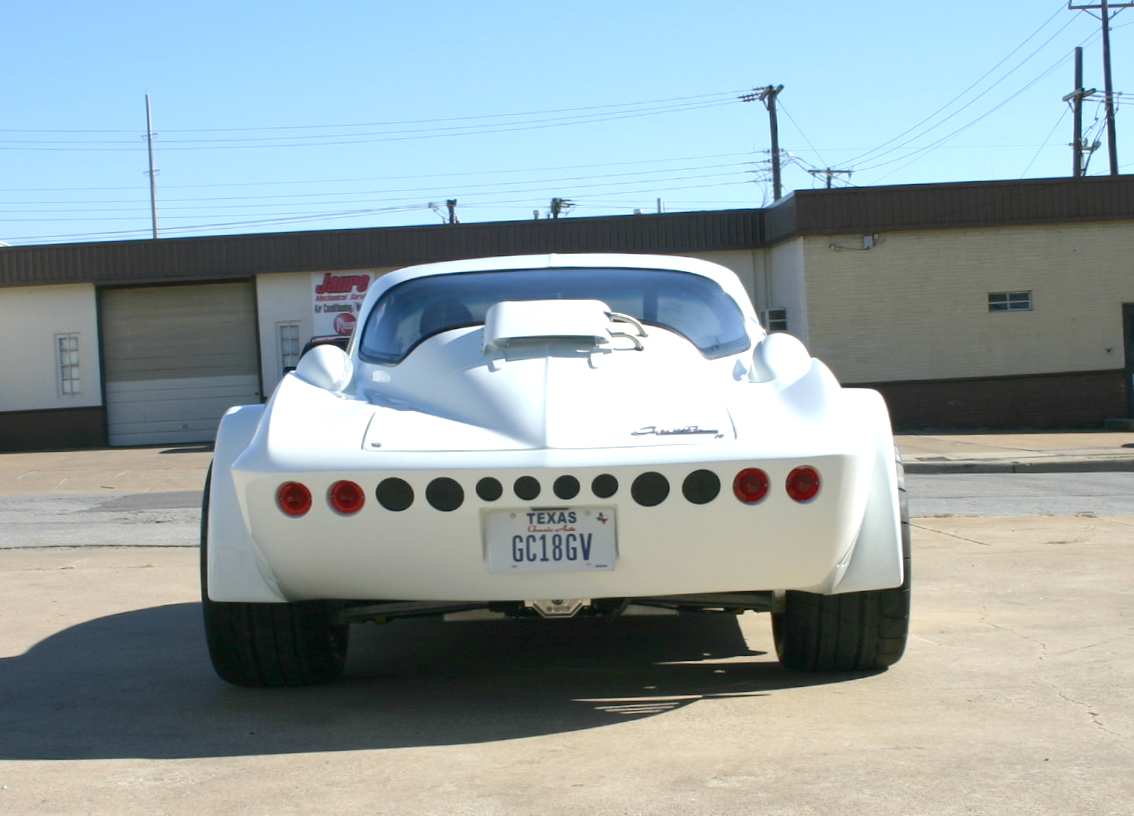
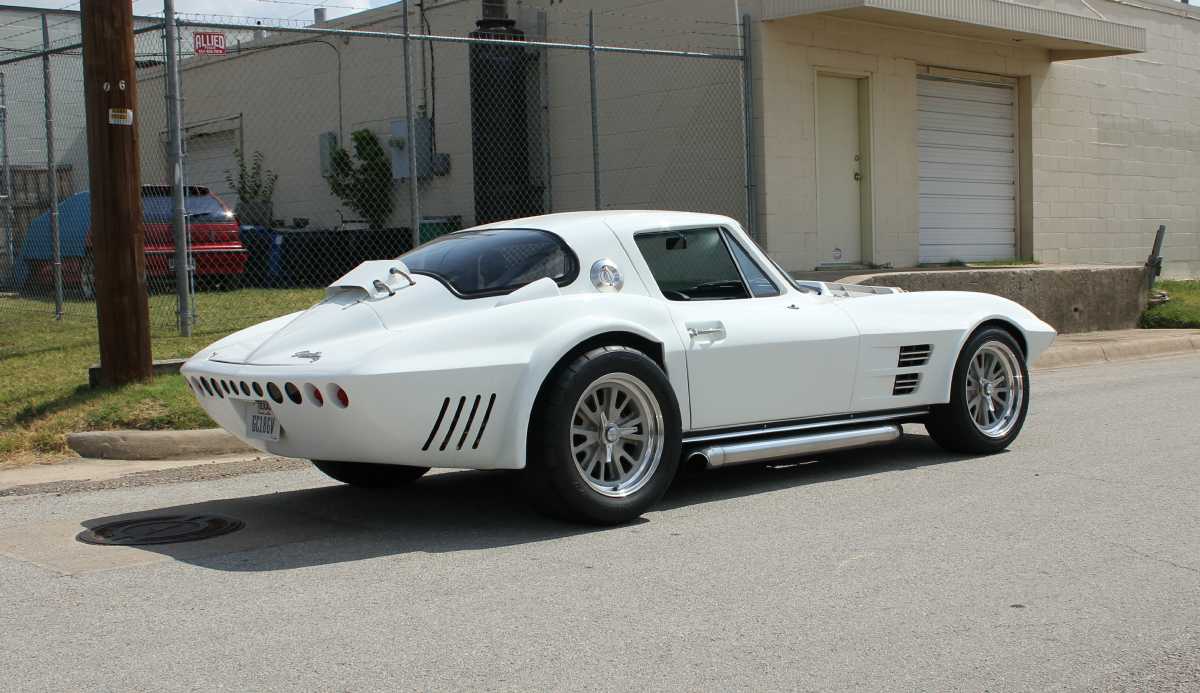
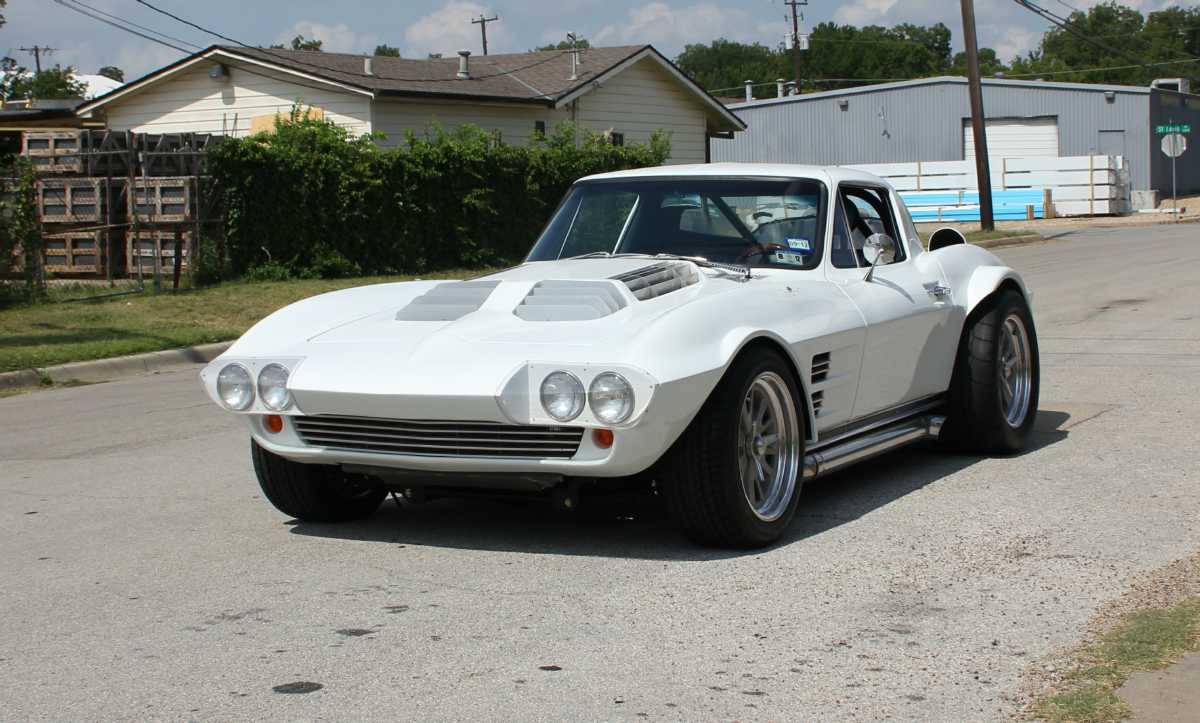
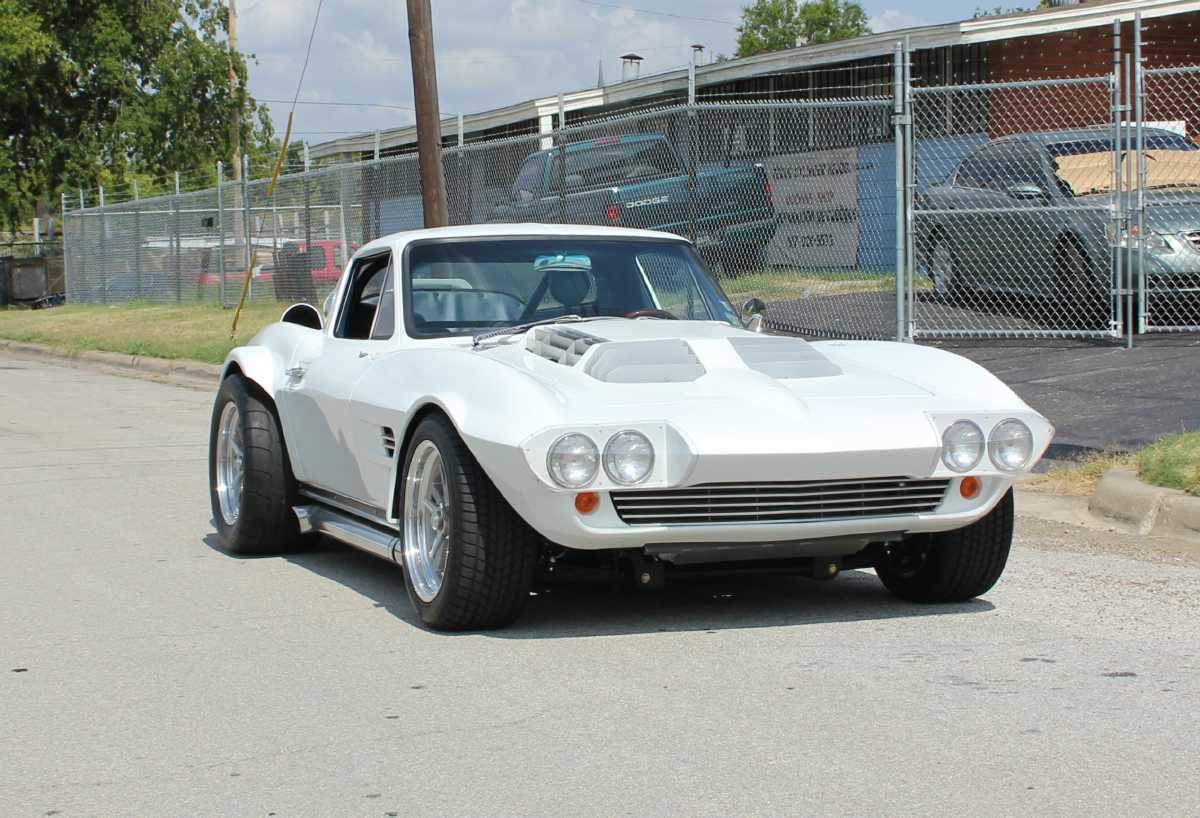
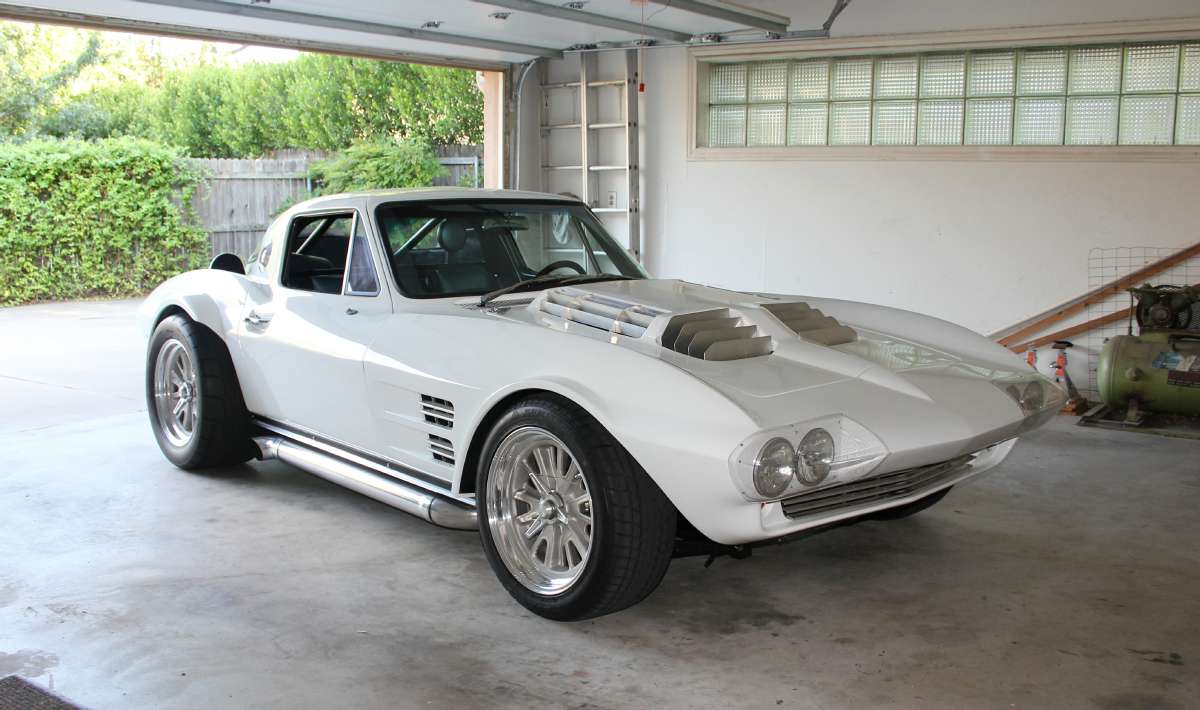
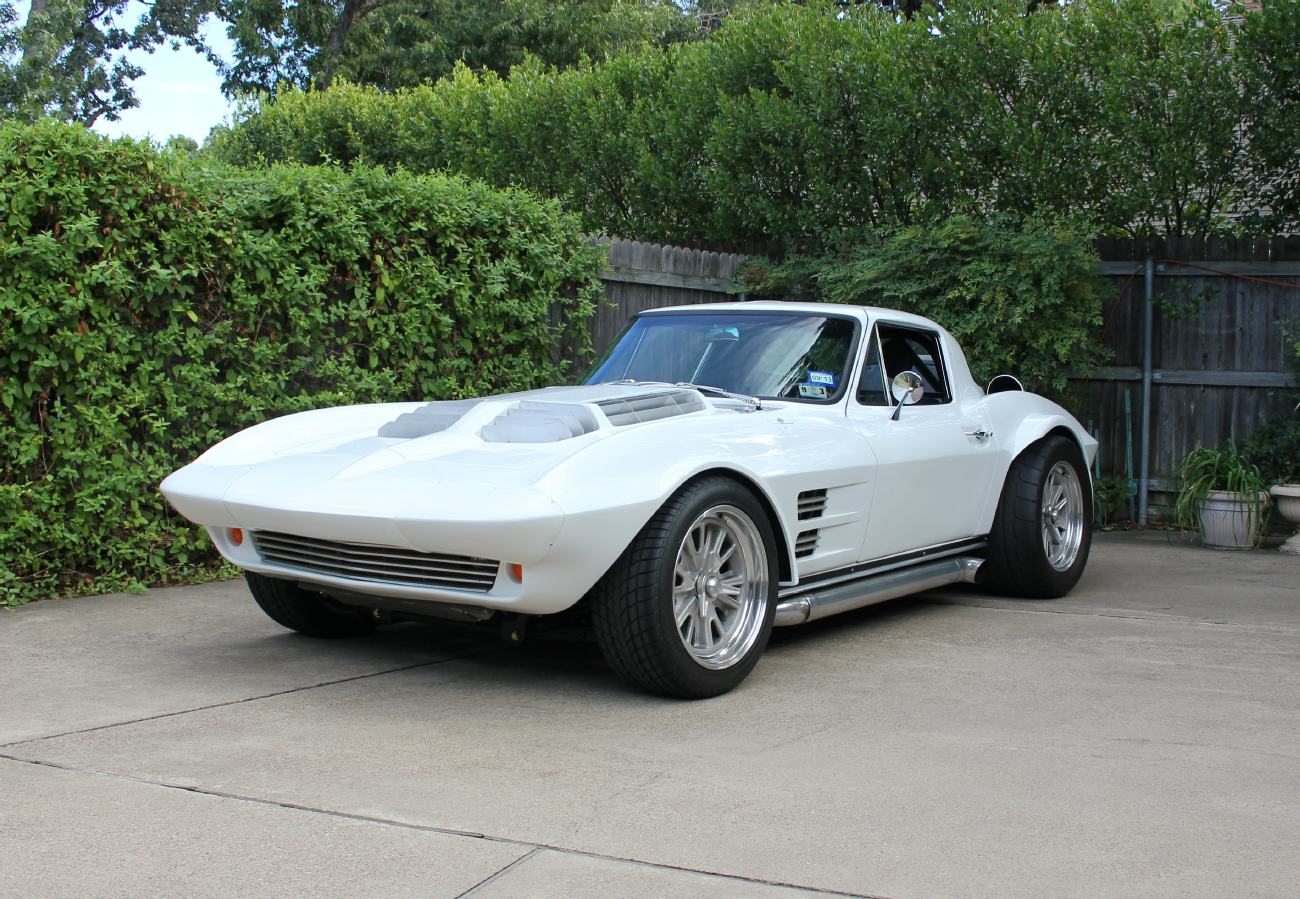
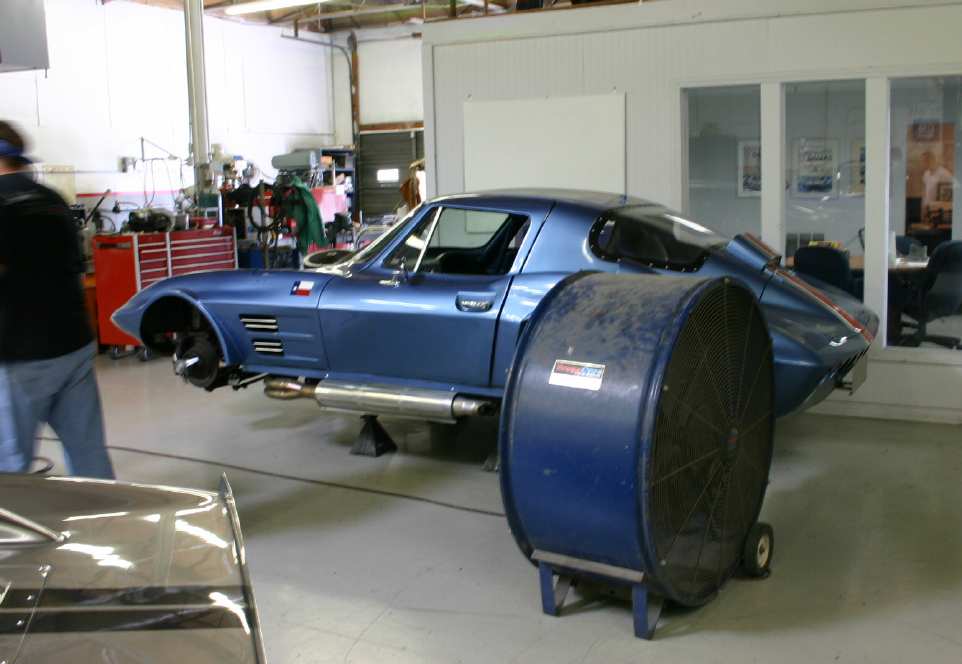
The Corvette sported a small badge proclaiming “Grand Sport Corvette”, and fender flare extensions, which were necessary to cover massive Halibrand knock-off magnesium wheels wrapped with huge Good Year Stock Car Special race tires. The car also sported a long 3.5” diameter exhaust pipe on each side, air-vent holes in the rear bodywork, real side vents in the front fenders, and a wild-looking hood with all sorts of vents and louvers. This Corvette was a large hulking all-business vehicle and to-date it still rates as the most awesome-looking car I’ve ever seen.
On the racetrack, it was no match in the turns for the mid-engine V8-powered competition, but on the straights, nothing could hold it. I recall being absolutely blown-away seeing a car of this physical size accelerate so hard passing other cars at will. The driver of the GS was Delmo Johnson of Dallas Texas. Delmo’s driving style, combined with the car’s enormous power (and ill-handling) forever etched the car’s performance into my memory. Passing some cars in the grass (when necessary), and laying long stripes of rubber when accelerating down the straights was unlike anything I’d ever seen (or imagined) in road racing.
I can tell you that none of this impressed my Dad, as the Grand Sport made his favorite Jaguars look like kiddy karts, easily lapping them in a ten lap open event.
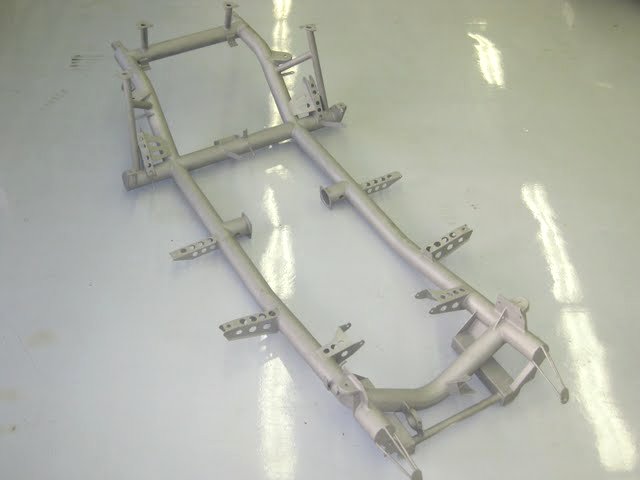
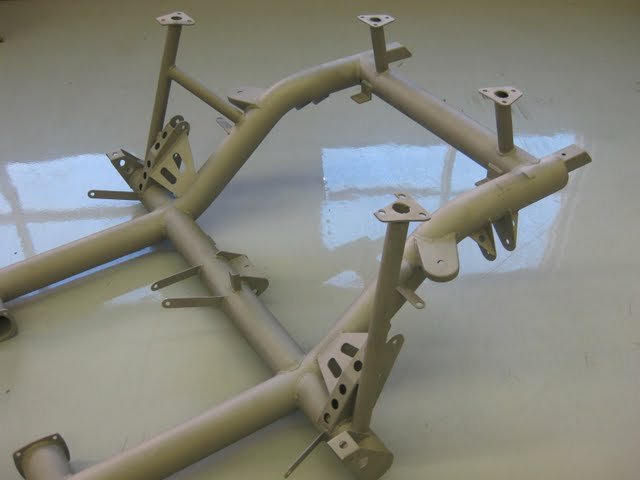
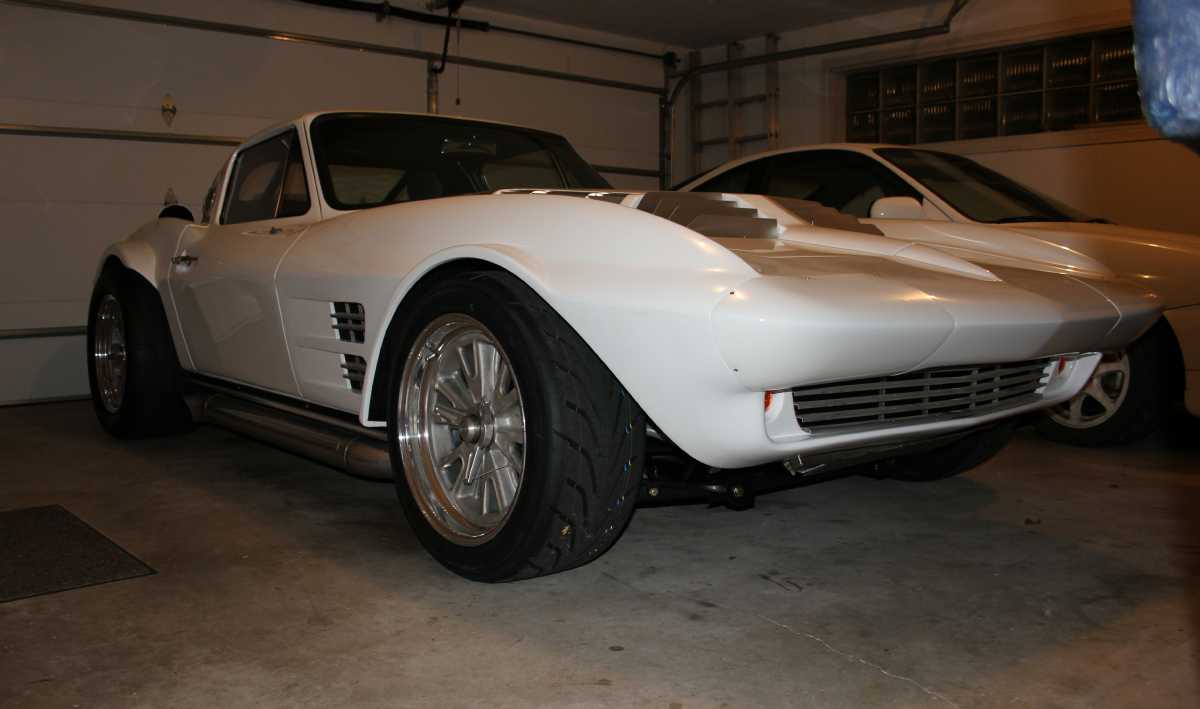
Like the Cobra’s, the car’s ladder-style chassis was made of 4” round tubing, sporting lightened production Corvette suspension components at the corners. The body was made of fiberglass that was so thin, using mild pressure; one could flex the center of the roof up and down a couple inches. The interior was also a thin fiberglass reproduction of stock. Windows were plexi-glass, with straps used to raise and lower the side glass. Overall weight of the cars was 1980 lbs, some 1200 lbs less than the production Corvettes.
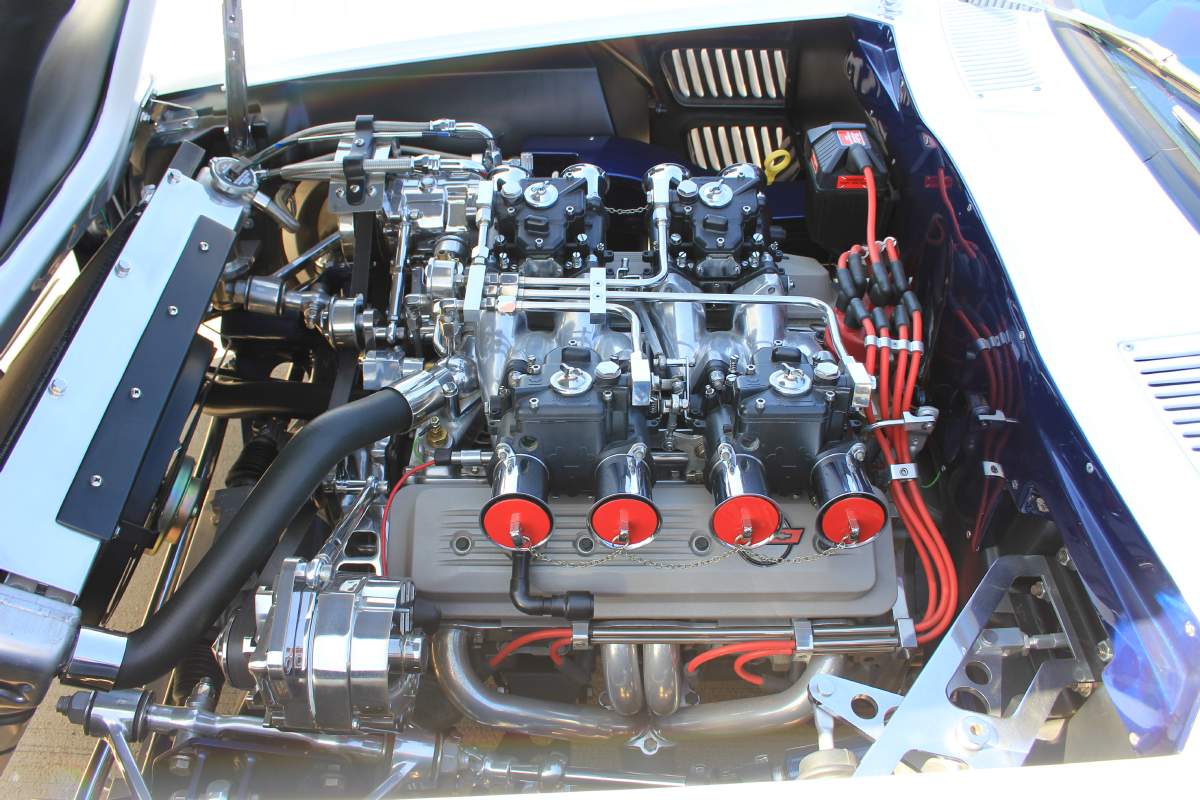
Engines (from Chevrolet) were 377 CID all-aluminum small-blocks, sporting four 58mm Weber side-draft carburetors. Custom headers and long side-pipes handled the exhaust (and made plenty of noise to boot). The engines made a reported 535 HP, which moved a vehicle of this weight in a hurry.
I recognized that they were “special” cars, but back then, nobody had a clue that they’d be worth what they are today.
For any who are interested, there is a web site devoted to the Grand Sports (http://www.racingicons.com/gs/). There are links to the restorations of the #2 and #4 GS’s, which are outlined in detail that’s absolutely fascinating. There is also a book about the cars (Corvette Grand Sport 1963-1967) by David Friedman. The book is well-researched, and even has pictures of the cars’ construction inside GM.
The Duntov cars are expensive at close to $200K without engine and transmission. In order to purchase a true serial numbered “continuation” car, one must purchase the car complete with a Duntov-installed engine/driveline.
As a side-note, Superformance, manufacturers of replica’s of the Cobra roadster, Cobra Daytona Coupe, and the Ford GT, has recently entered into a relationship with Duntov and will be manufacturing their own version of the Grand Sport. If the quality of the current cars they build is any indication, I have no doubt that their GS cars will be extremely well finished and come with air conditioning, power windows, etc. Their suspensions are supposed to be very true to the original with the transverse leaf layout and the single-pivot trailing link in the rear. Since the chassis they produce for their Cobras isn’t of round-tube construction (like the original Cobra’s), it will be interesting to see what the Superformance production GS has underneath….
Price on the cars is supposed to be $89K with no engine/transmission.
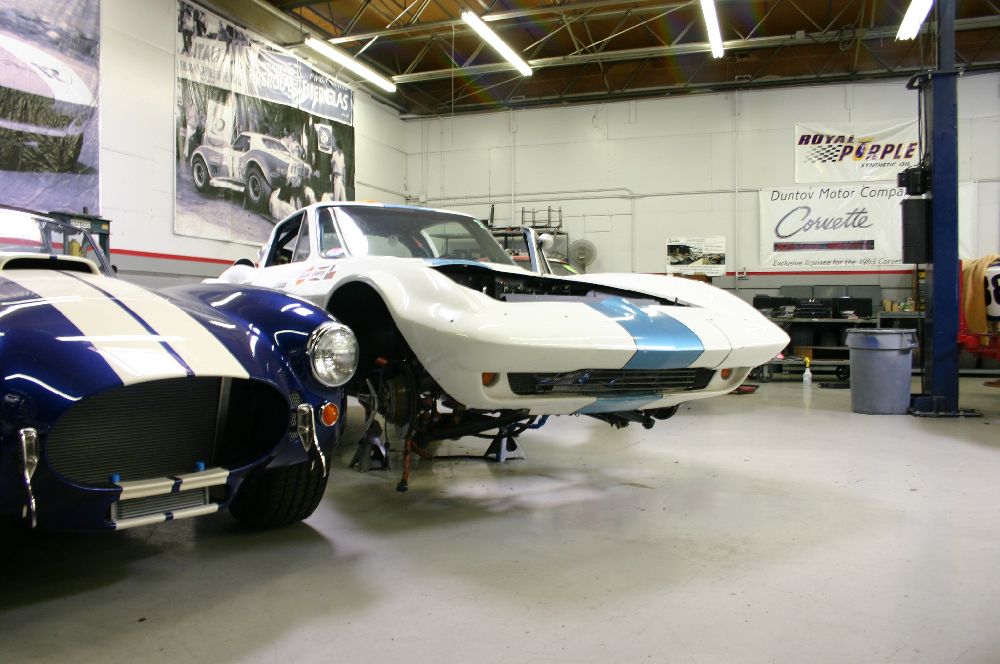
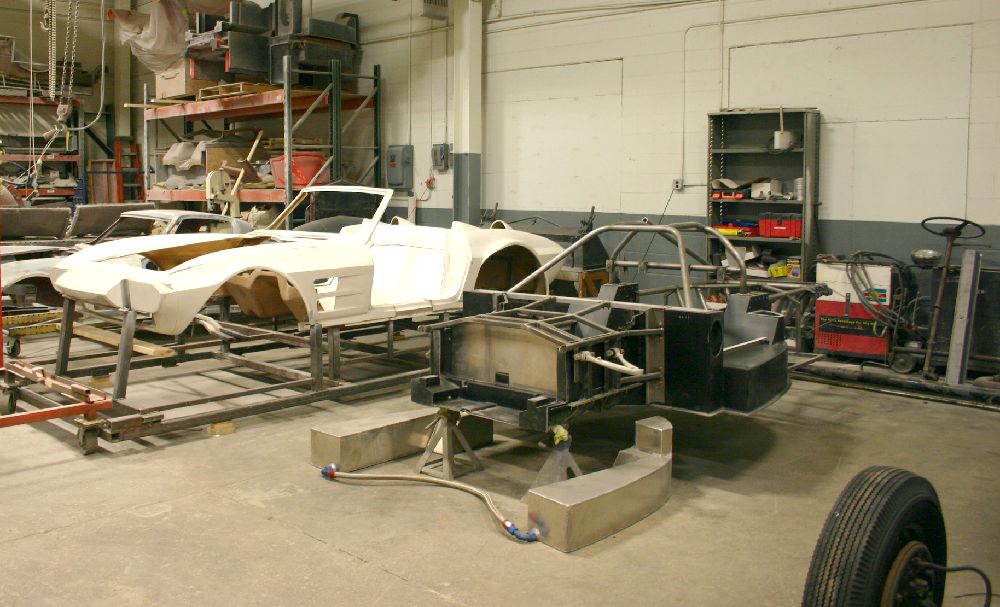
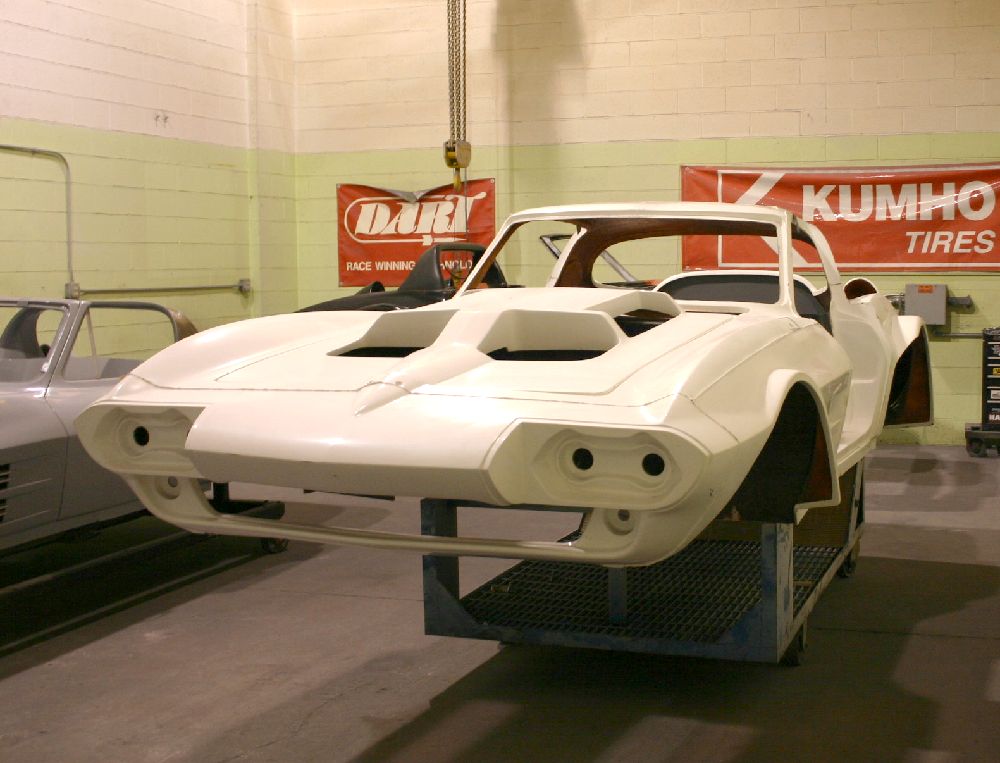
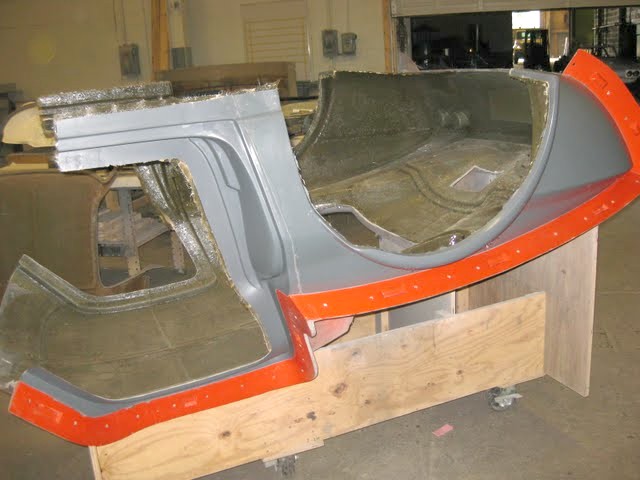
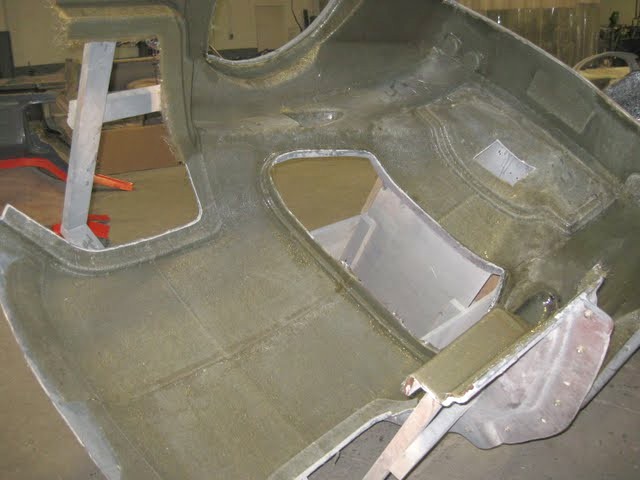
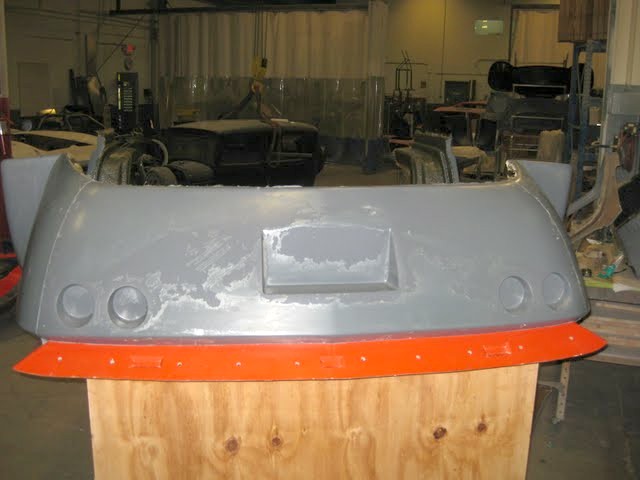
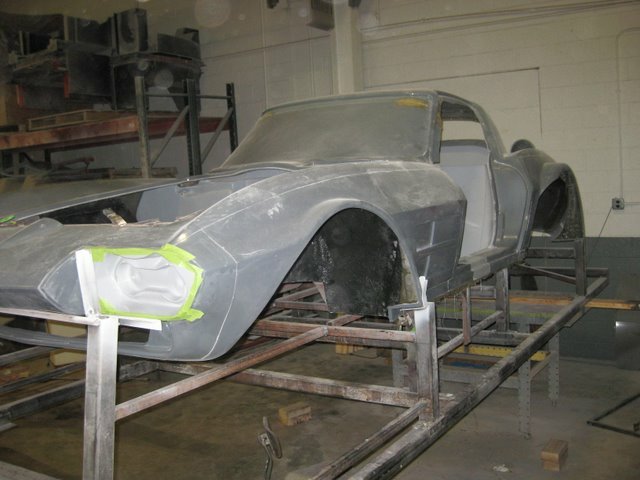
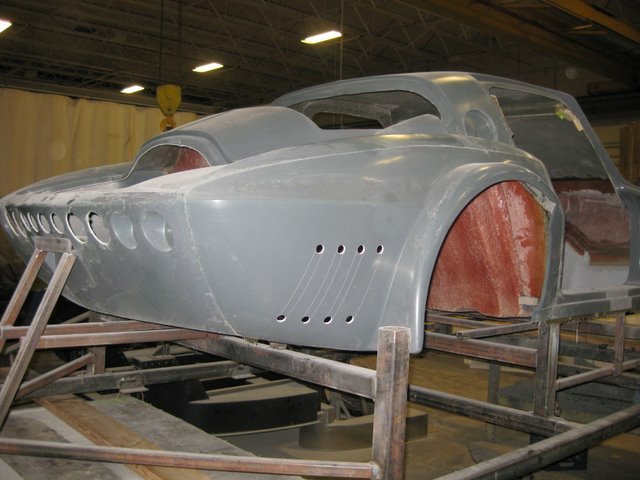
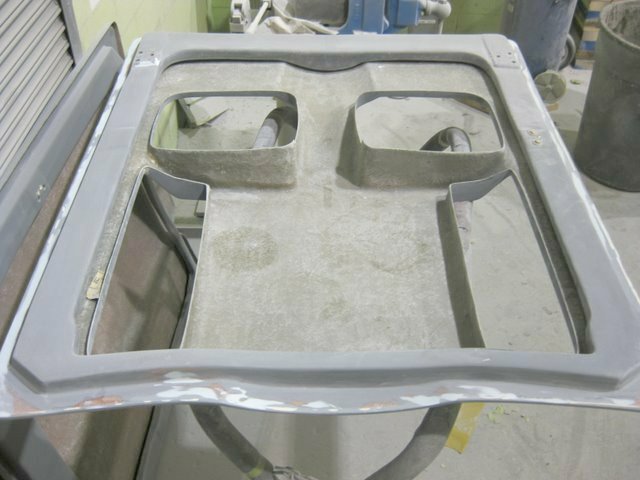
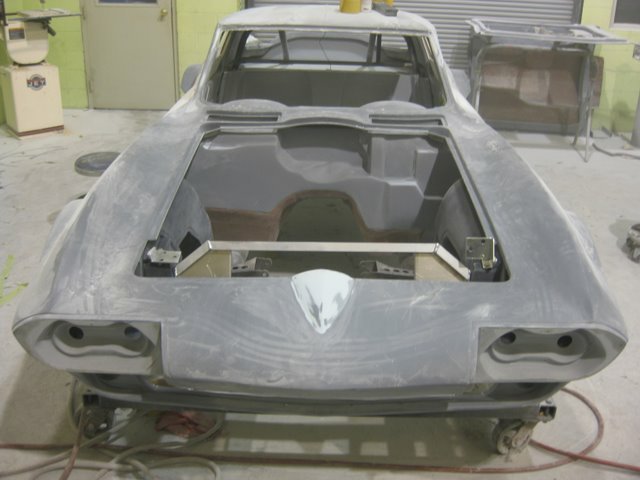
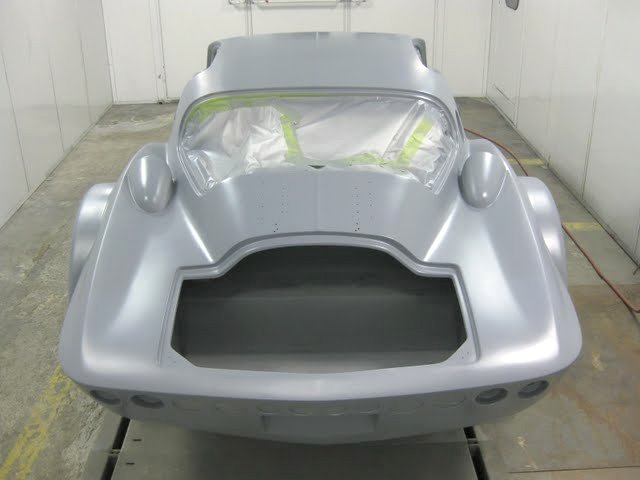
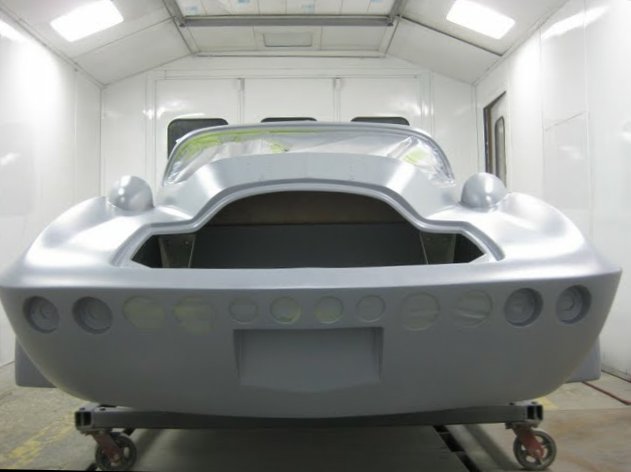
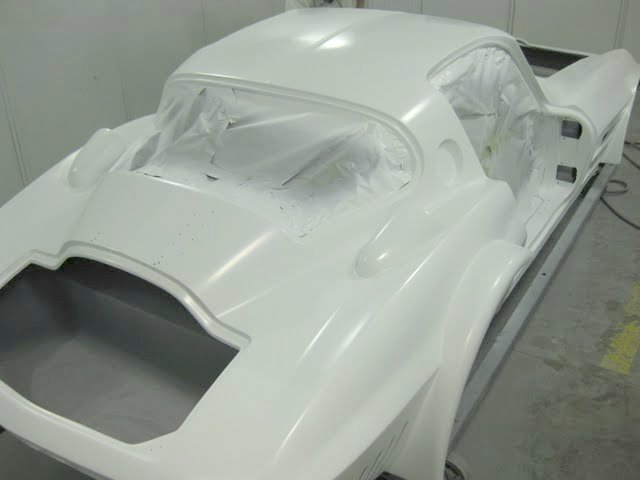
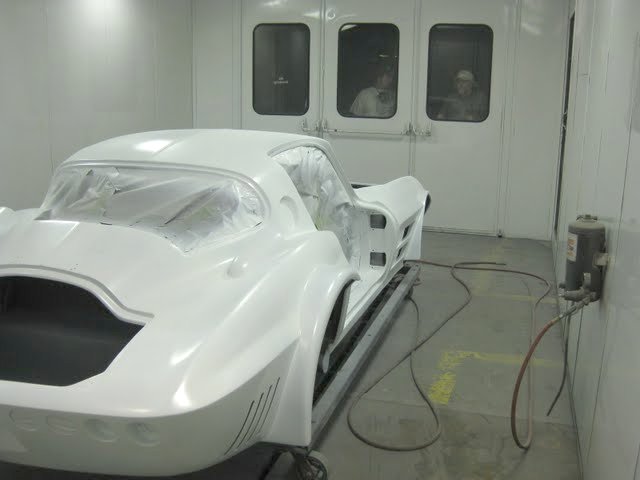
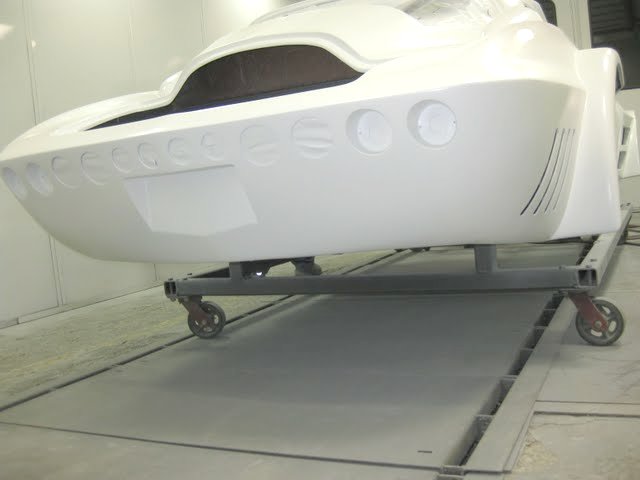
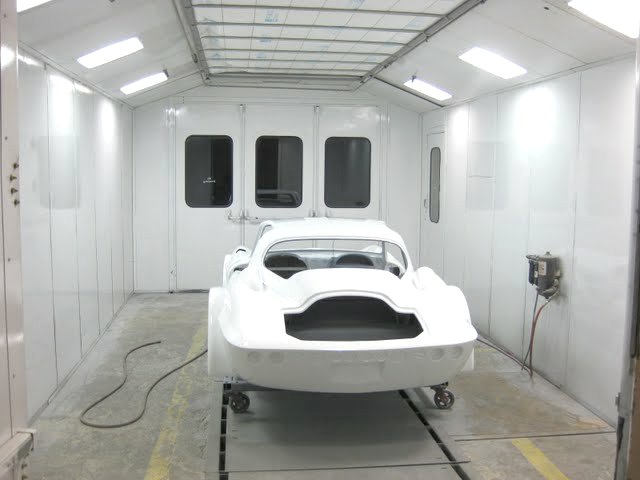
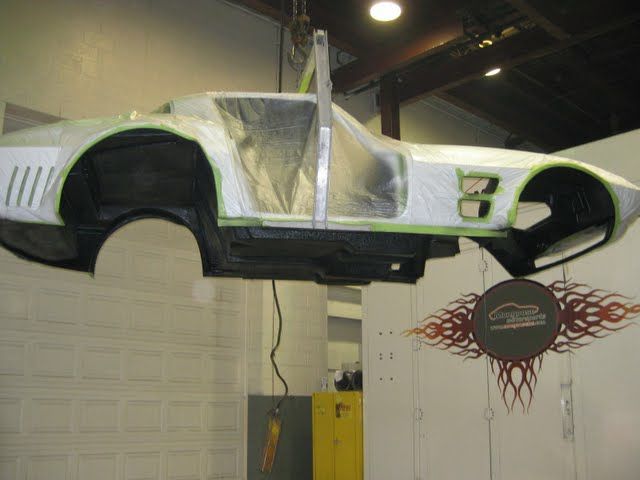
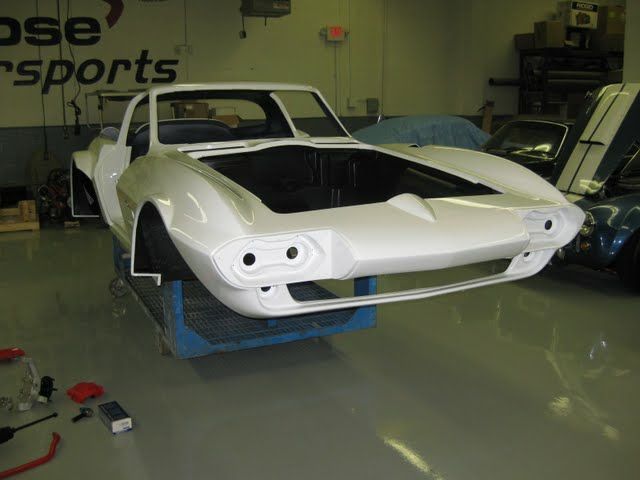
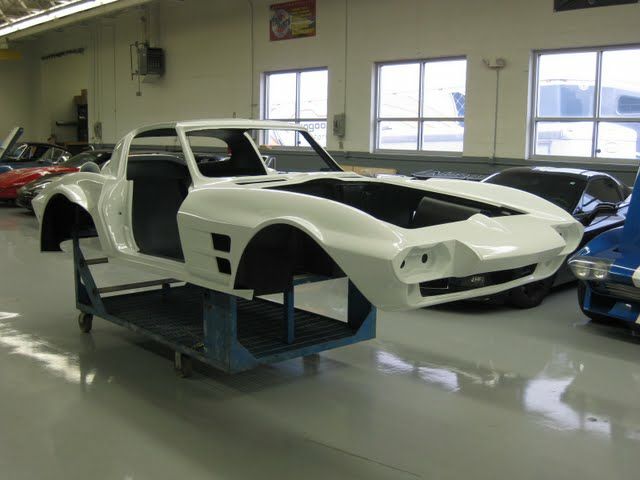
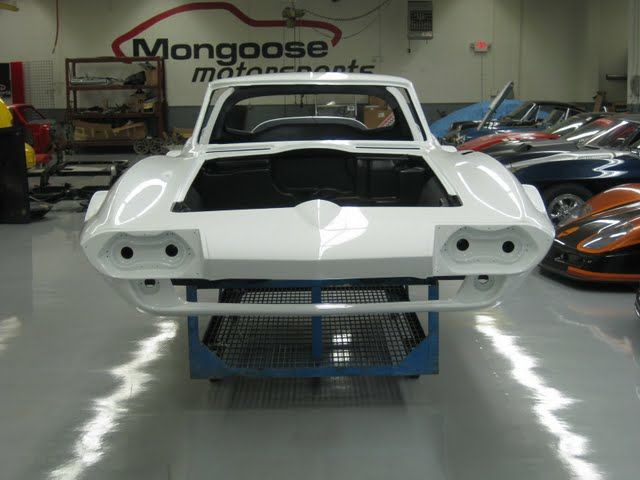
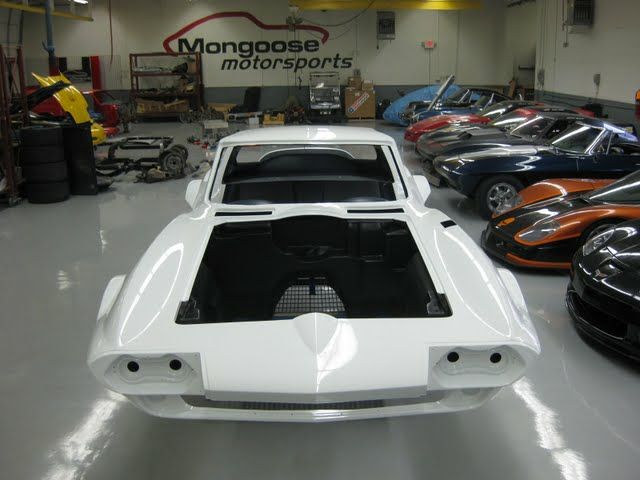
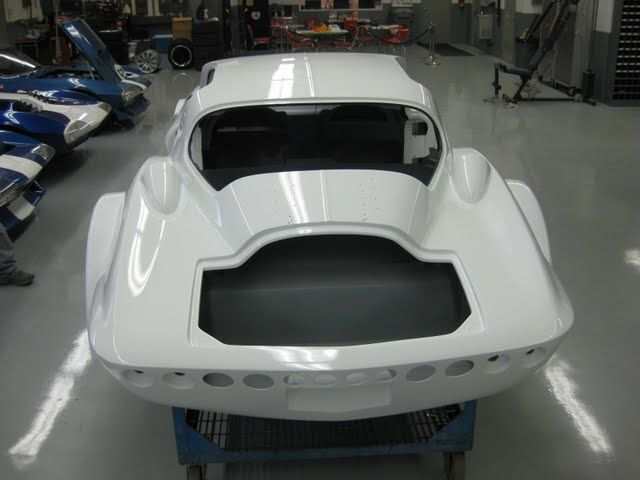
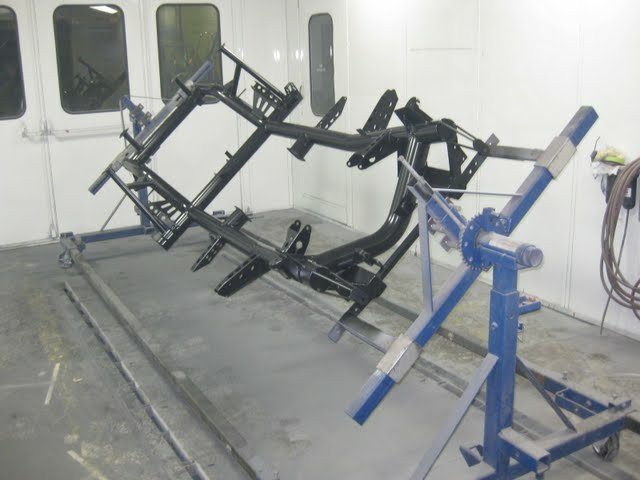
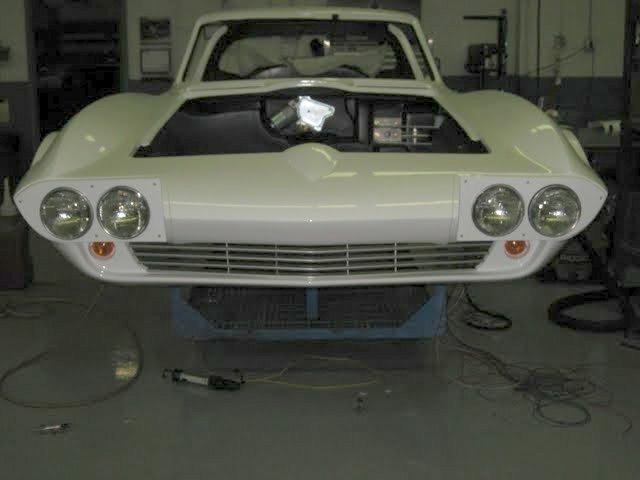
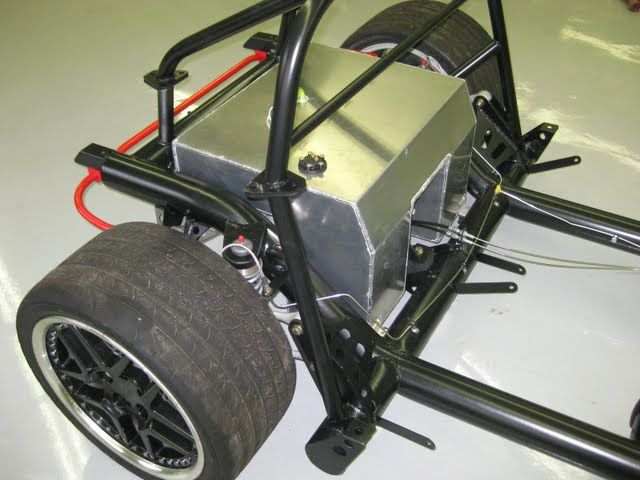
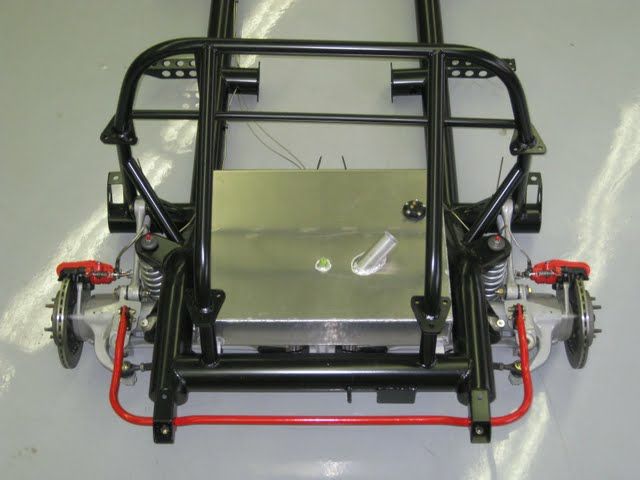
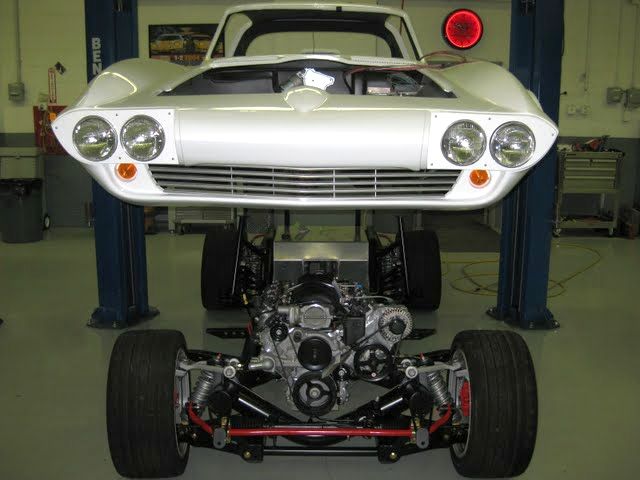
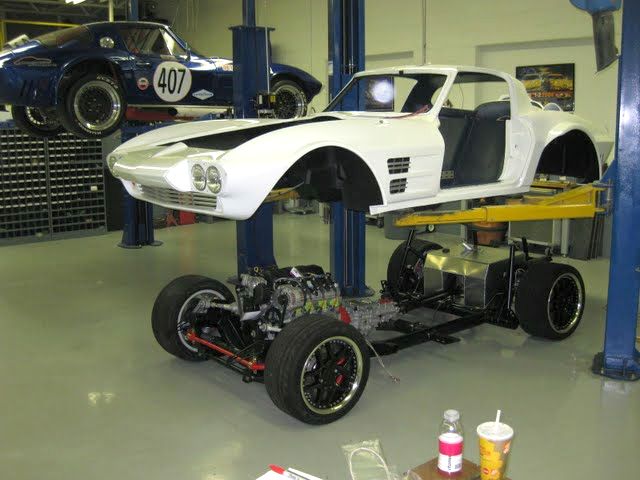
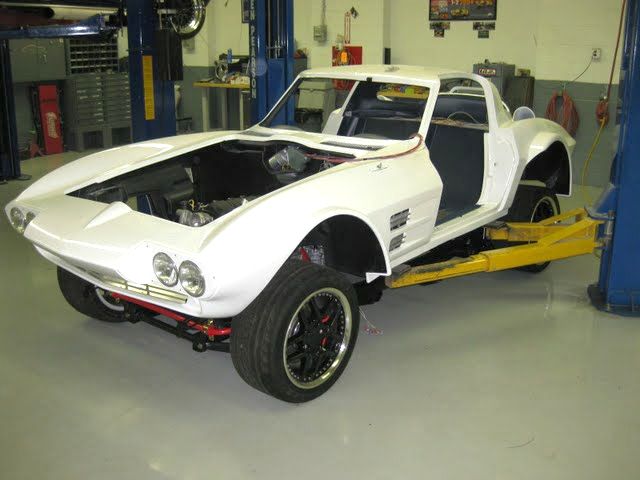
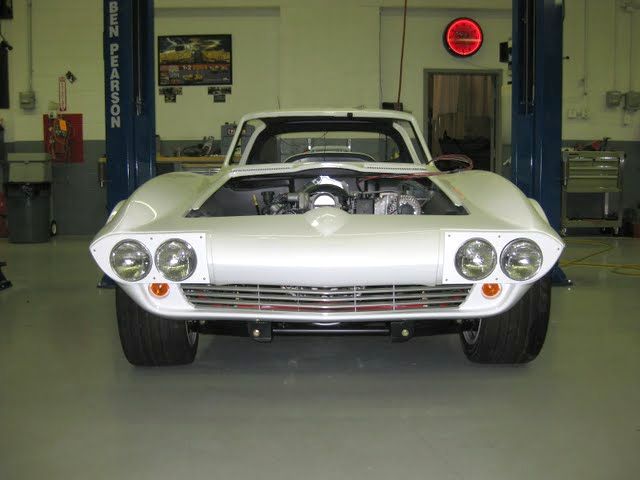
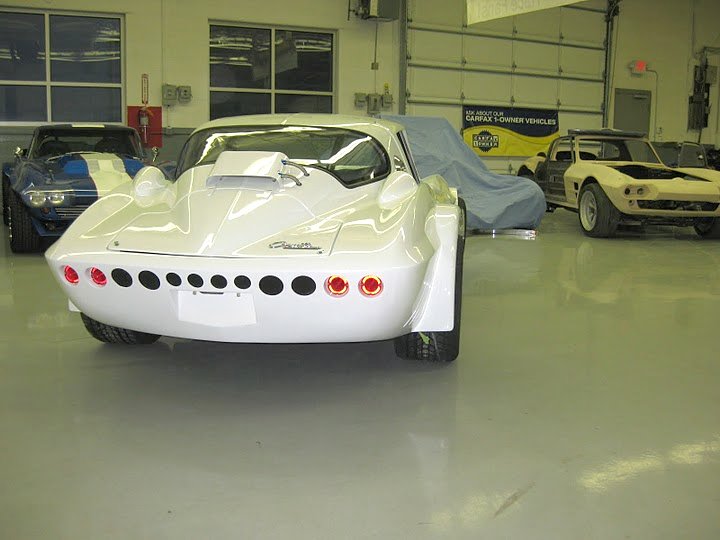
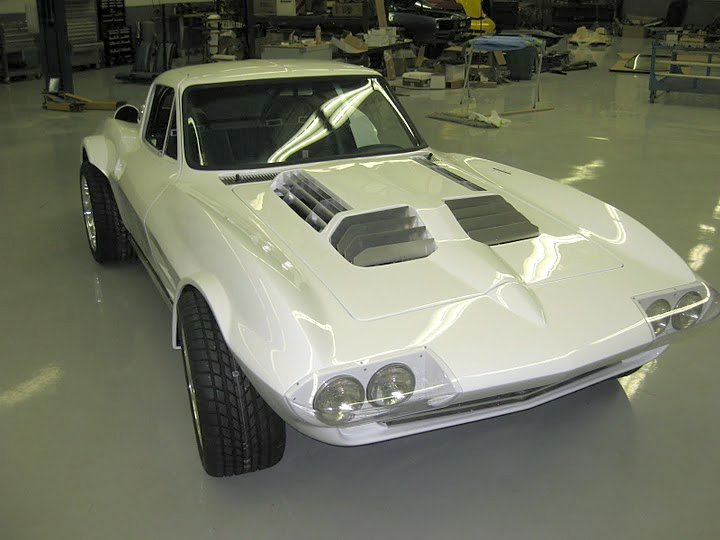
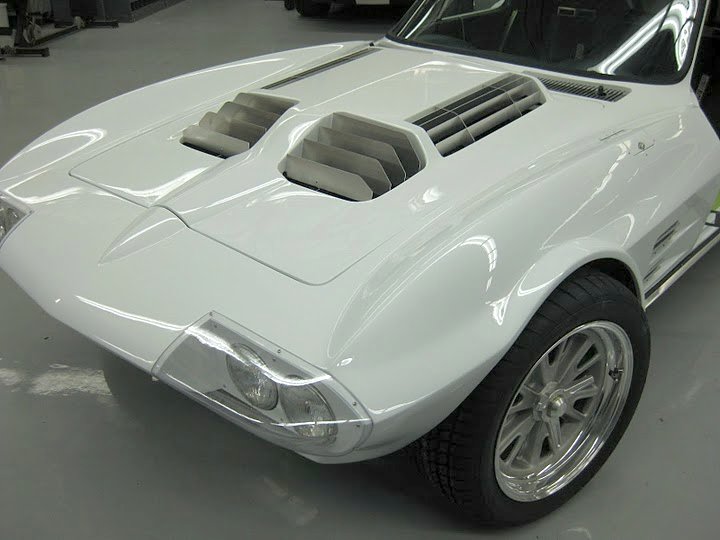
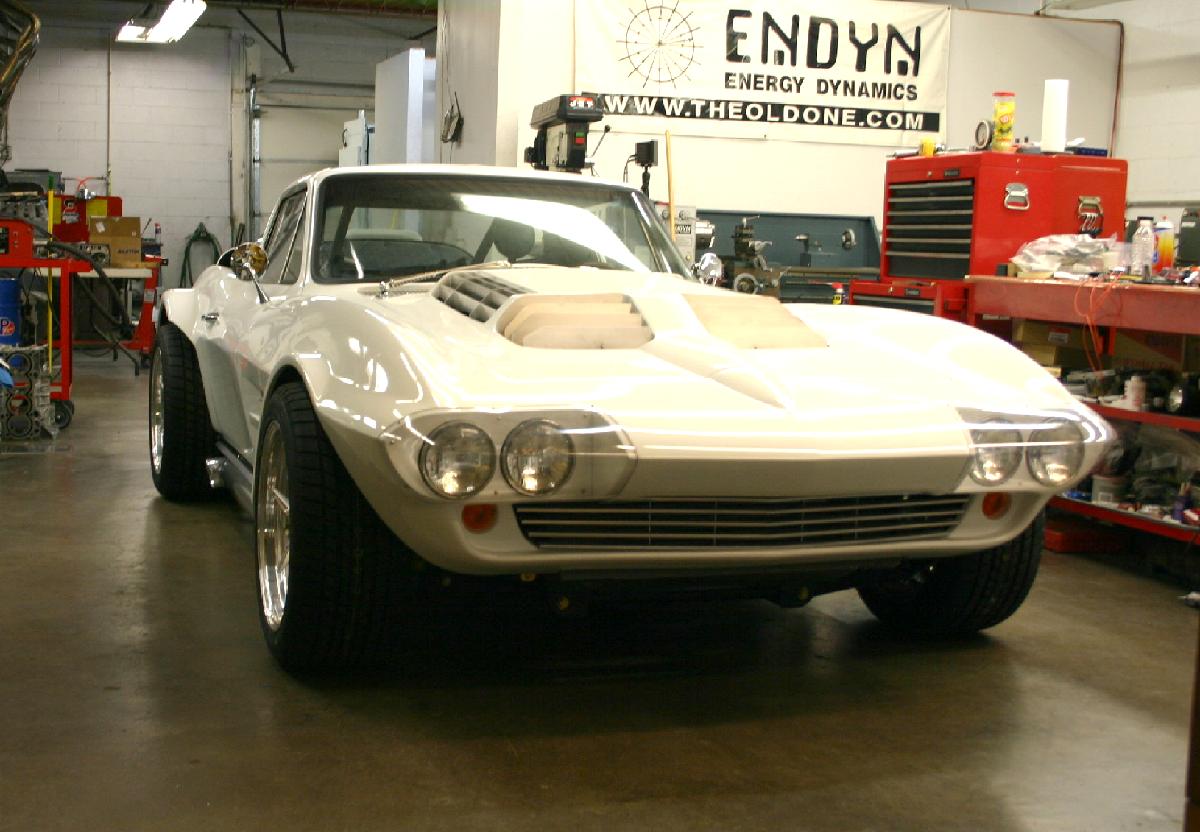
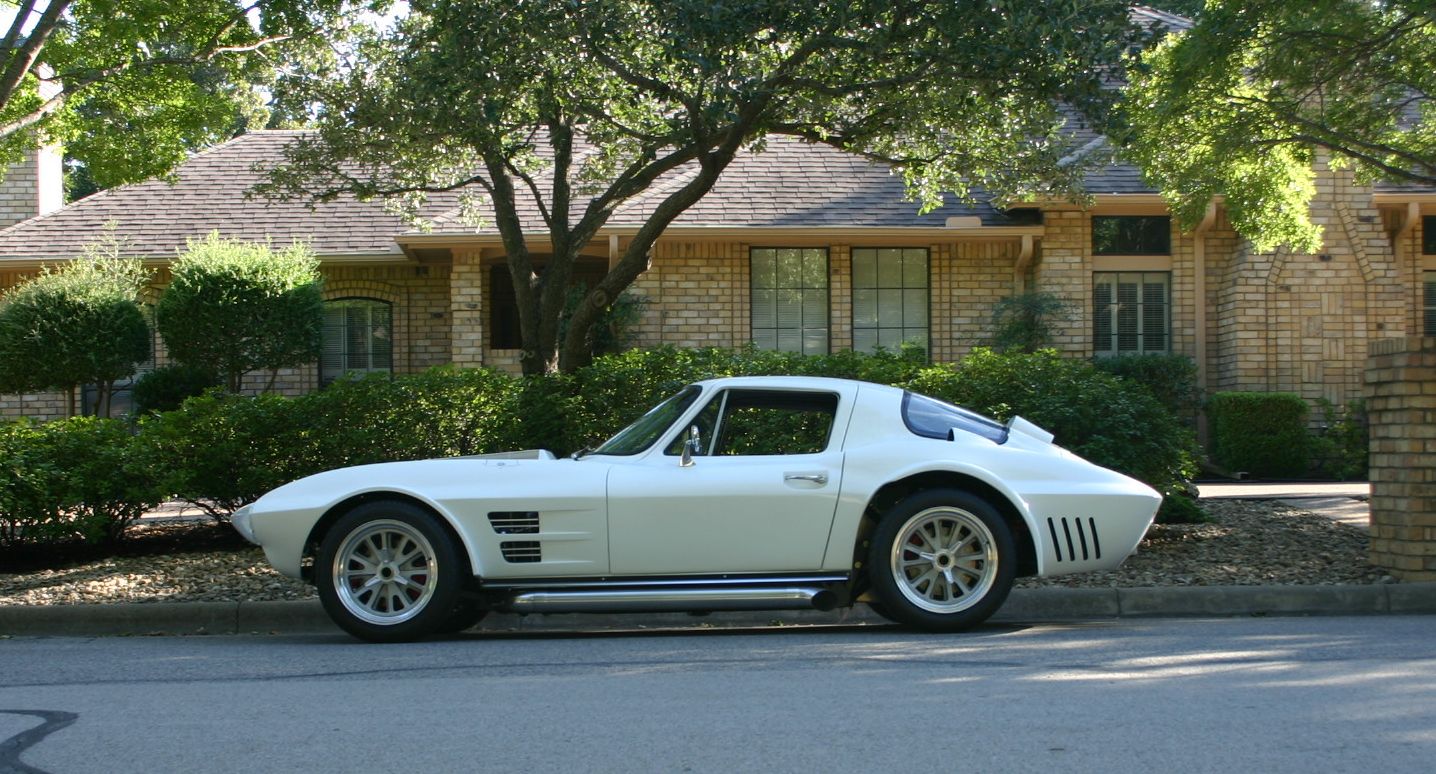
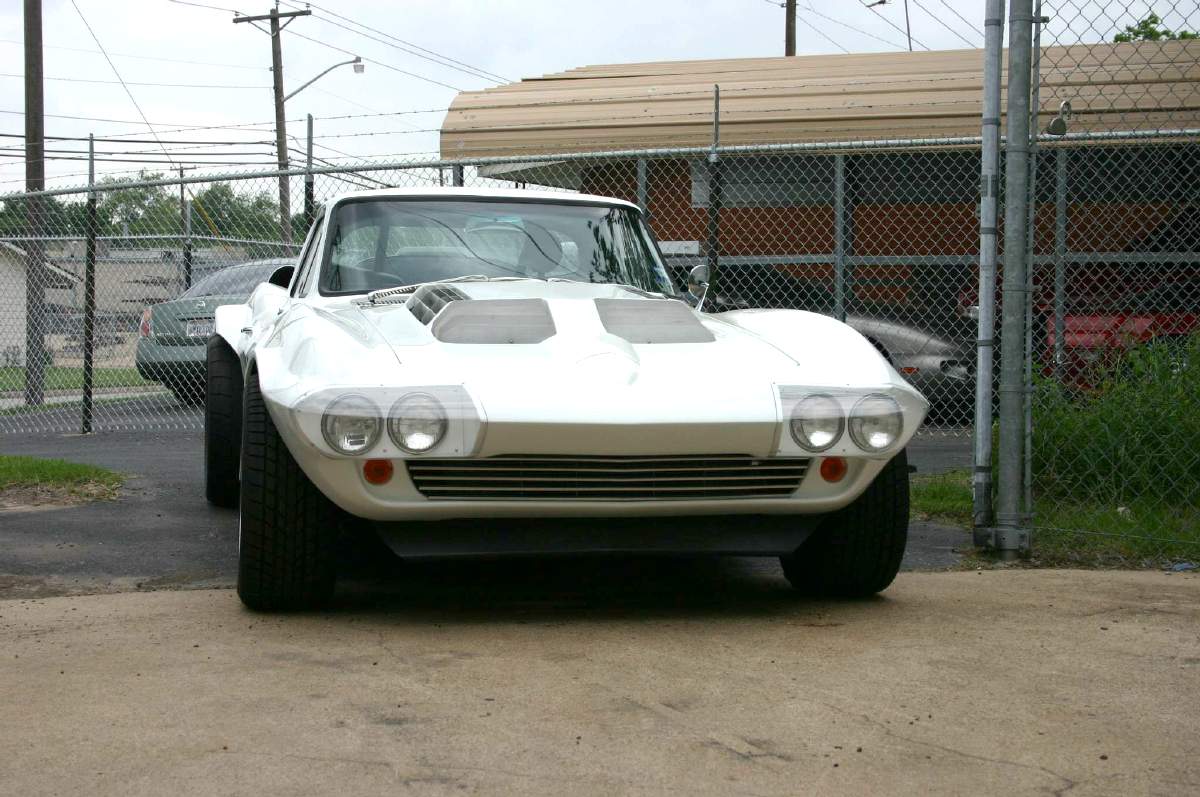
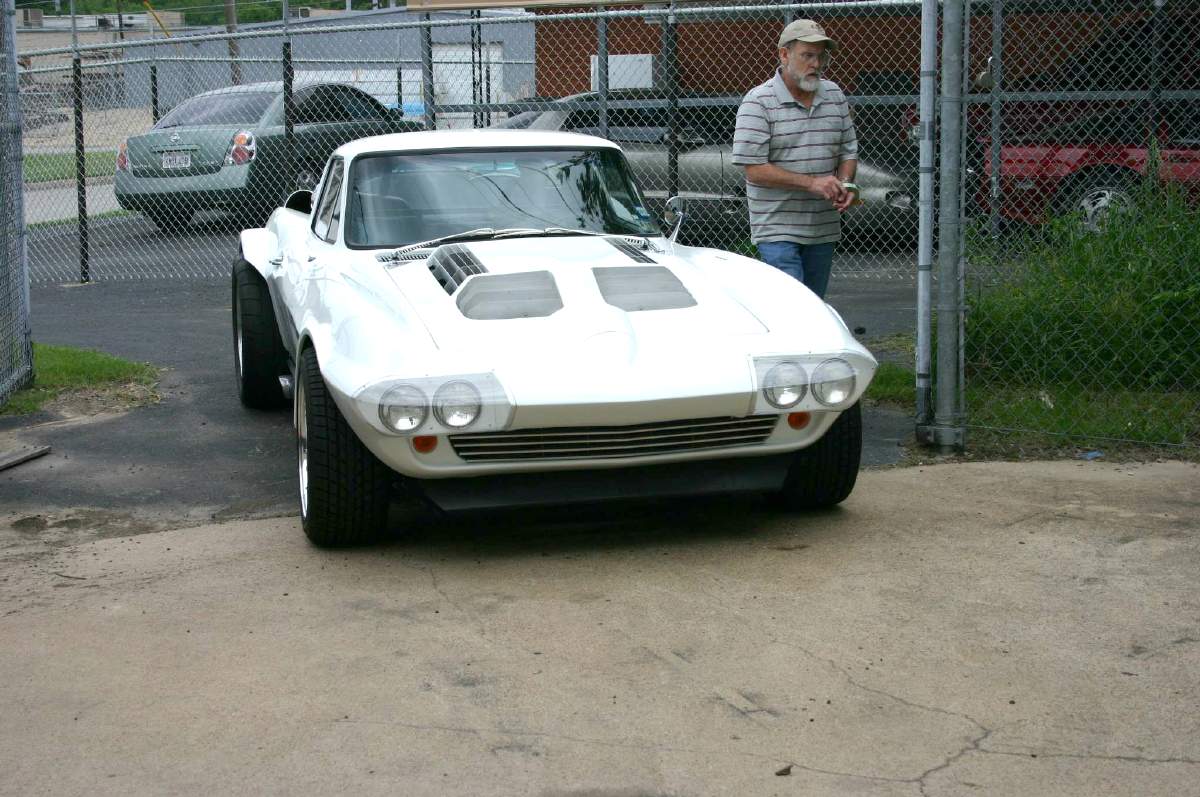
The pictures above are of the Duntov Motor's first Grand Sport car. Note that the nose and the rear are drooped, which sacrifices good looks for claimed improvement in aerodynamics.

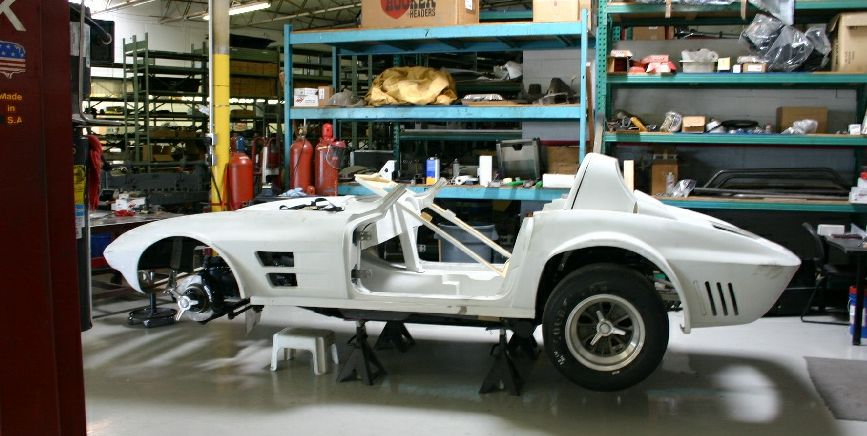
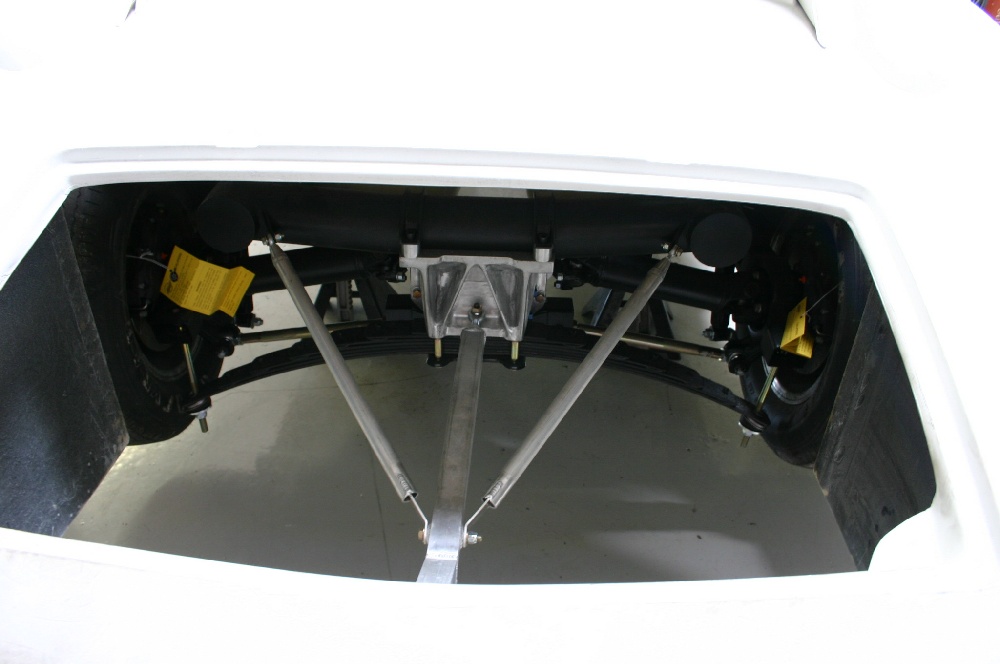
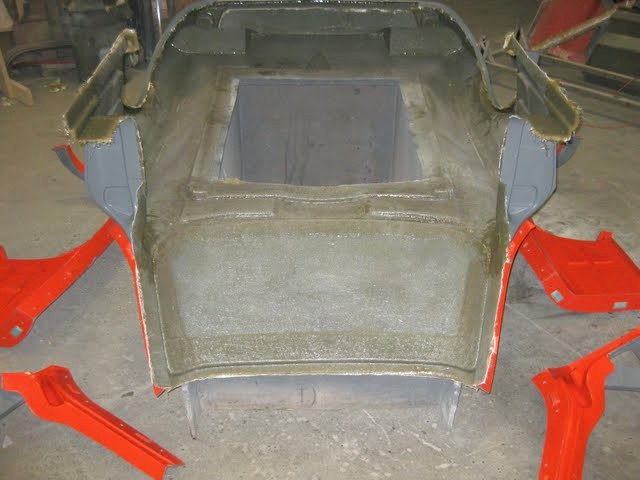
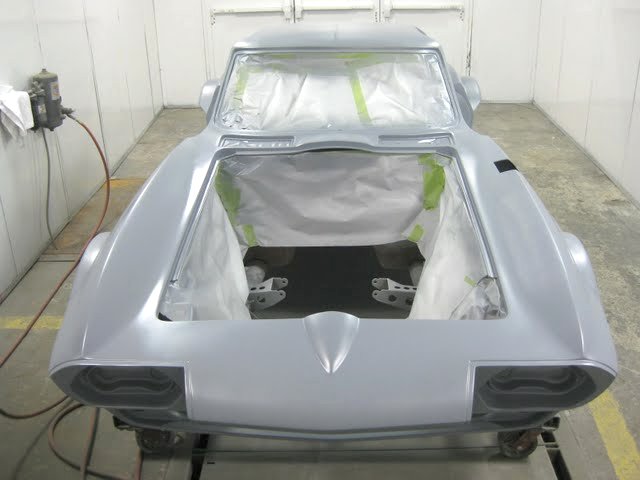
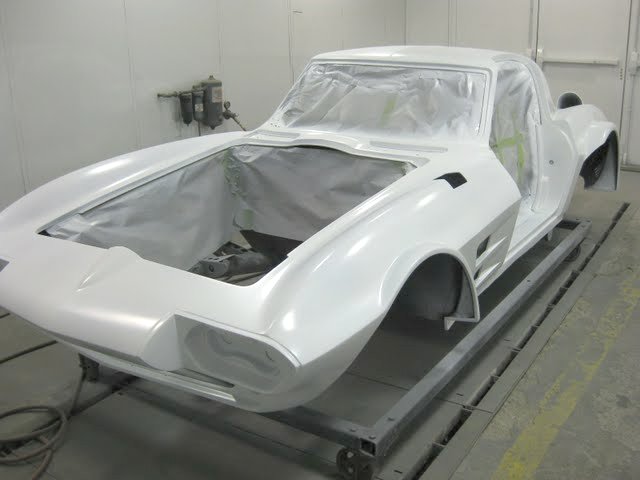
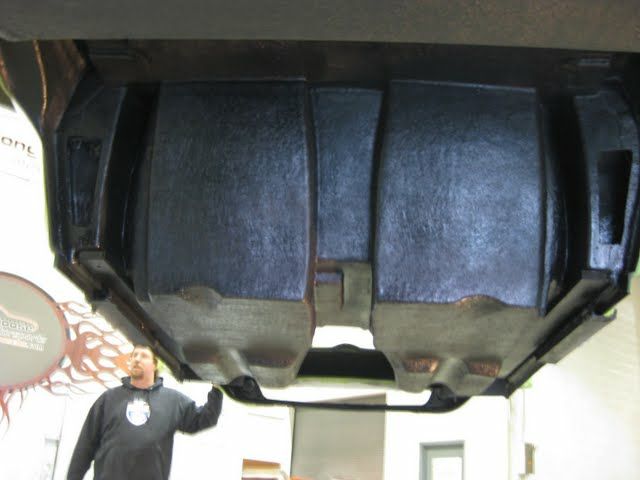
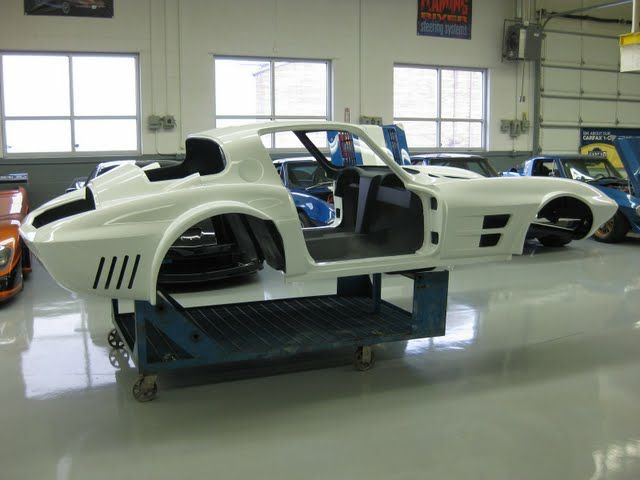
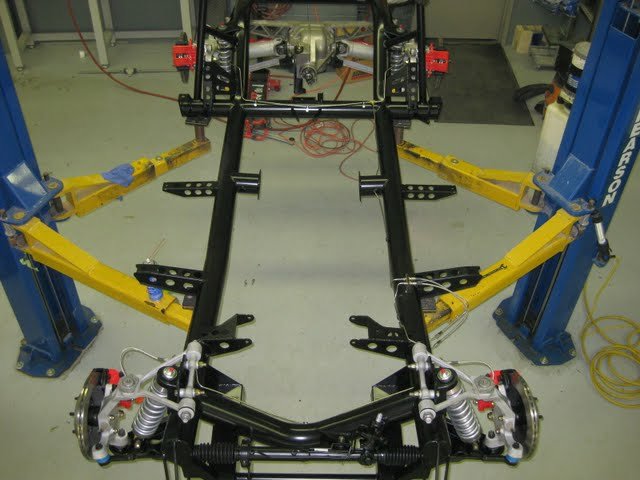
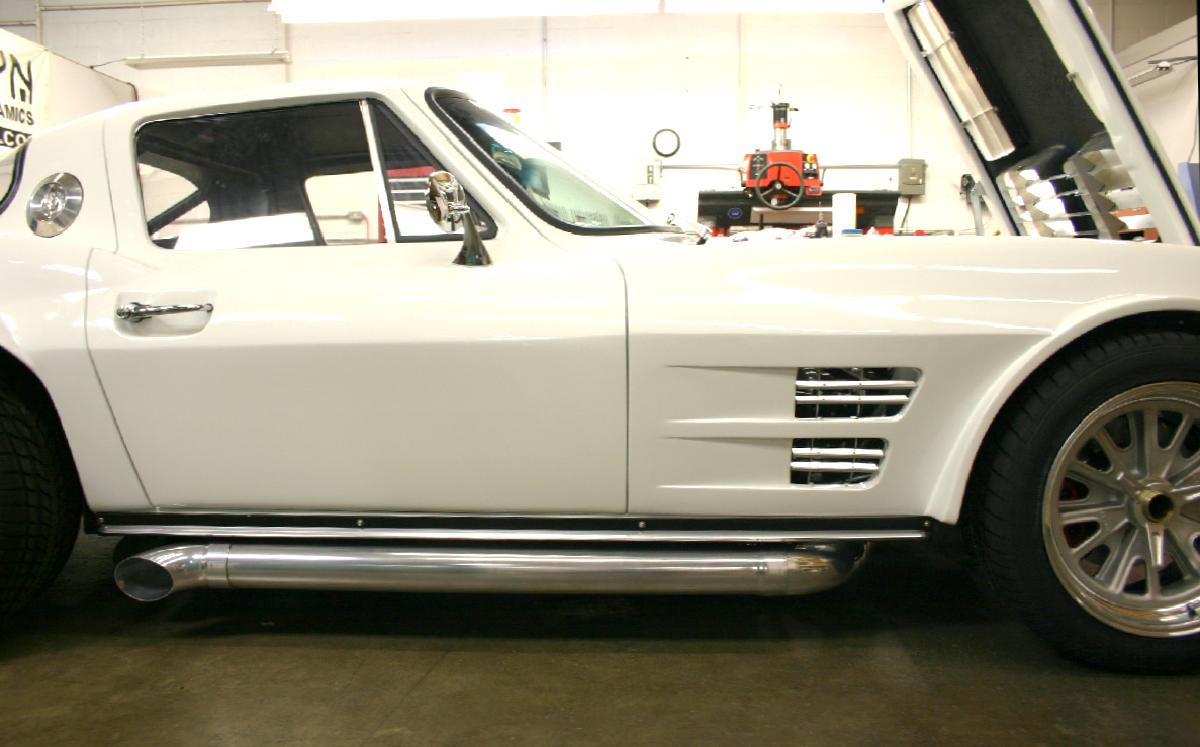
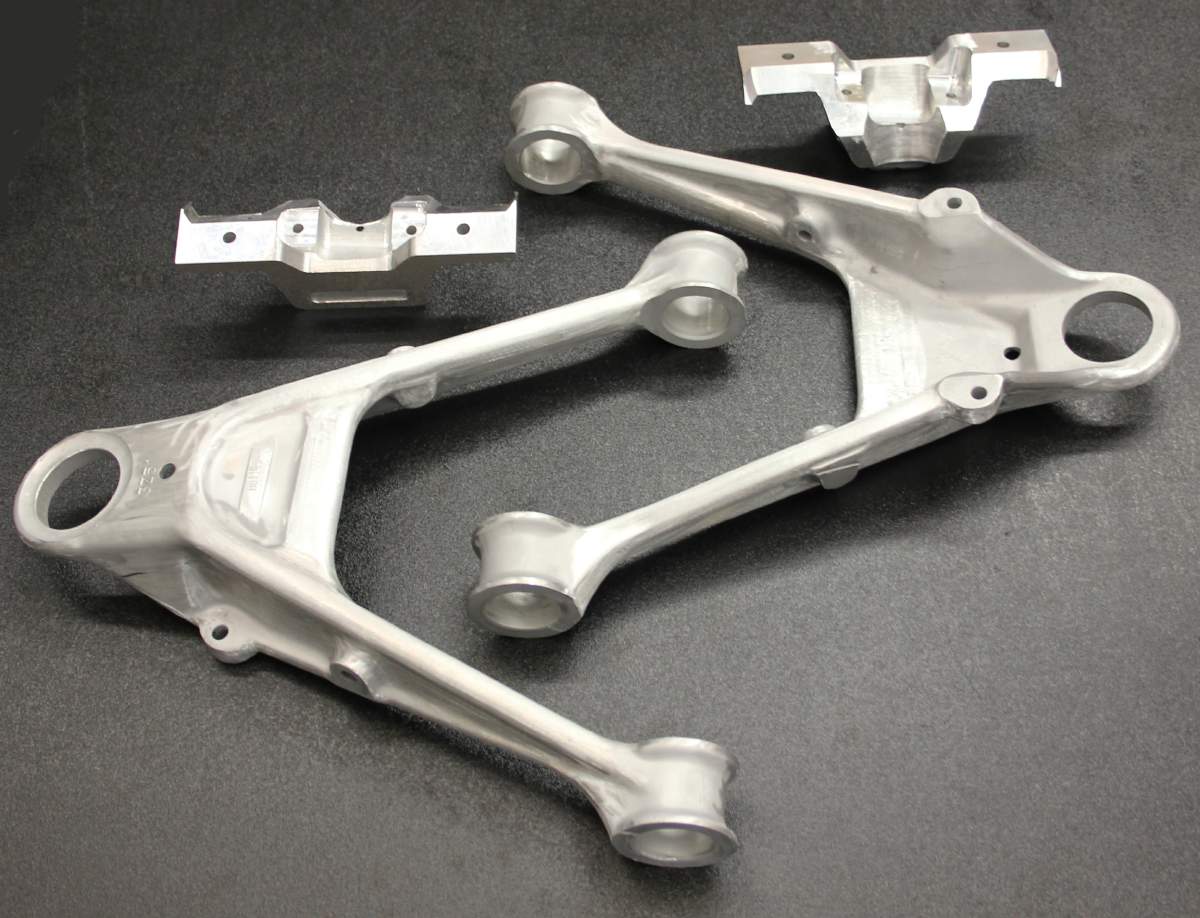
The pictures above are from the Duntov shop. The roadster in the two lower picture is the go-by sample headed for South Africa, where Superformance will "clone" it. Note the Grand Sports actually had trunk lids to allow fitment of a spare tire which was required by the class rules in GT class racing back in the 60's. If you don't think Zora was seriously trying to save weight on the cars, get a load of the minimal rear body support from the chassis.
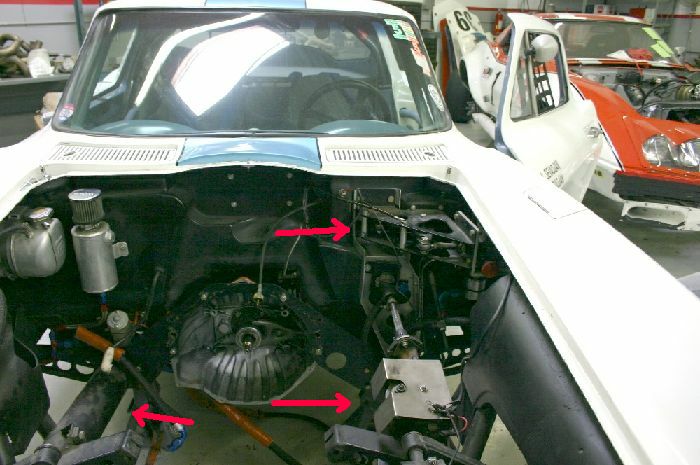
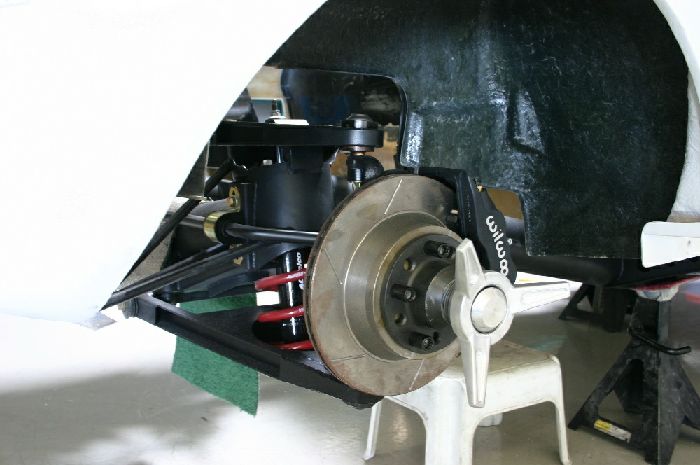
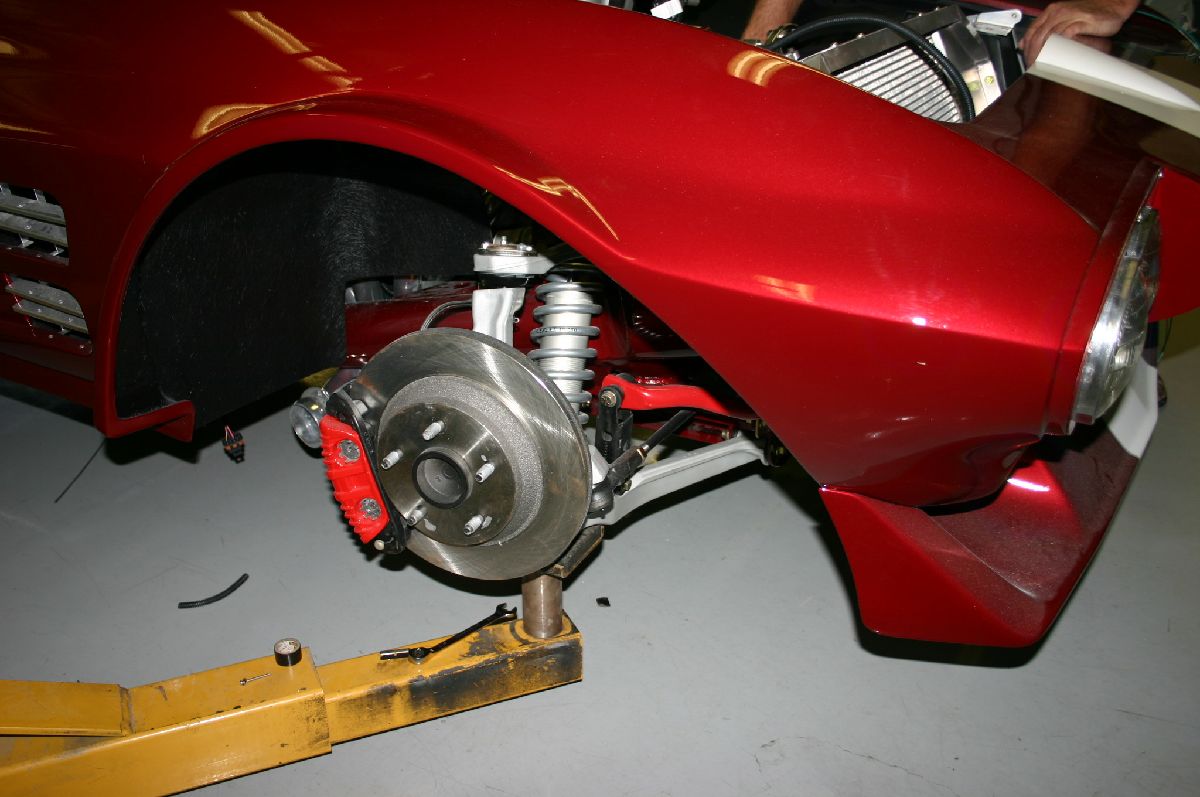
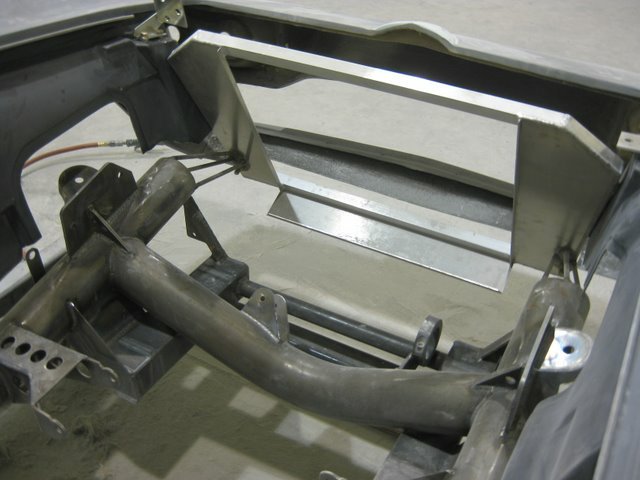
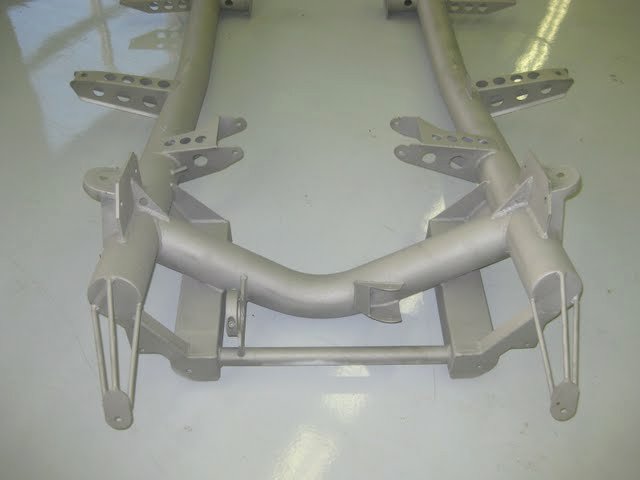
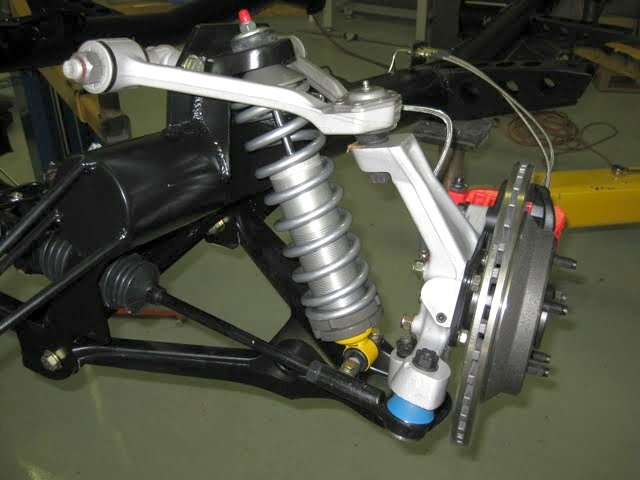
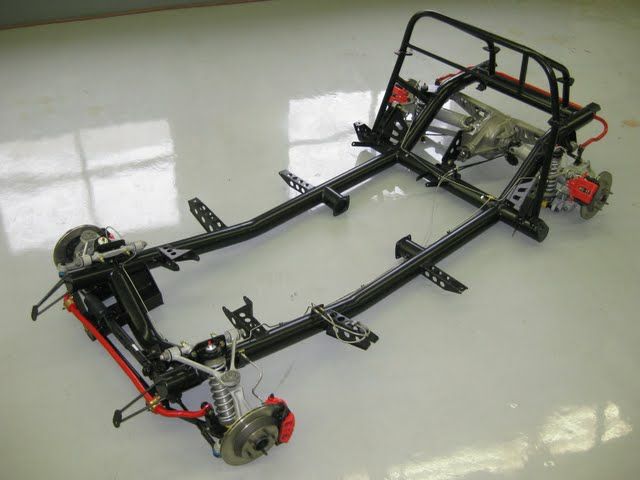
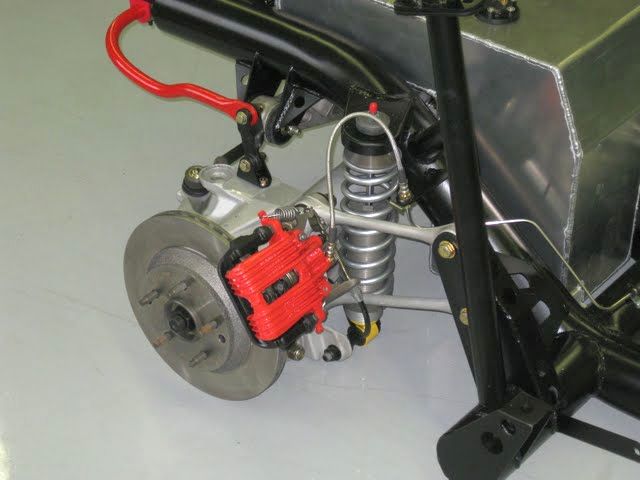
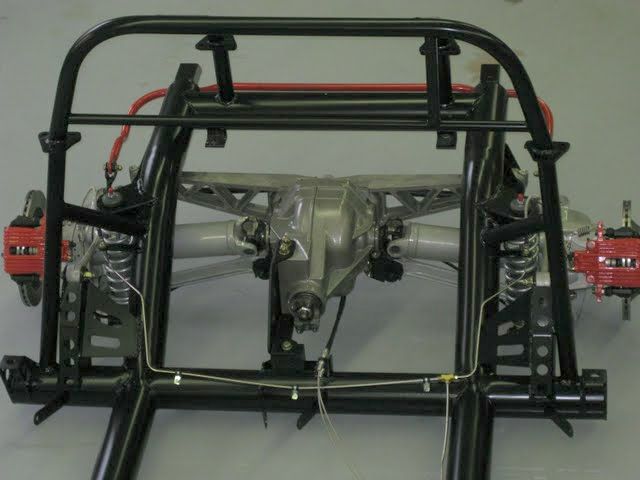
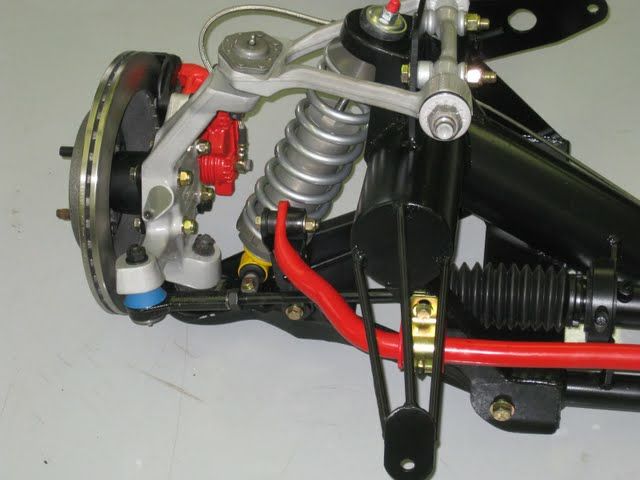
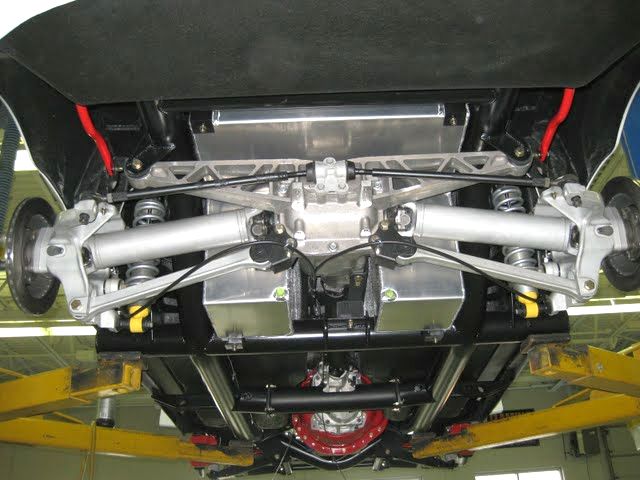
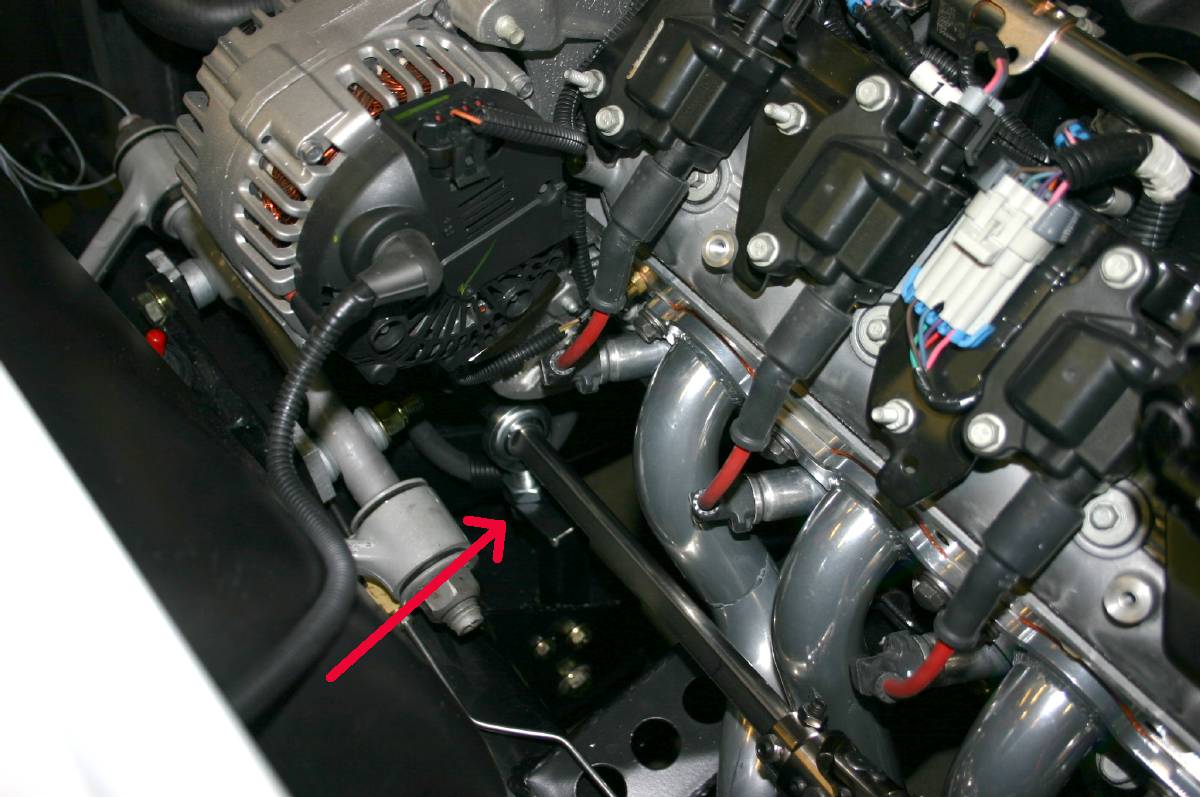
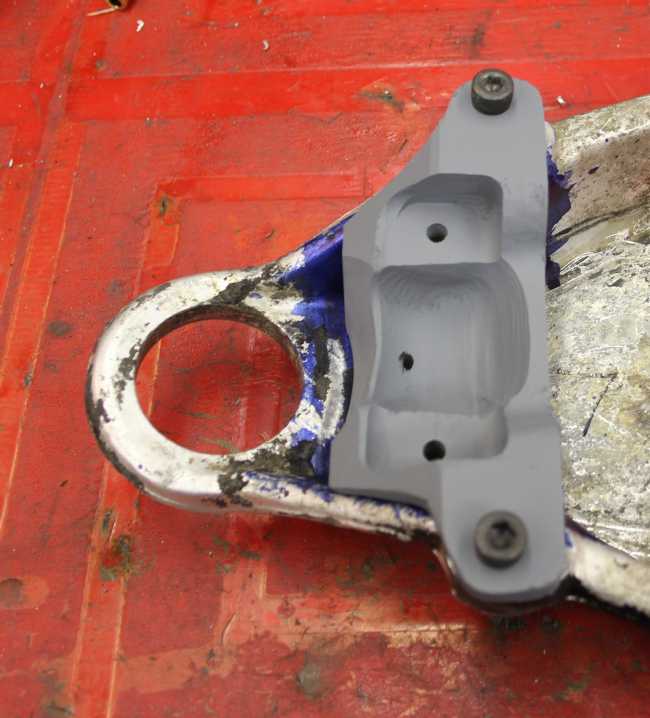
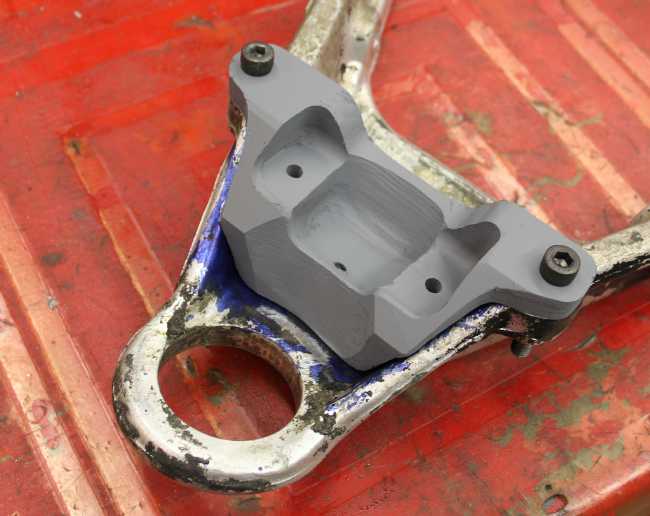
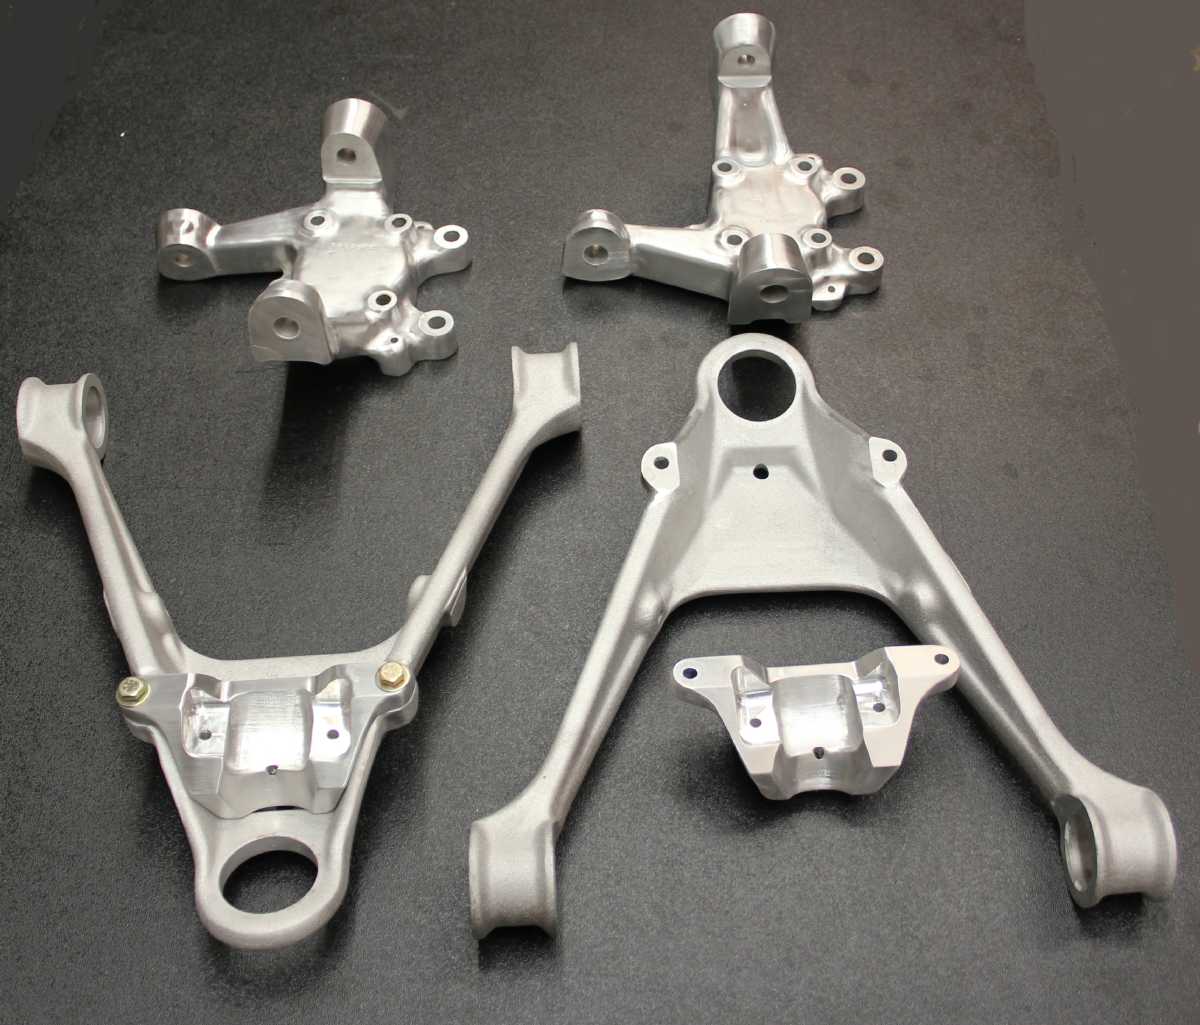
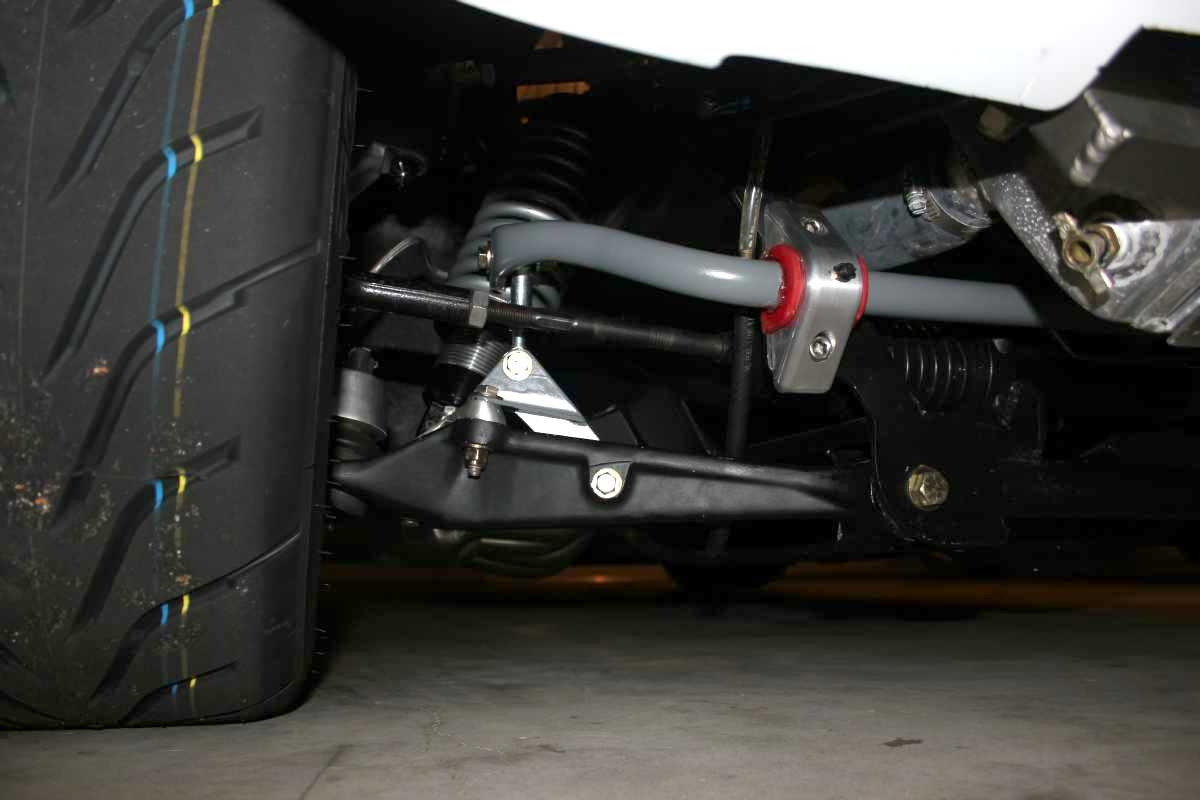
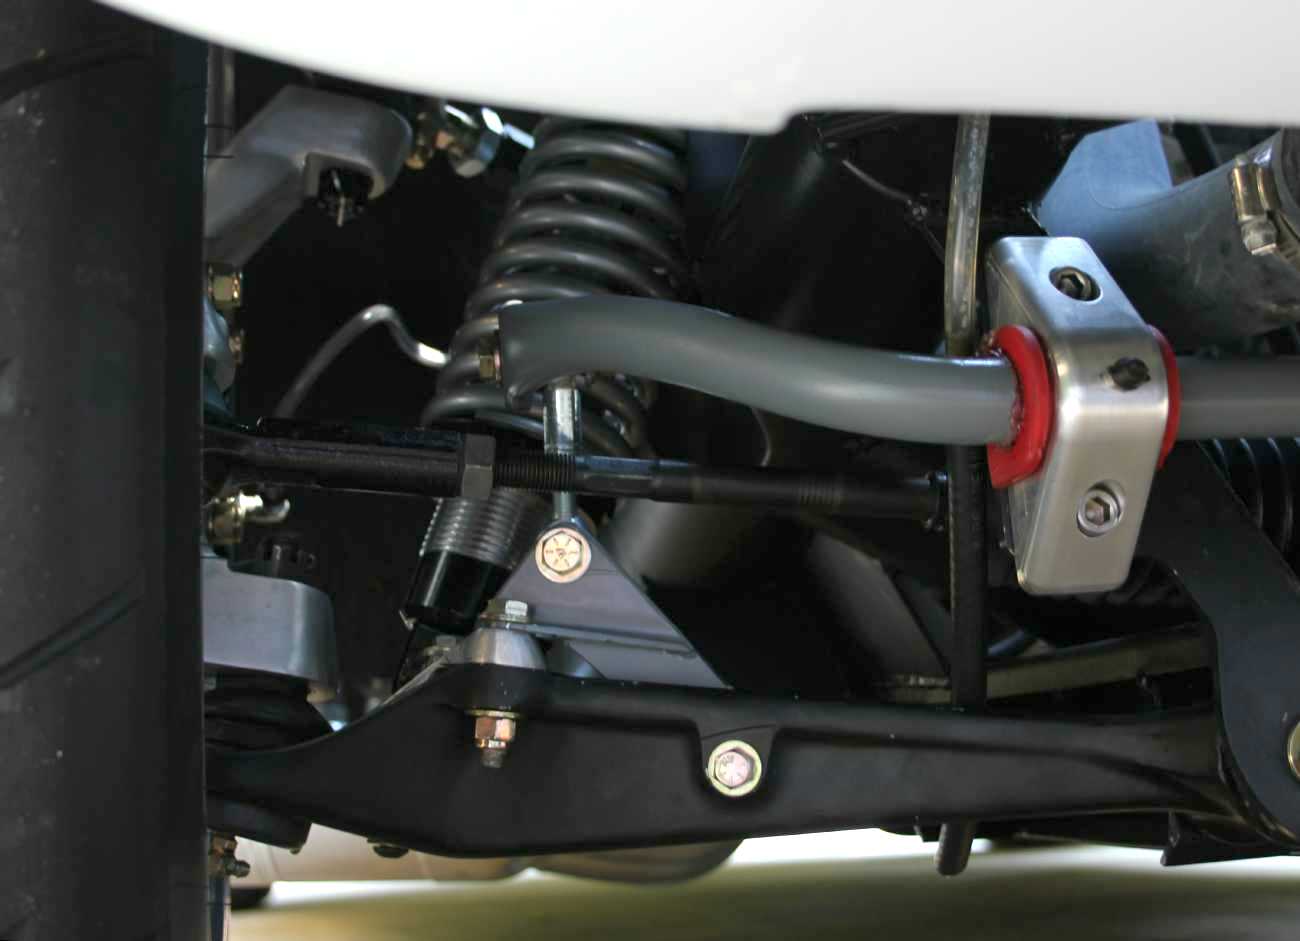
In the top picture you can see the round tube frame rail, as well as the bell-crank mechanism that relocates the brake master cylinder under the front fender for additional engine clearance. The recirculating-ball steering box is covered with an aluminum head shield. At the bottom is the front suspension. Note the fabricated upper and lower control arms (of stock Corvette dimensions) and the use of large-diameter coil springs ala the original cars.
And that finally brings us to this:
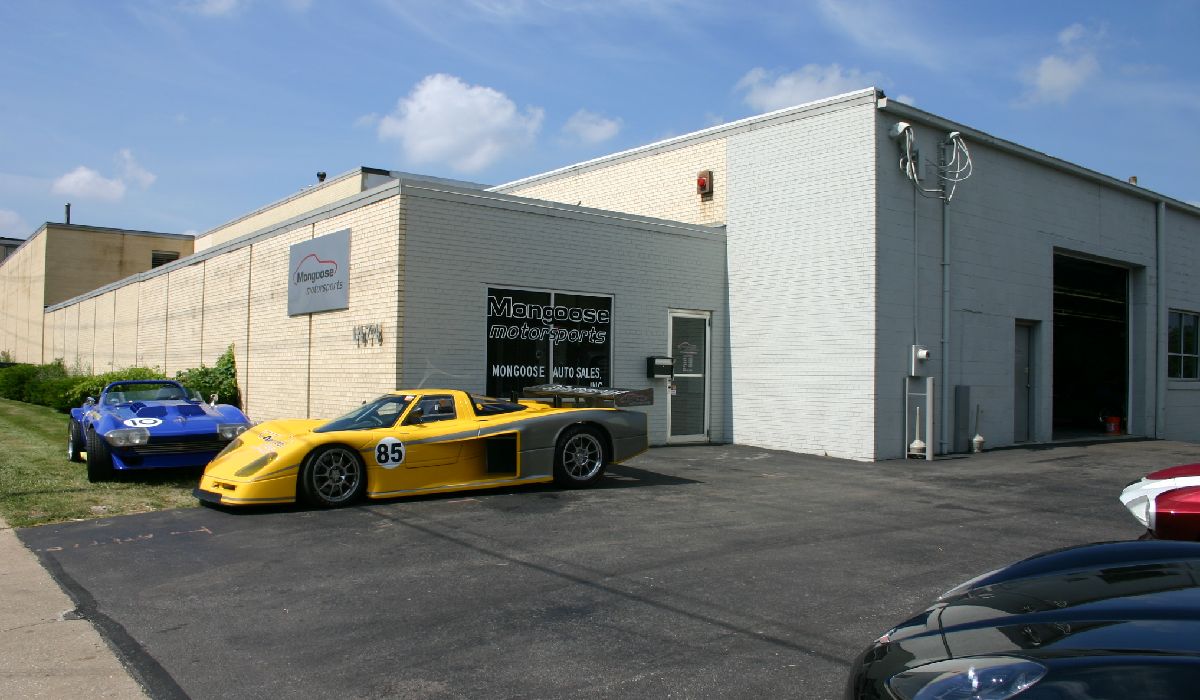
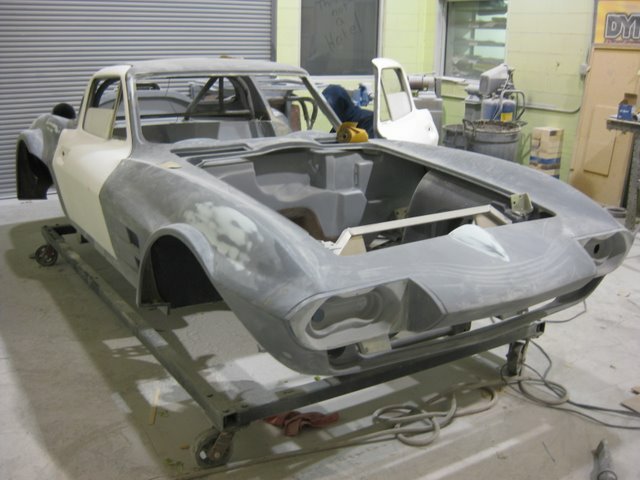
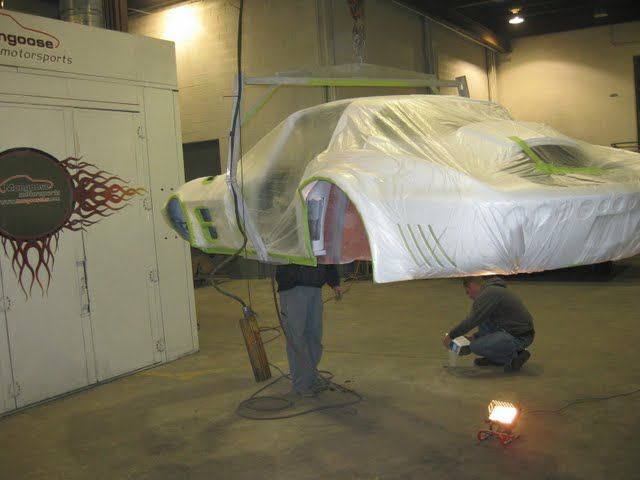
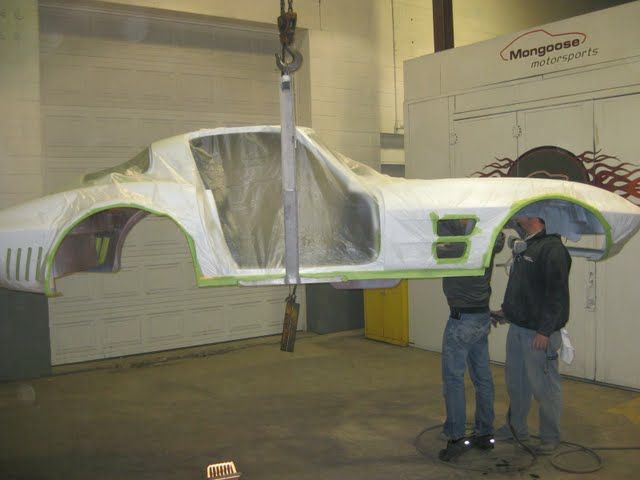
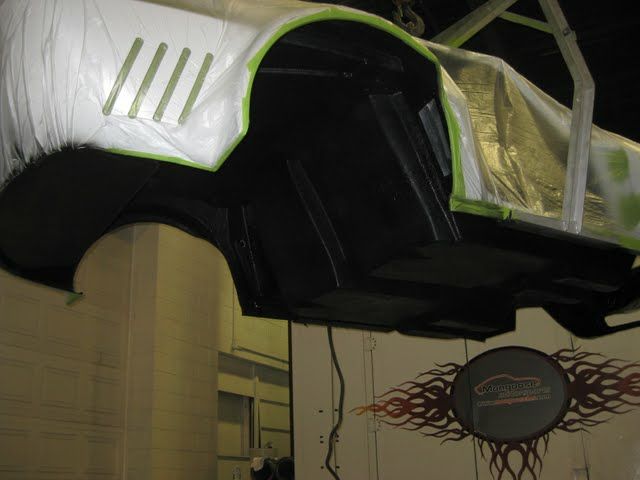
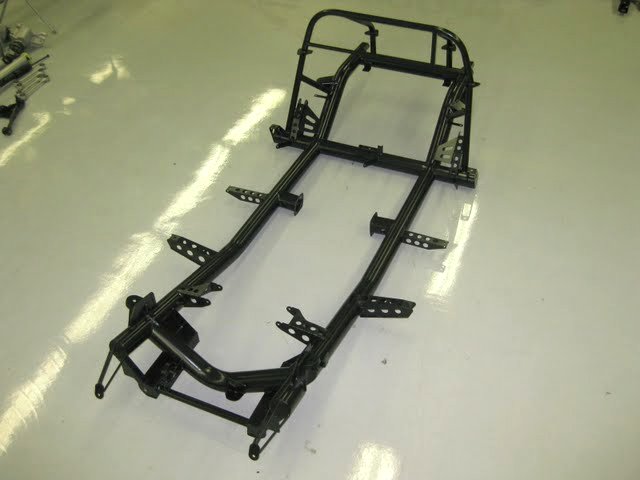
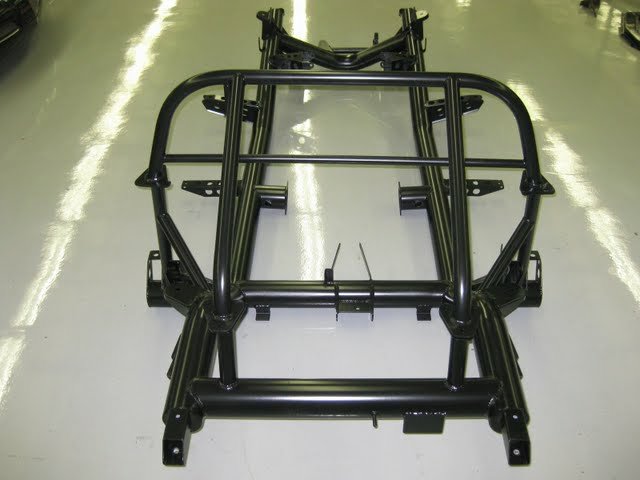
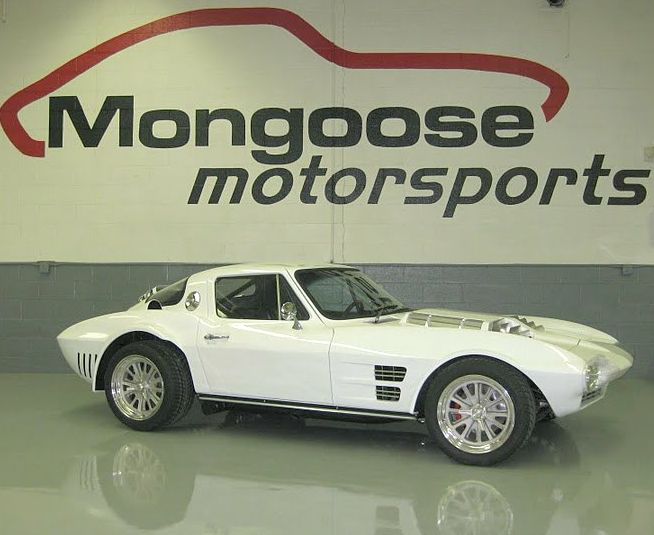
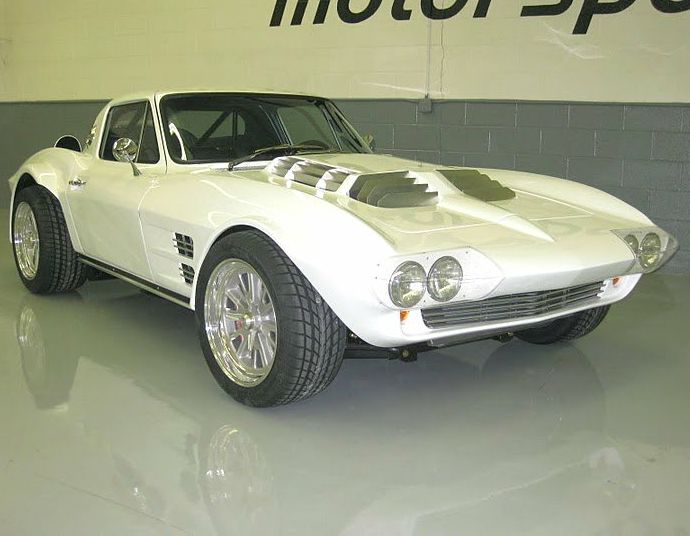
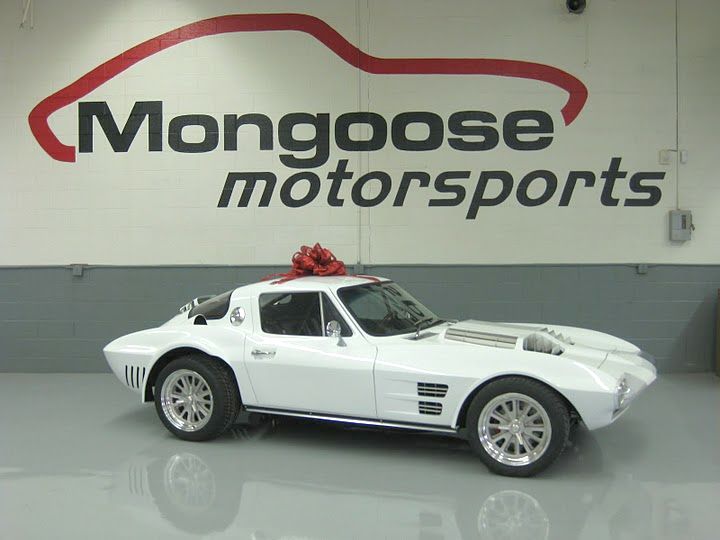
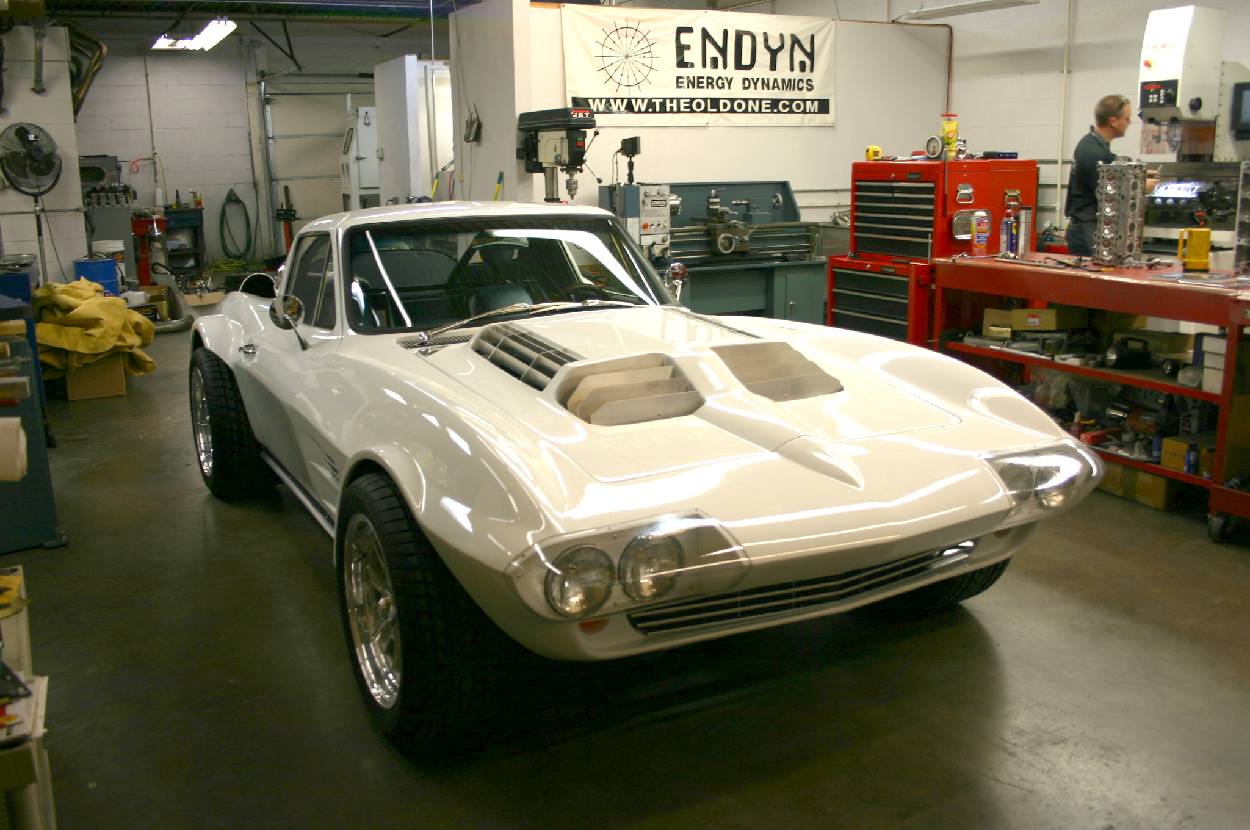
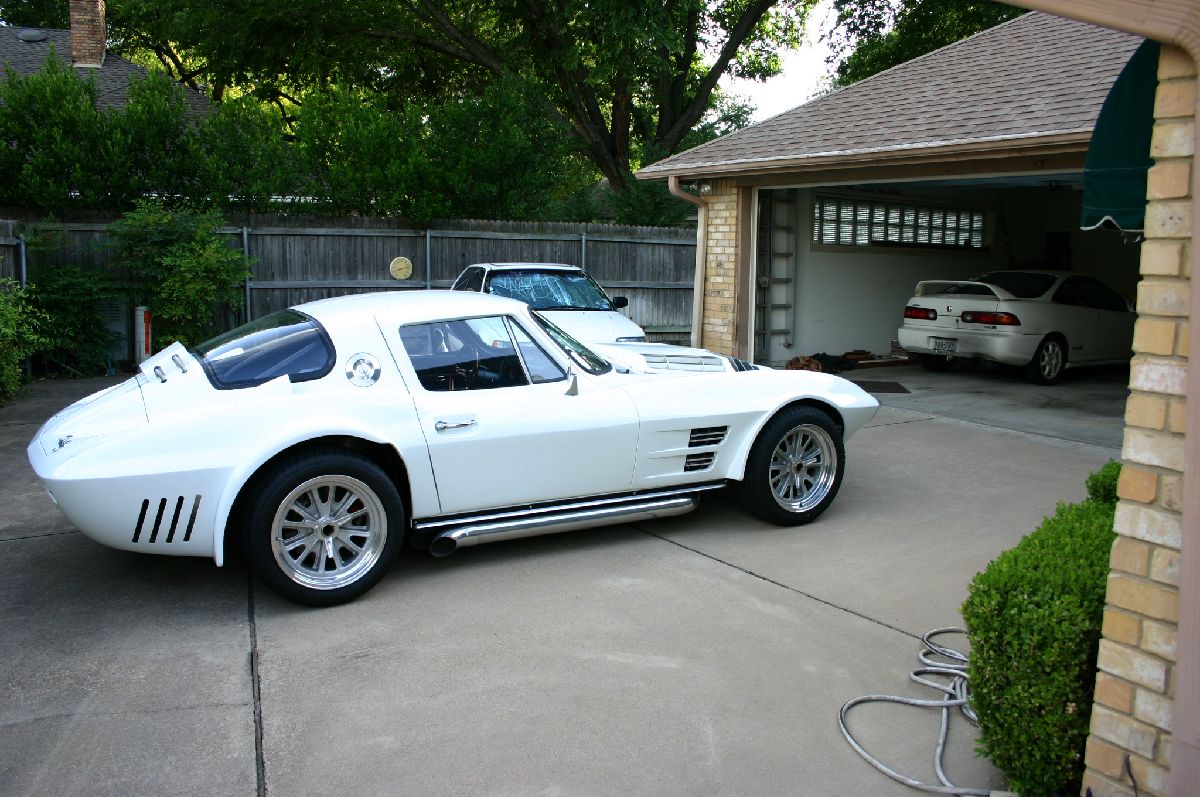
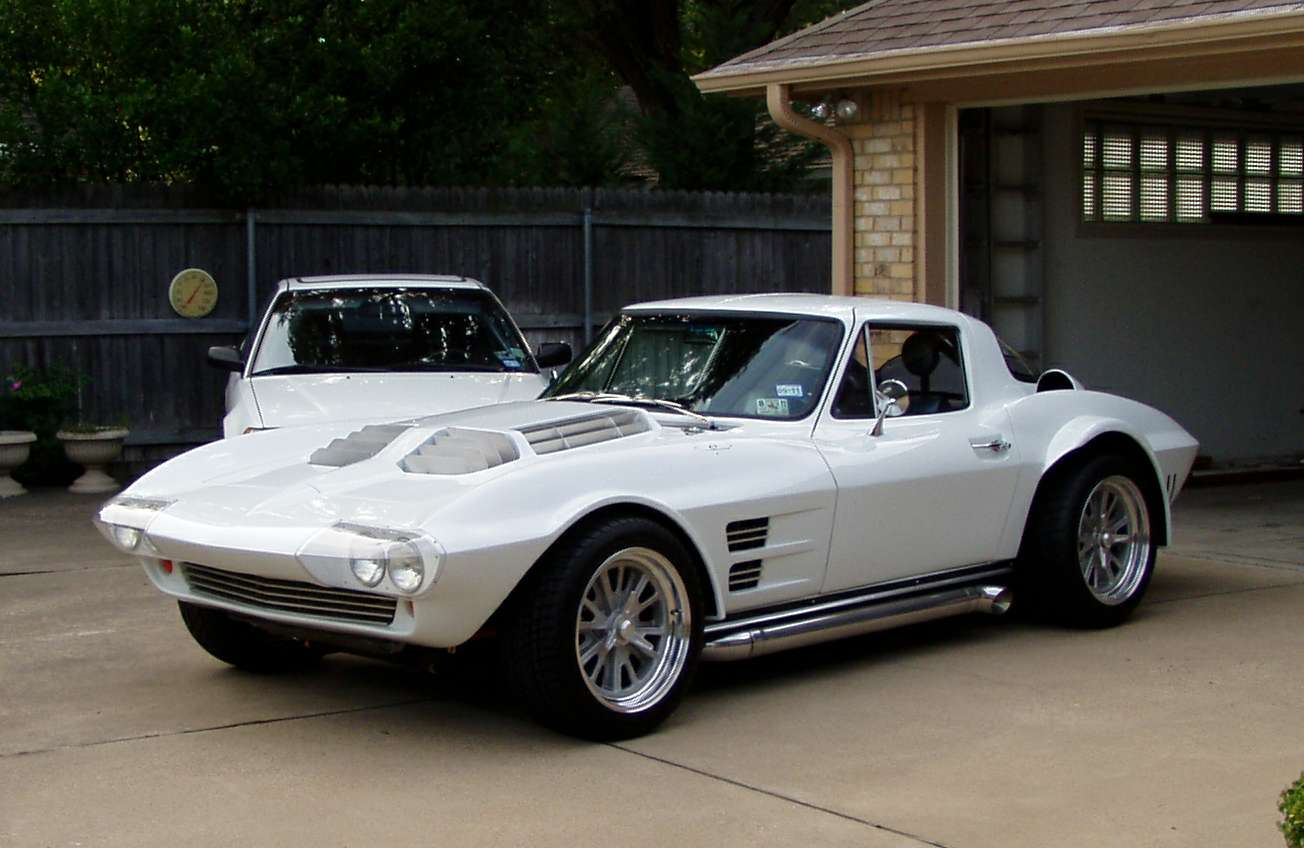
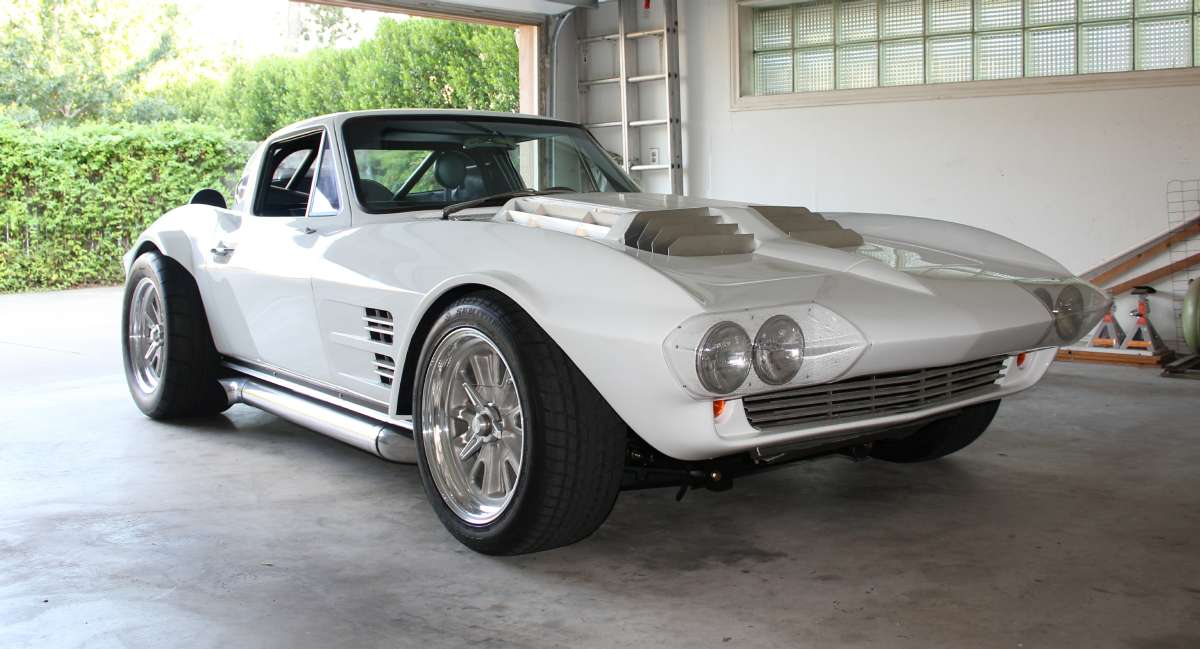
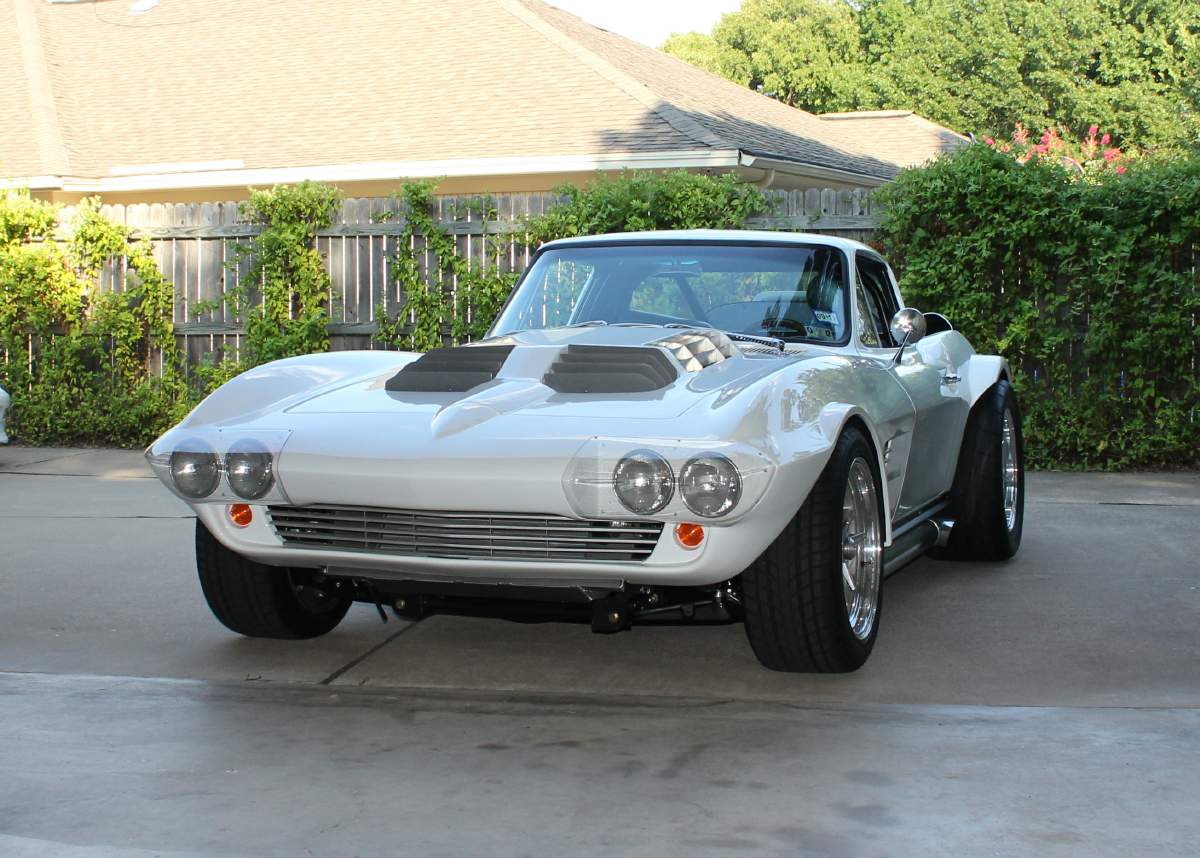
A couple years ago while looking through a kit car magazine, I saw some Grand Sport Corvette replicas produced by Mongoose Motor Sports in Ohio. Their cars looked first class in the magazine articles, and similar to the D&D version, these also used C4 Corvette suspensions, steering, brakes, etc. The chassis was once again a round-tube ladder design like the originals’, and virtually any Chevy engine/transmission would drop right in.
I spent many a month looking over their web site (http://www.mongoosems.com/) , which is chock-full of pictures of the cars and how they are constructed. They also have a number of video’s one can view.
The more I looked over the pictures, the more intrigued I became with their offerings. Their facility also looked very nice in the pictures, and I decided that if I was ever up in the area, I would stop by and take a look for myself.
Brian accompanied us to Trick-Flow, where we were again impressed at the engineering and manufacturing facility that's evolved. They really are a first-class operation and we're purchasing some of their heads for some V8 projects we're working on.
But…it was the Grand Sports that dazzled us all. Seeing that many in one place made me think I’d died and gone to Heaven!
Going inside was an eye-opener. The front office area had all sorts of Grand Sport-related pictures and items, as well as several well appointed offices. Walking into the area where they do the finish assembly of the cars was really a trip for any Grand Sport lover.
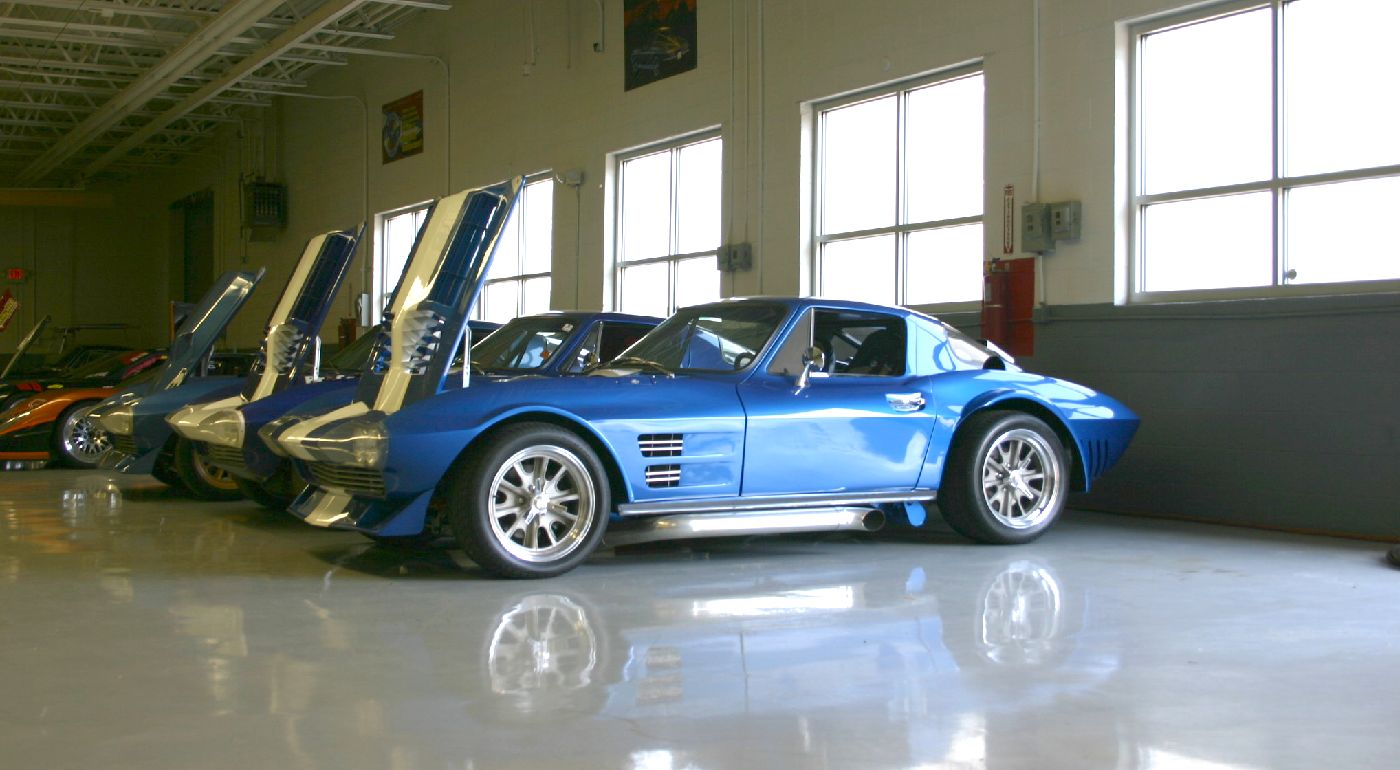
As you can see, this area of the facility at Mongoose Motorsports is immaculate as was the lone of Grand Sports and GTP's parked against the wall. Pure Heaven for me!
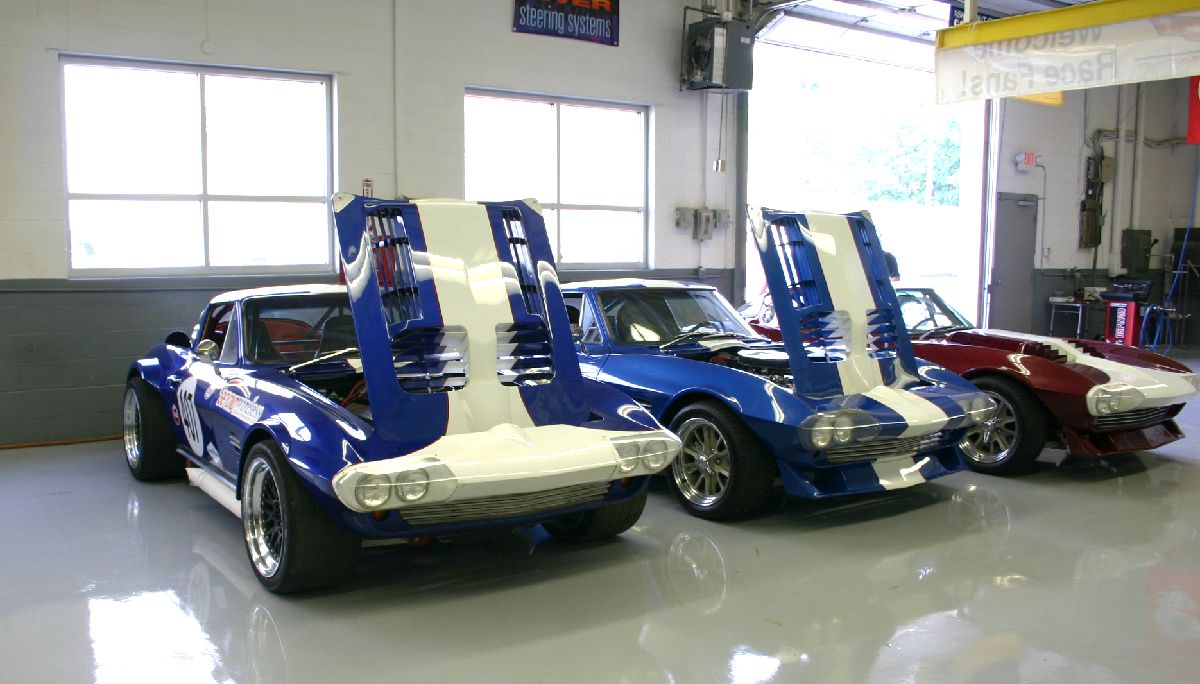
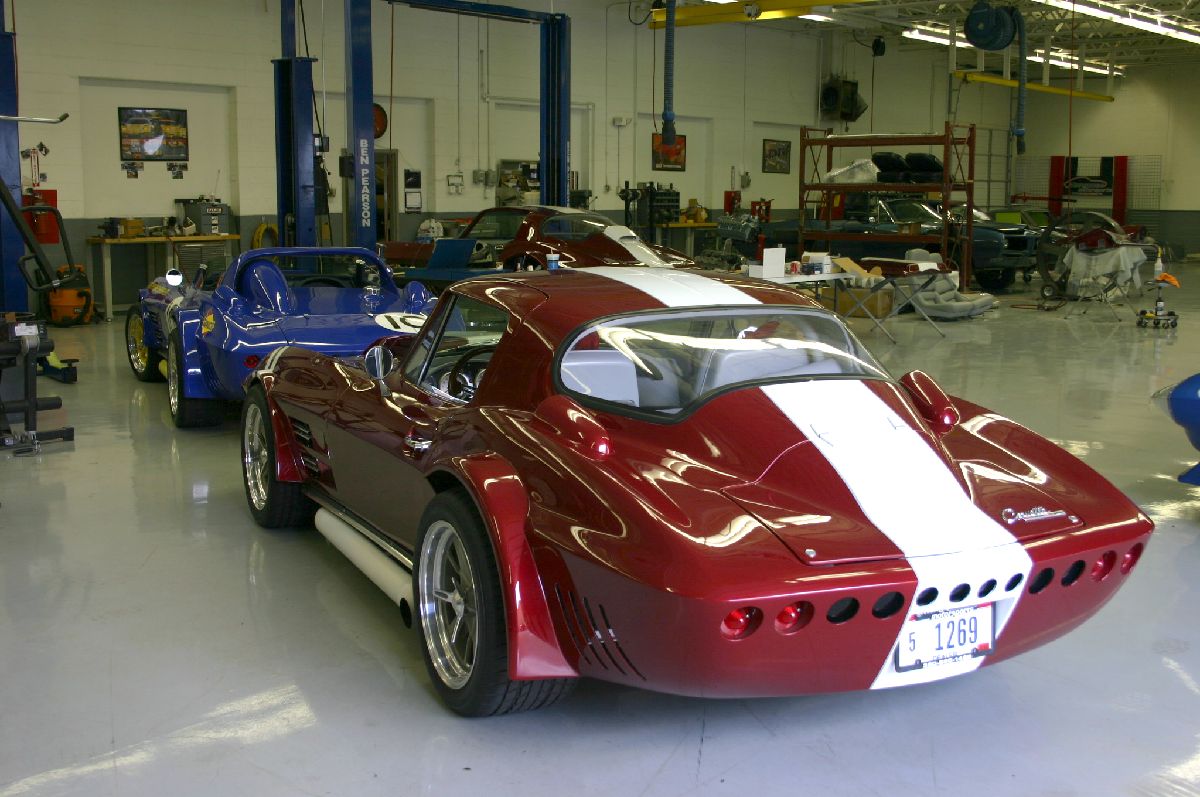
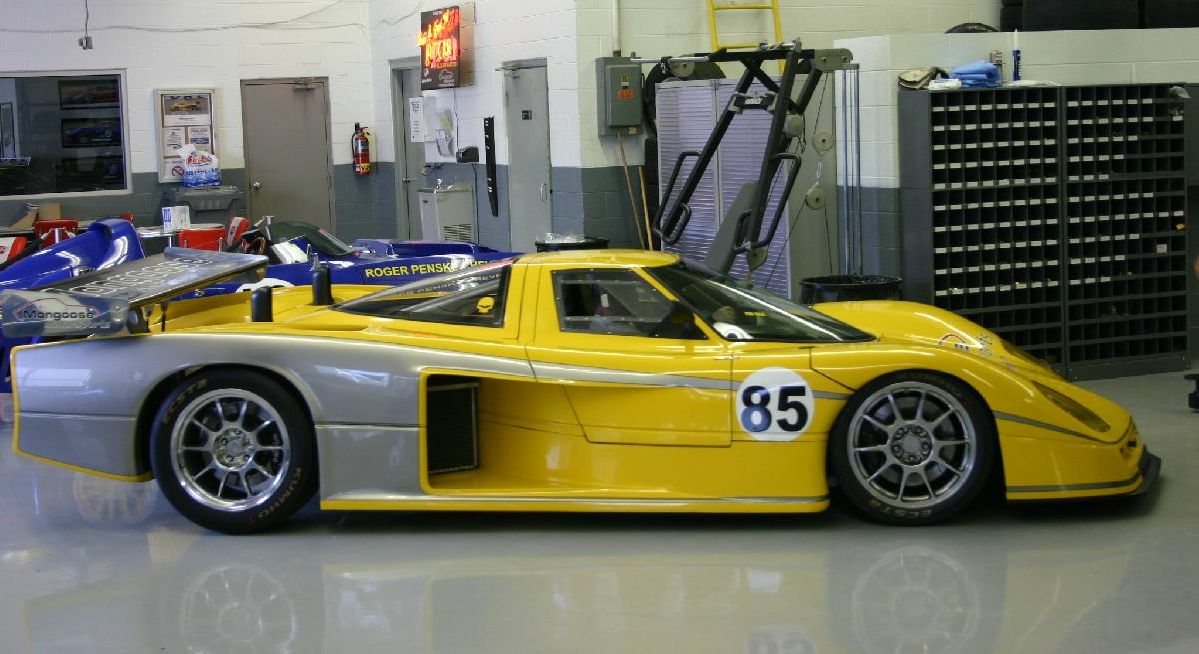
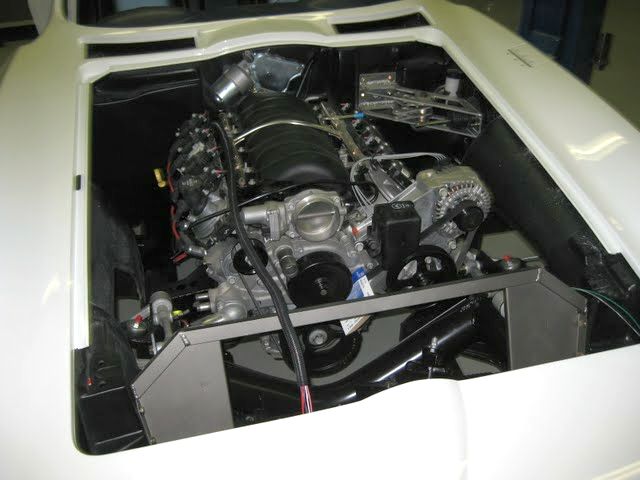
The cars in the pictures are powered by a variety of Chevy engine combinations. On the left we have a 450HP small-block, center a 502 GM crate engine, and on the right, a 400HP GM LS. The center and right-hand car have power windows and air conditioning with plush late-model Corvette seats. The left-hand car has a full cage and sticky tires for auto-crossing.
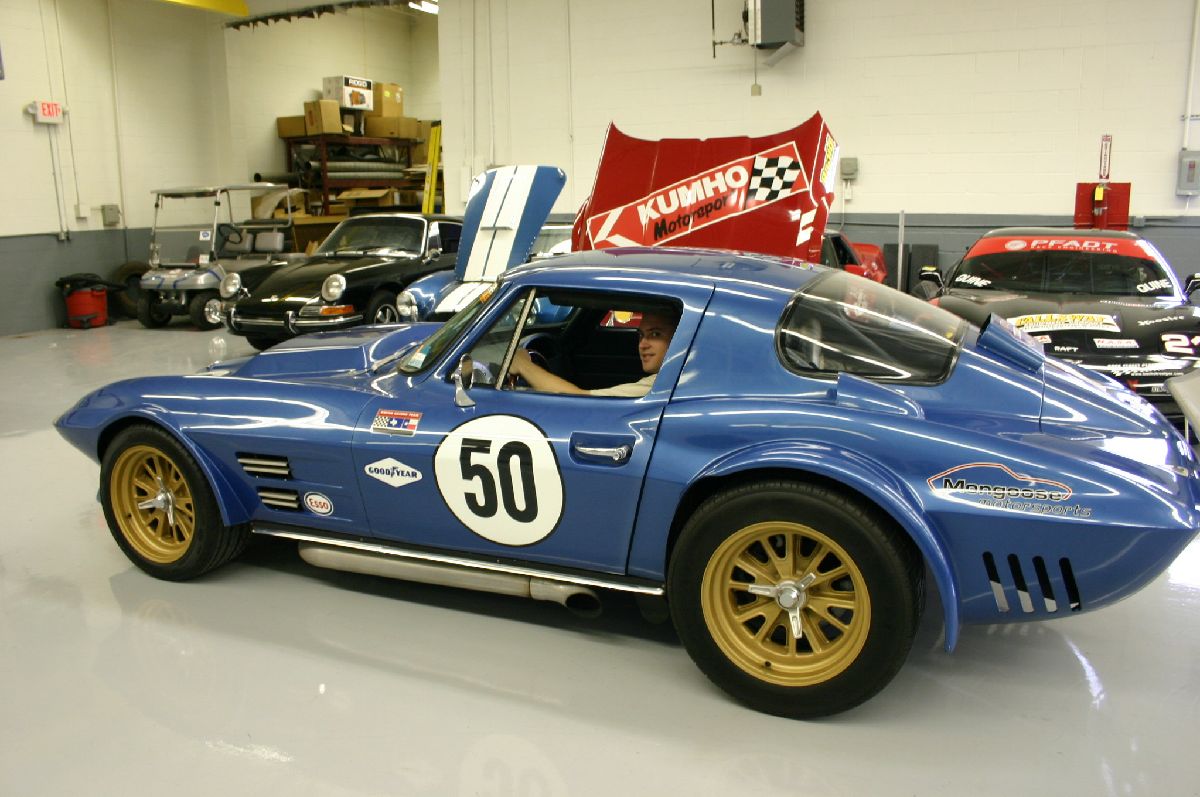
Under the "50" car's large hood scoop resides a 750HP high compression 400+ CID small-block and after my ride in the car, I can tell you that it hauls serious ass. With a weight of less than 2400 lbs, it has a serious power to weight ratio and it hooks hard. No mufflers also added to the sensation. This car was an absolute blast. As you can see, Dustin was really into day-dreaming during his "seat-time". Actually, we were all intoxicated with the cars.
All of us also went for drives in this LS-powered car, which has (only) 400HP. I think that all of use were genuinely amazed at the ride, grip, and handling of these cars. Not a squeak or a rattle in them and with this particular car with it's stock engine was faster than a new Z06 I'd been driving previously that day.
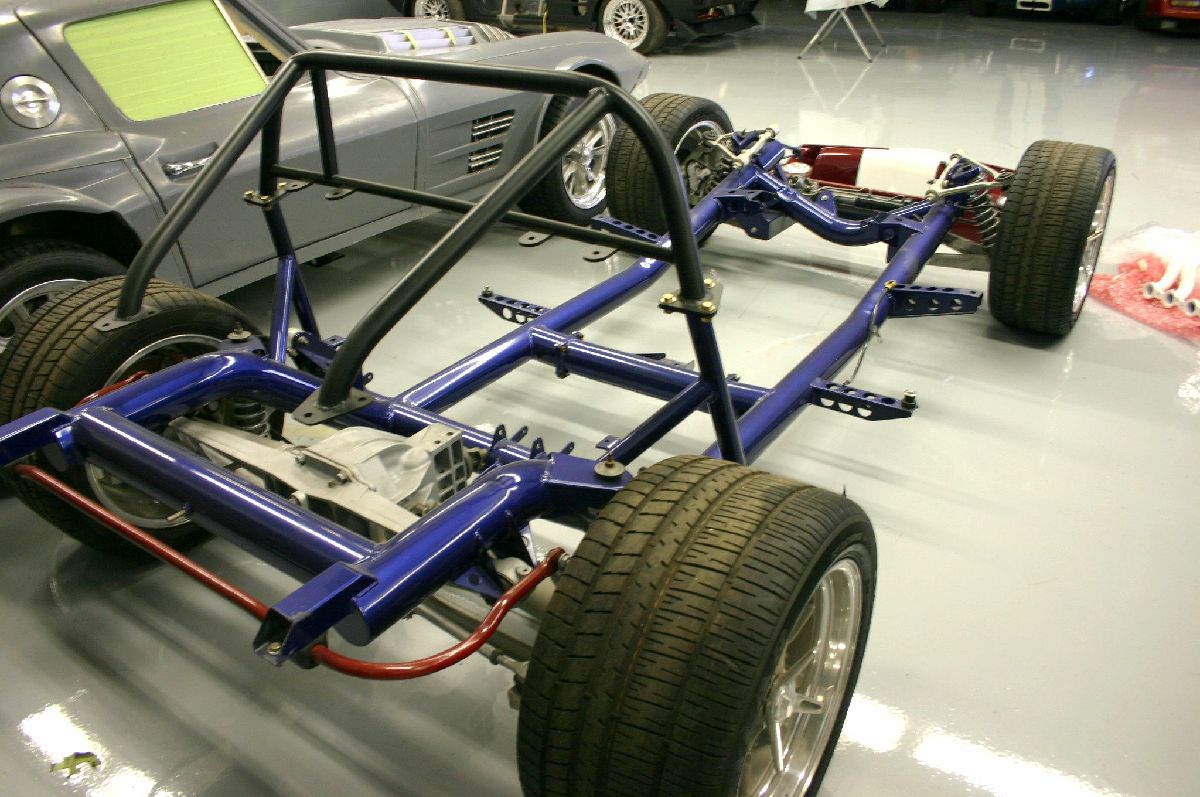
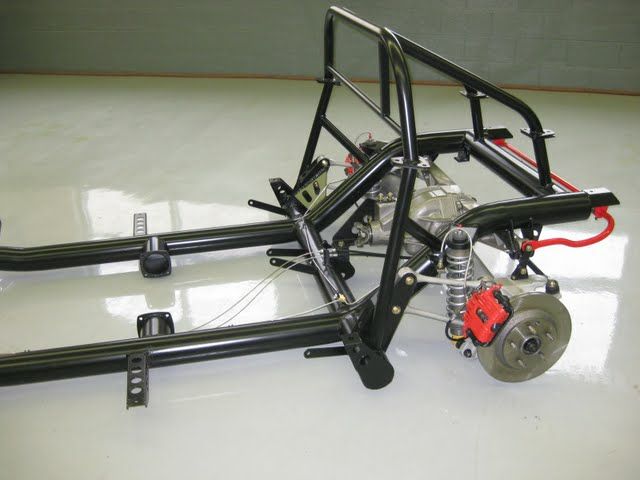
In the pictures above, you can see the simple 4" round-tube chassis that almost identical to that of the original Grand Sports that Chevrolet built. The Mongoose chassis if built from heaver-all tubing, and of course, rather than using the antiquated suspension of the original, it's outfitted for coil-overs and the C4 Corvette suspension, brakes, and power rack and pinion steering.
This car (four pictures above) runs a 502BB Chevy with a GM Ram Jet fuel injection system that all fits neatly under the louvered hood. As you can see, the car is in it's final days of preparation (wiring, etc) prior to delivery to a lucky customer in New York. Once again, you can see that the attention to detail at Mongoose is exceptional. This car was air-conditioned with power windows....and a stereo to boot!
Gary at Mongoose let us roam around the facility at will. I was particularly impressed with the fact that they build everything related to the cars in-house, so they have complete control of quality. They do all the metal fabrication, welding, fiberglass lay-up, body work, painting, and assembly in separate well-lighted areas. I was given a menu that allowed me to spec every detail from the chassis / roll bar / supports / suspension / brakes to the number of plies I wanted in the body. Having the ability to build a car that weighs, handles, and brakes exactly like I want using modern design componentry is important to me because I don't want a car that's so "original" that it incorporates the short-comings of the 1963 vintage cars.
I gave Mongoose a deposit to begin my ideal Grand Sport on the spot.
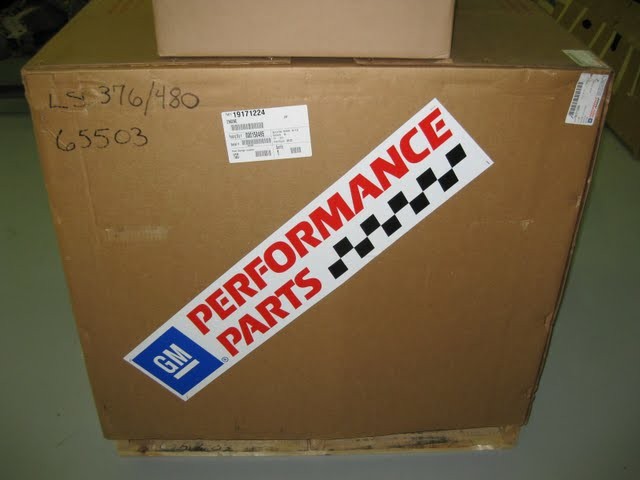
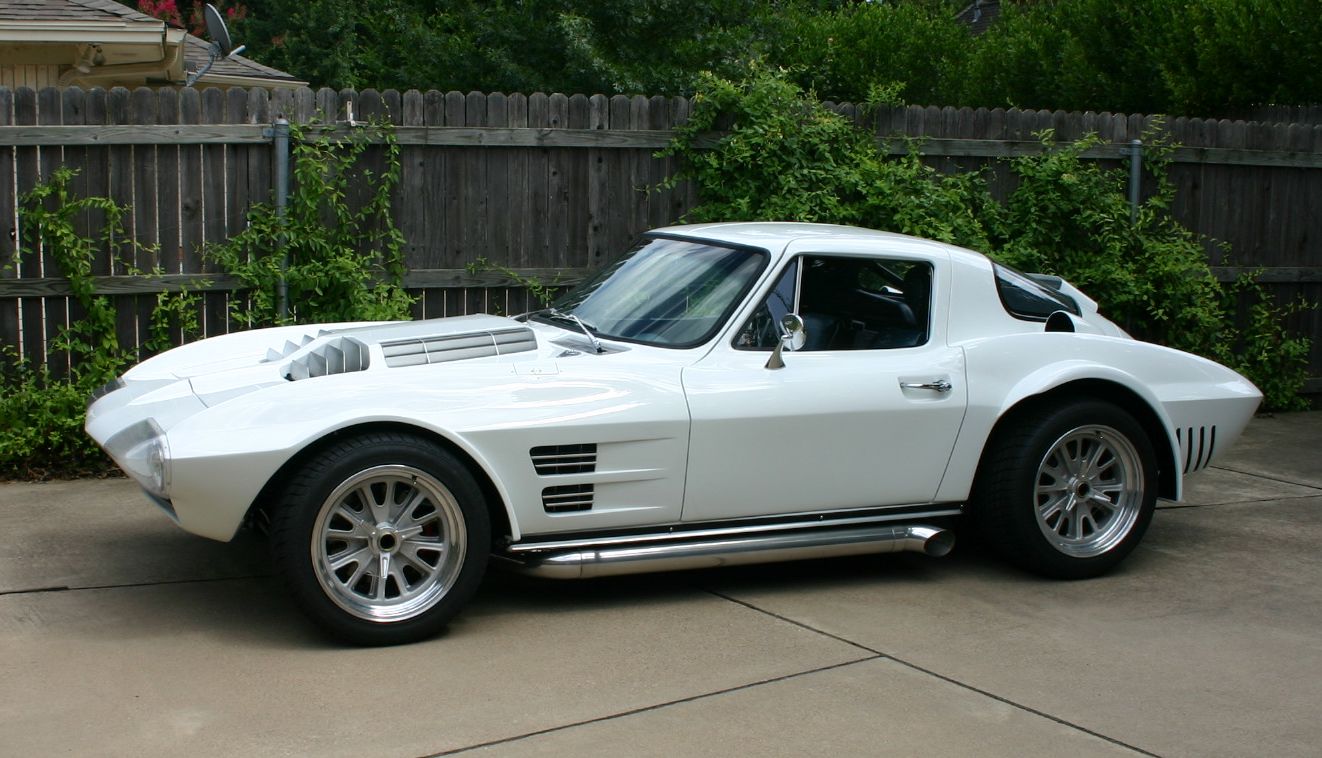
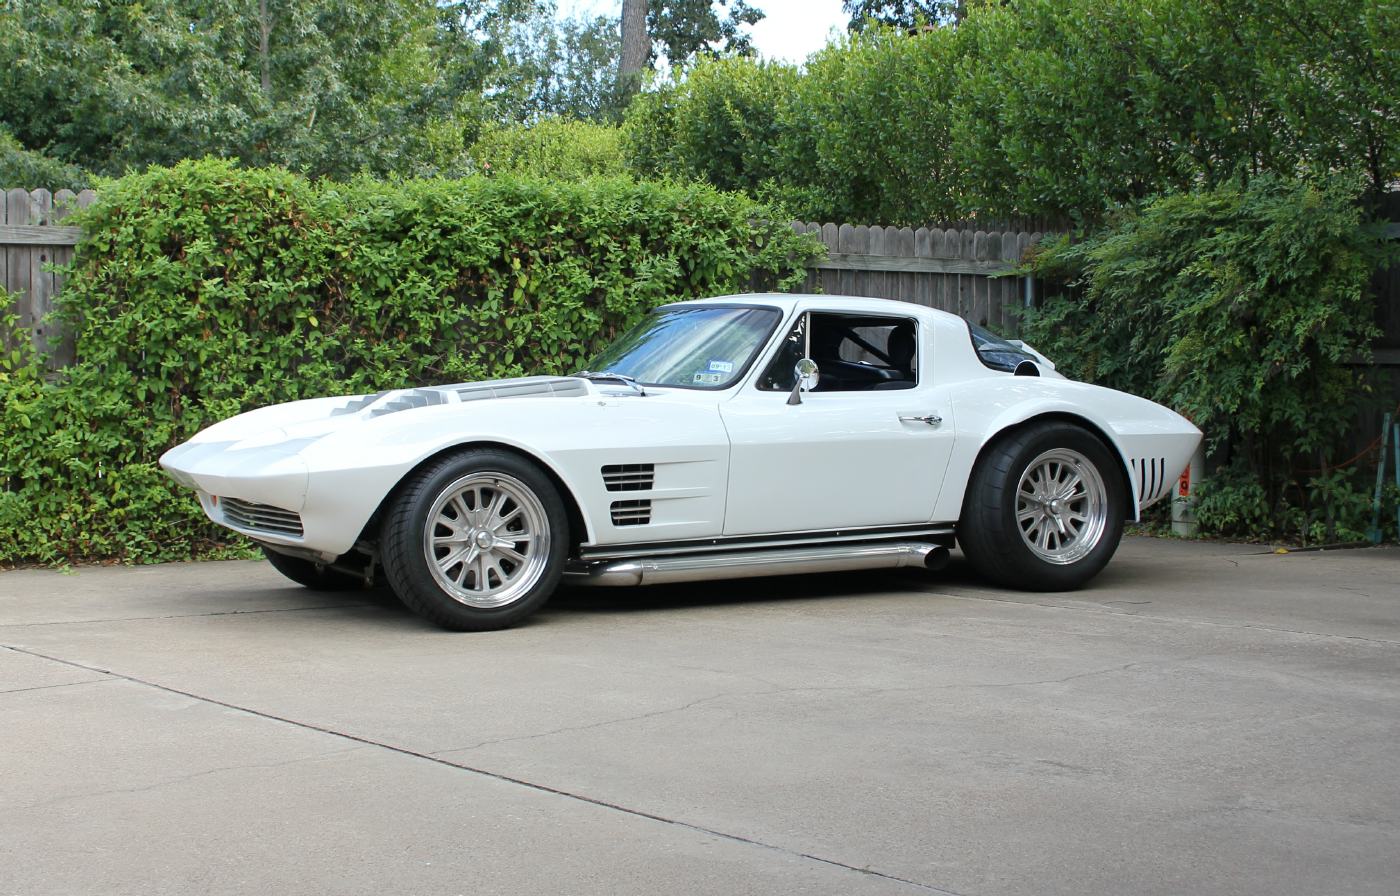
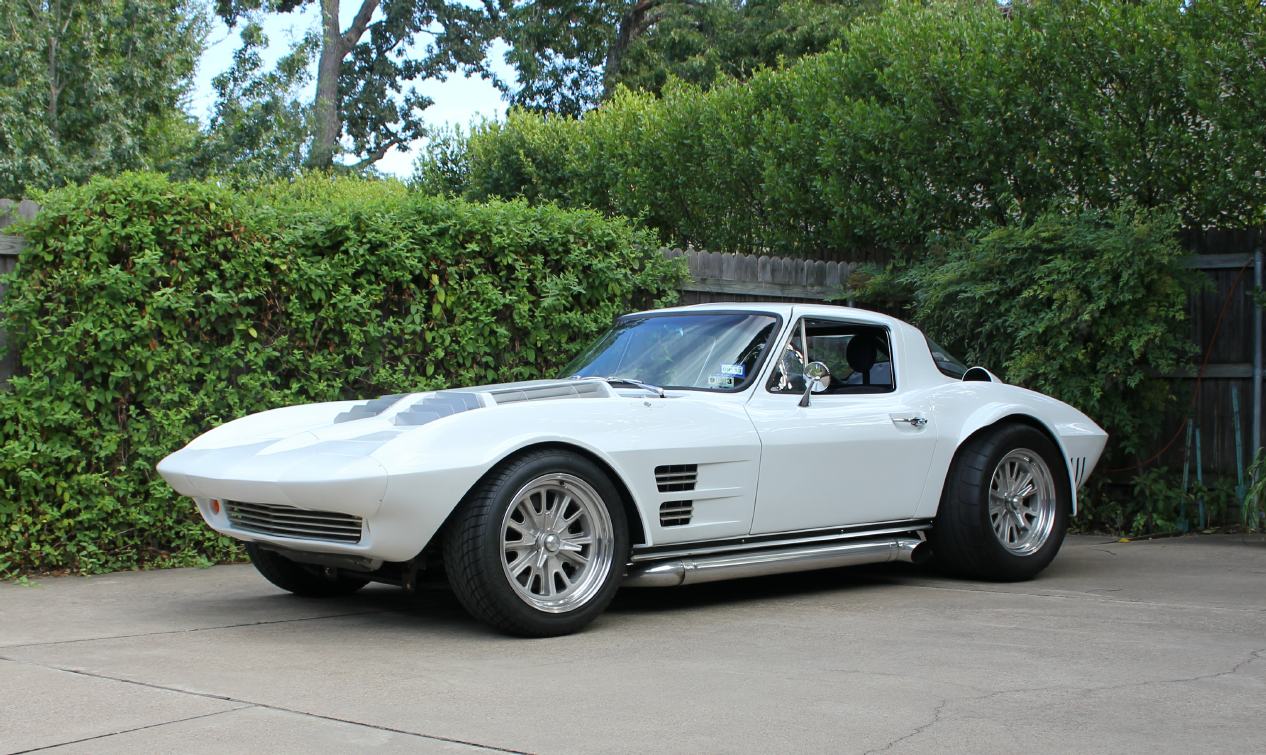
My car will be painted in the most functional color (for weight and heat)...solid white, which so happens to be the color of all the cars in my family. The chassis will be set-up for a late-model LS powerplant, which will be backed-up by a ClutchMasters clutch and flywheel, and finally a TKO600 5-speed gearbox. Rear end assembly will be all-aftermarket by Newman using 3.54-1 gears. While I intend to build a stroker engine using a Kinsler cross-ram FI manifold this winter, to get it going, I opted to buy a new GMPP LS3 with 480bhp out of the box. I also purchased the GM wiring harness, ECU, and accessory drive. This should net some fun while we're building the "killer" engine. Once the car arrives here in Fort Worth, we will set about building a set of headers and side-pipes that are true to the original's unique design. We will also be handling all the plumbing and final wiring here.
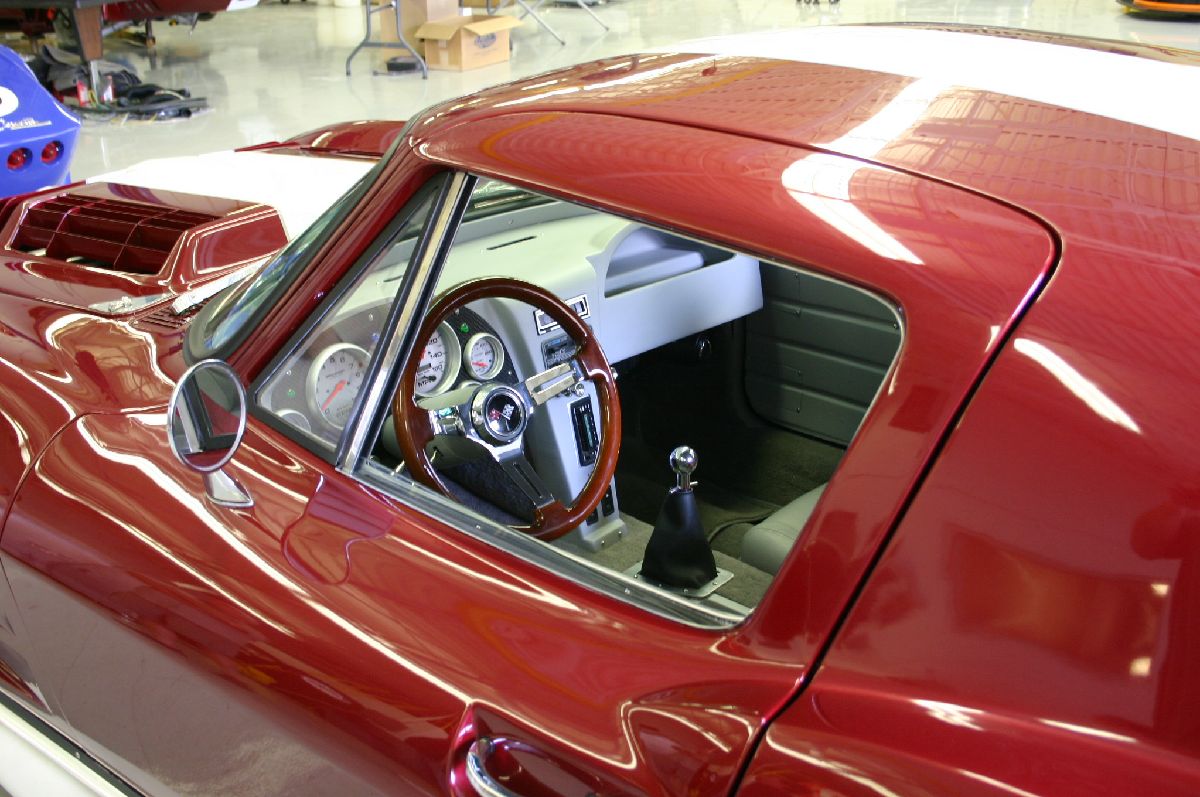
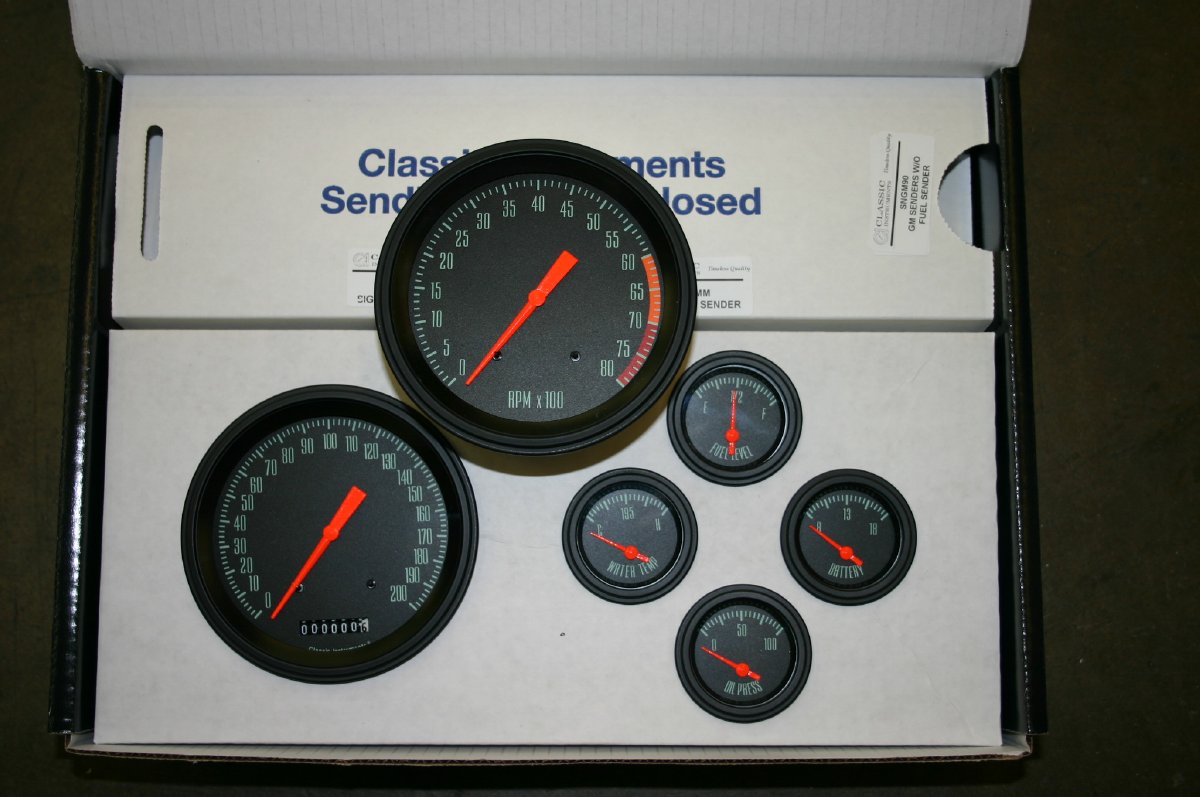
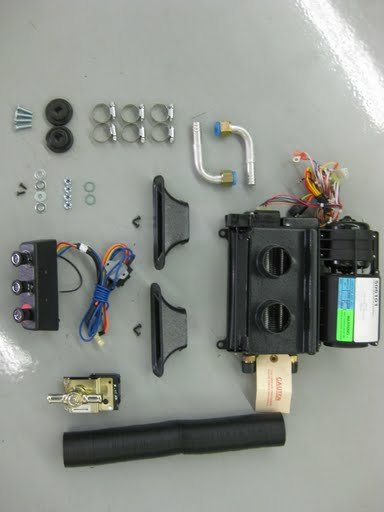
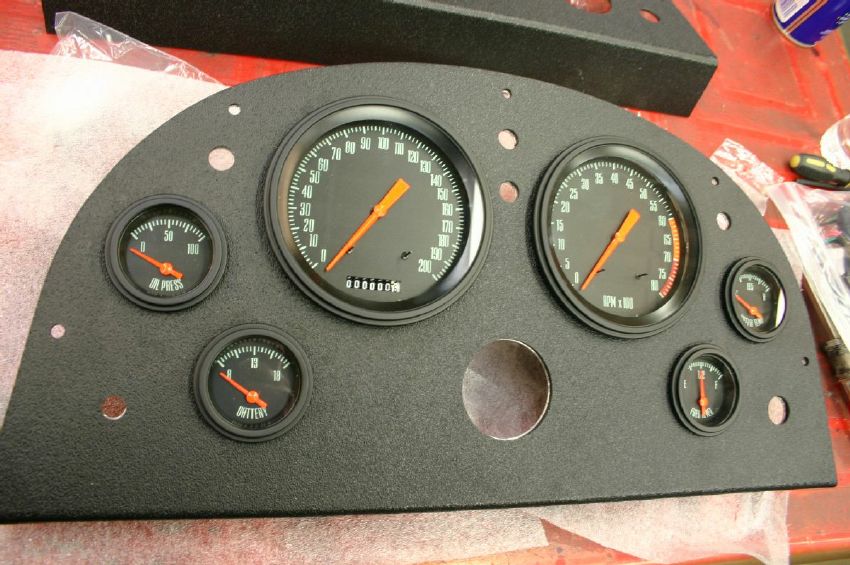
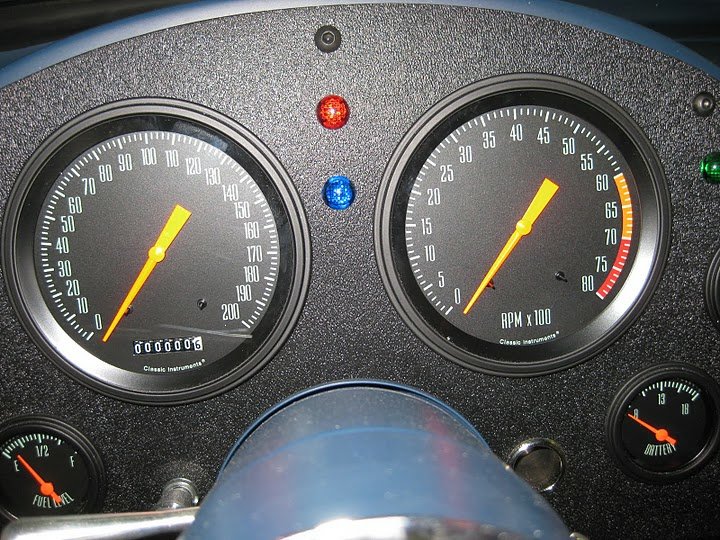
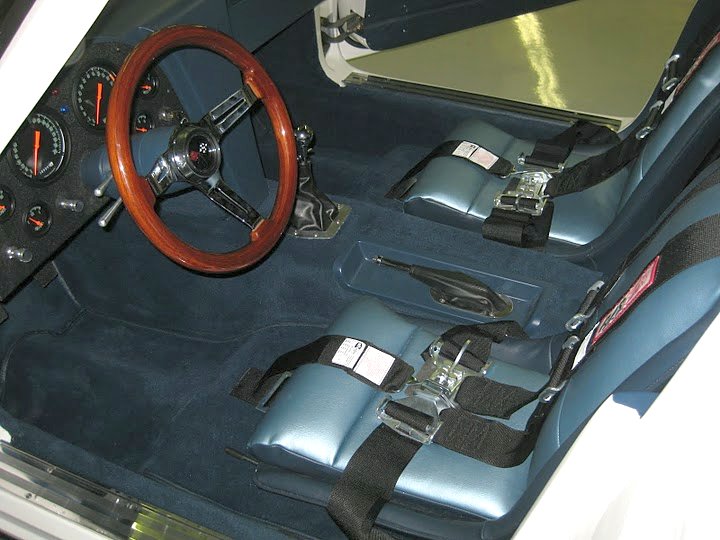
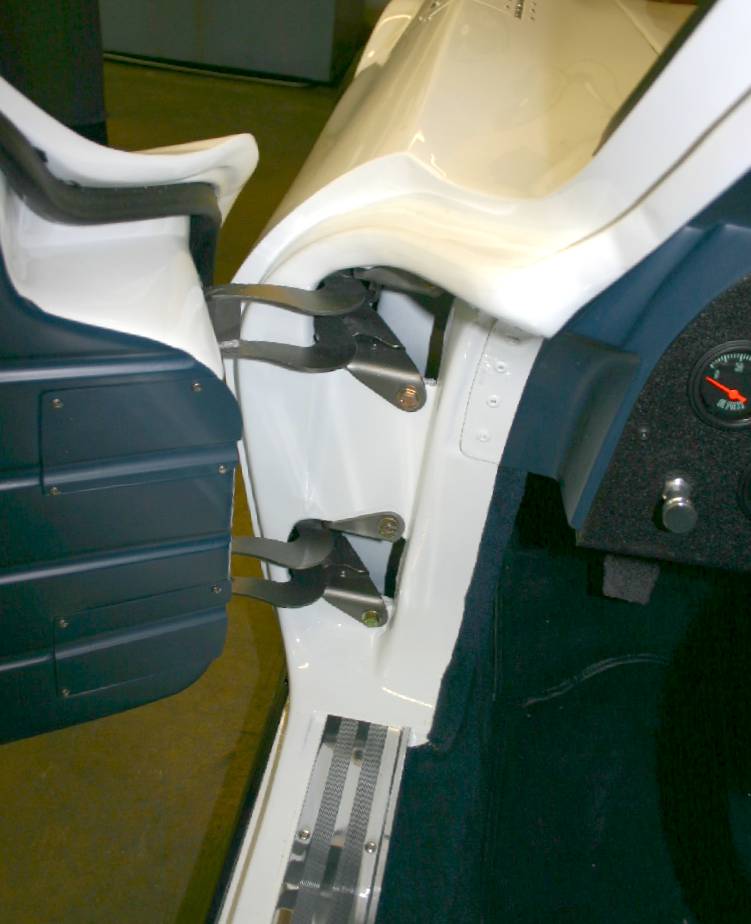
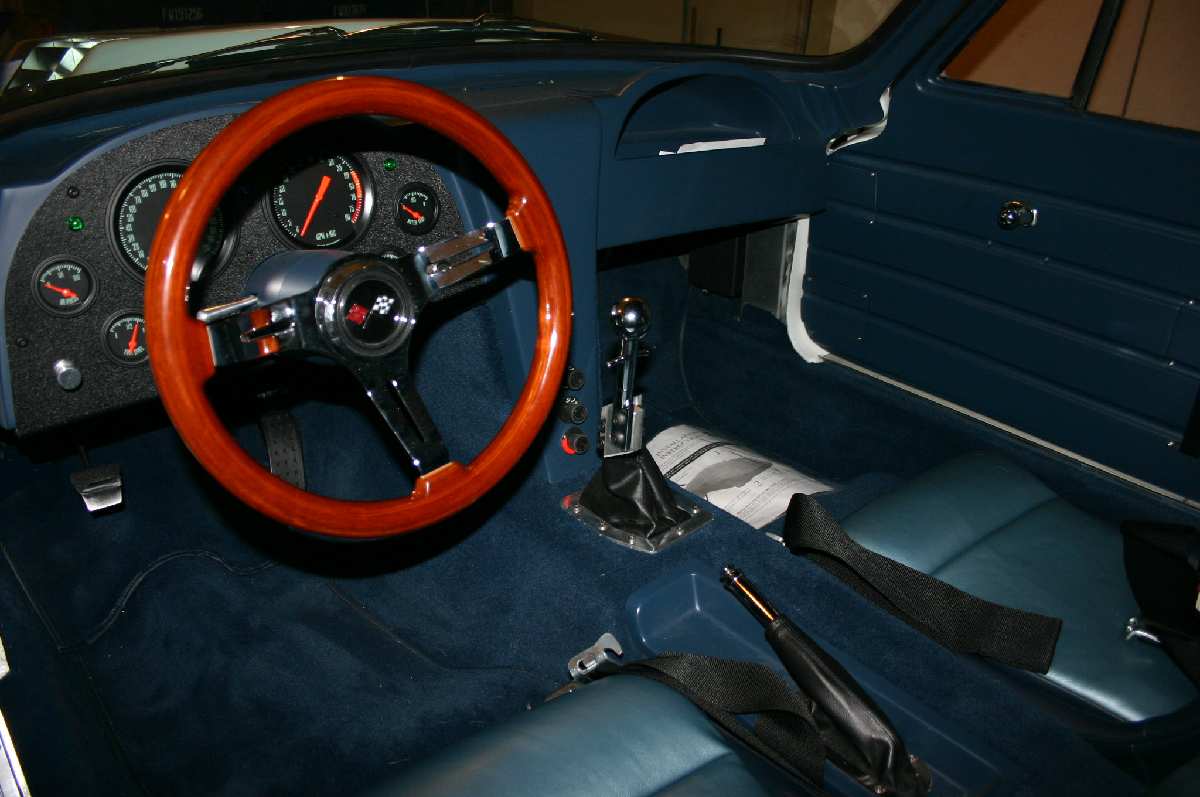
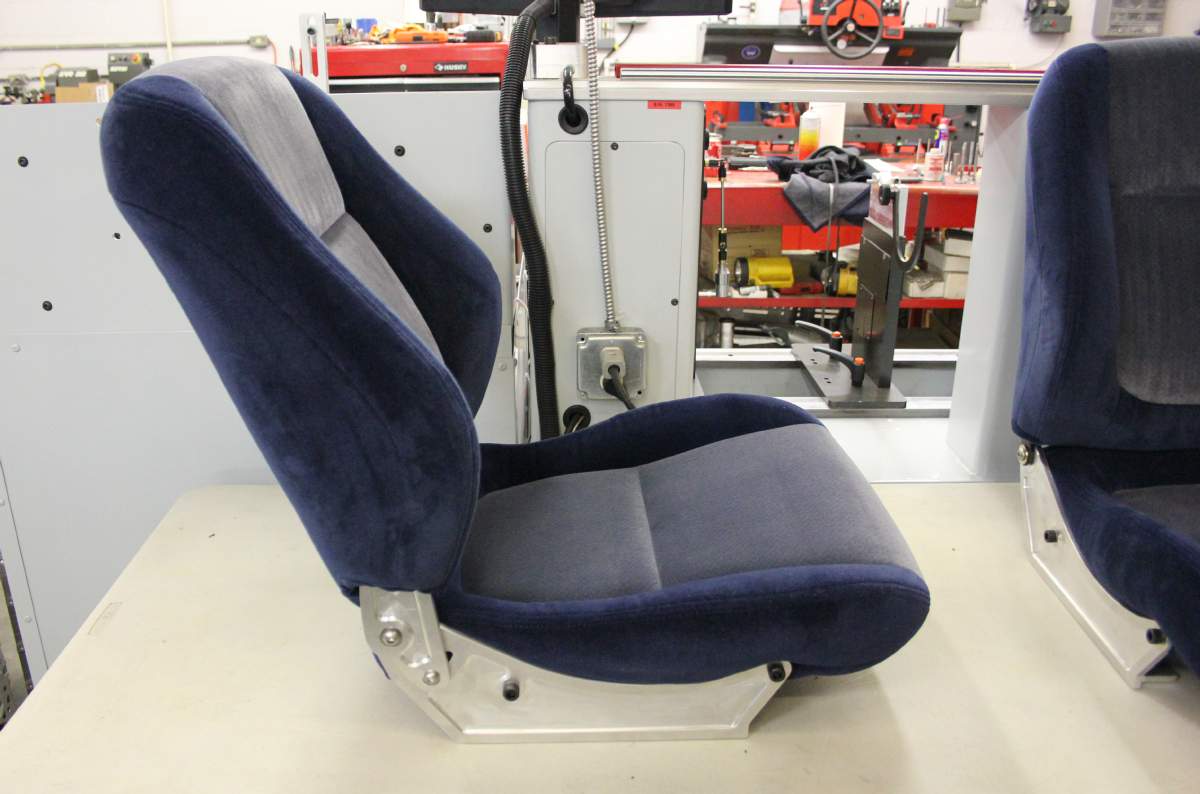
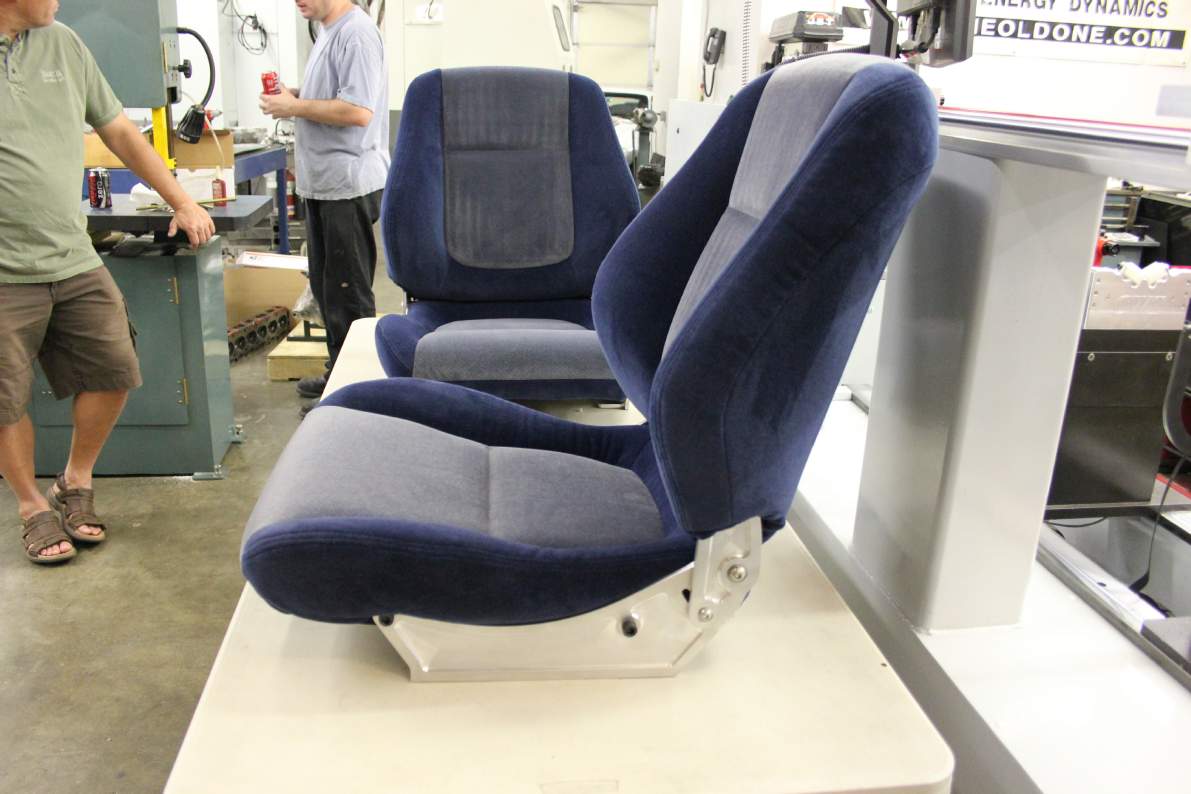
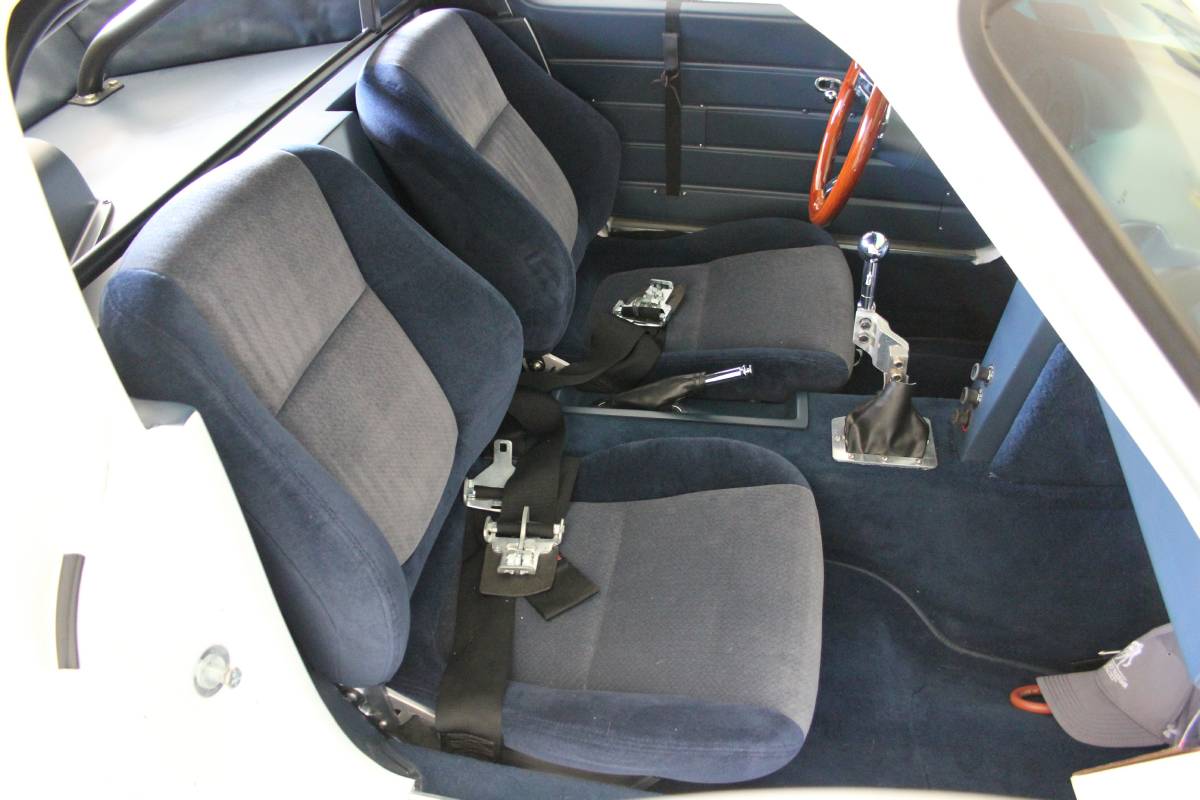
I have opted for a heater-defroster, but that's the car's sole amenity. Side glass will be Lexan with strap-up-down mechanisms. rear glass is also Lexan. Windshield is OE safety glass. The interior will replicate the original cars with the small two-tone blue seats. I'm having Classis Instruments make the 8K tachometer and the 200mph speedometer, as well as the other gauges. They are attempting to replicate the original cars gauges in layout and color. I really wanted the dash to have the OE look rather than the "aftermarket" look of Autometer gauges.
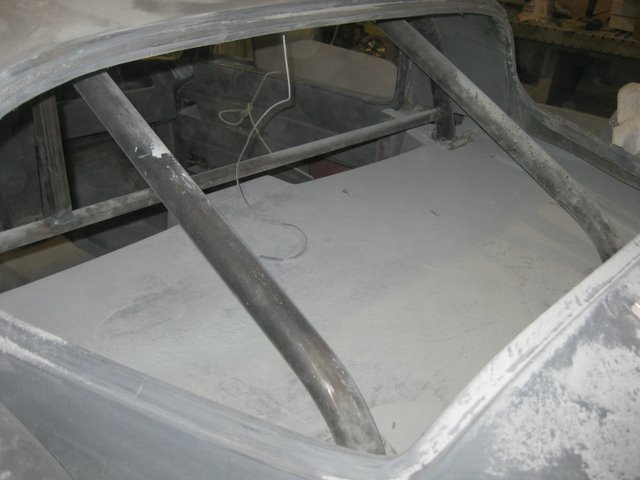
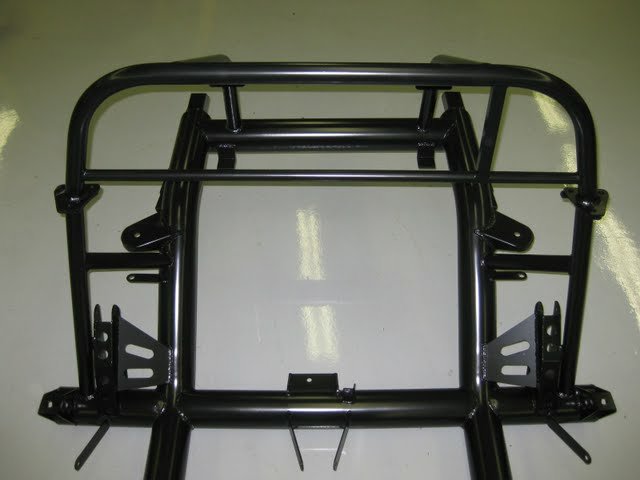
The chassis incorporates a roll bar that will have rear struts connecting it to the rear of the chassis. At some point in the future, I could add some more tubing, if I feel that chassis flex is an issue. We're doing the chassis in black semi-gloss, and since I have opted not to use the ugly front spoiler (the original cars didn't have one), the aluminum lower control arms in front will also be black so they aren't as noticeable. If I feel that a spoiler is necessary, I'll fabricate a simple flat one that will look more period correct on the car. Aero front-end lift was a big issue on the original cars, however, while I may get to 150mph in a hurry, I seriously doubt that I'll ever want to go faster.
The top picture is of the Mongoose Chevy LS powered GTP street-legal racer. In the lower picture you can see the combination tube/carbon monoque chassis It's an incredibly fast street car, however, it's ride height and long nose overhang would make it impossible for me to drive to work every day (the roads I travel are full of abrupt dips, and even my Civic has to be brought to a complete halt in a specific lane to avoid killing my traction bar pivots and header up-front). If Endyn was located in a less-industrial neighborhood, things would be a lot easier, and there's no question that the rush-quotient from driving the GTP far exceeds that of the GS. Light weight combined with a killer CG makes for a really fast car that's also easy to drive.
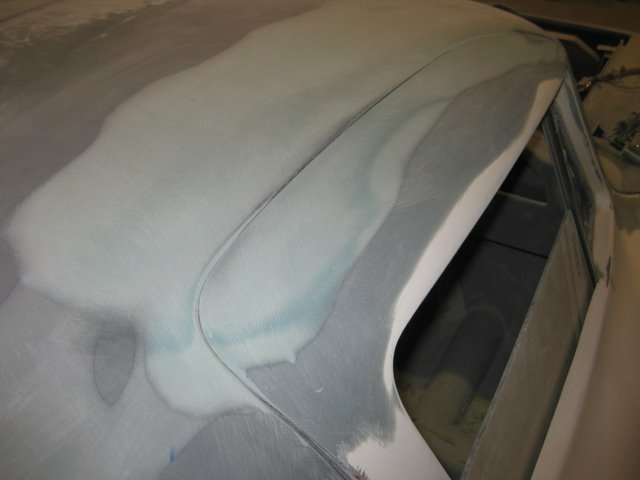
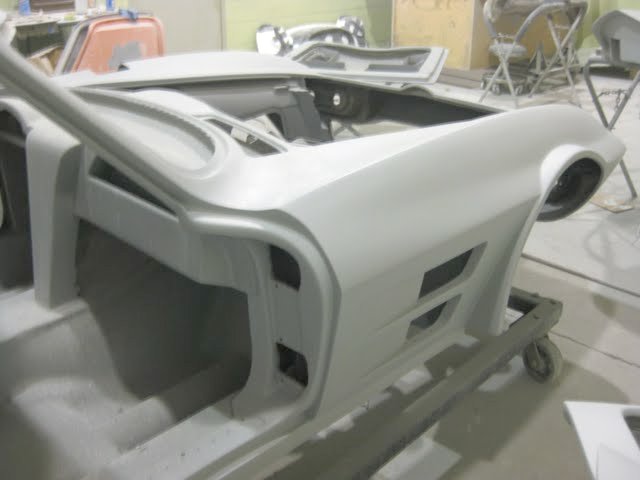
The pictures above were taken in the body-finishing area of the facility. The black roadster's body is nearing completion. The white coupe is preparing to have the body seams blended prior to final preparation for paint. Mongoose has a huge sealed EPA-legal paint booth near this final body preparation area. After seeing all the facilities they have available, and the immaculate show-quality body and paint work on their cars, we all quickly decided that we would not attempt to do any of this work after the car arrives in Fort Worth. The body for my car is being produced from all-new tooling that makes the parting seams almost non-existent compared to bodies from the older tooling (see the white car above left),
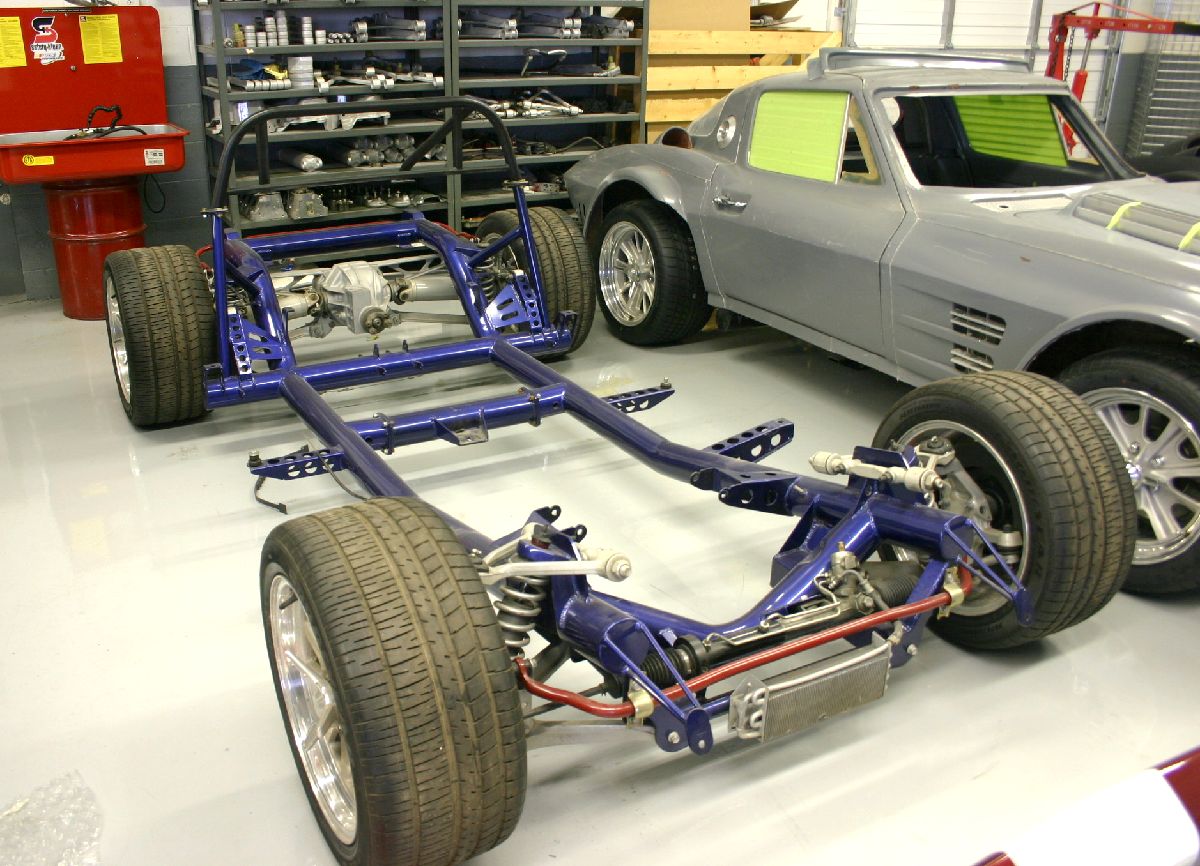
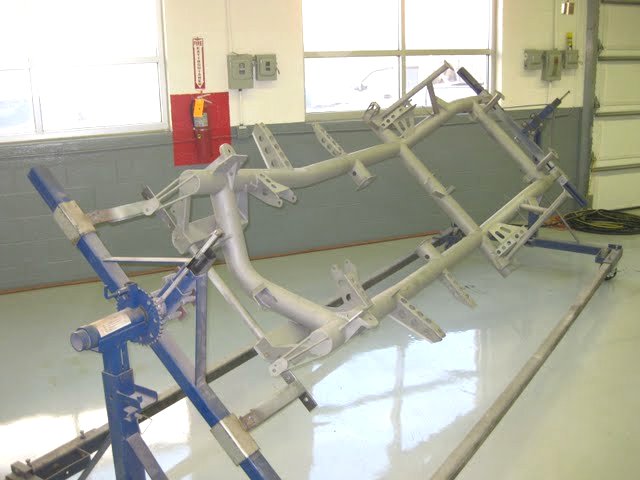
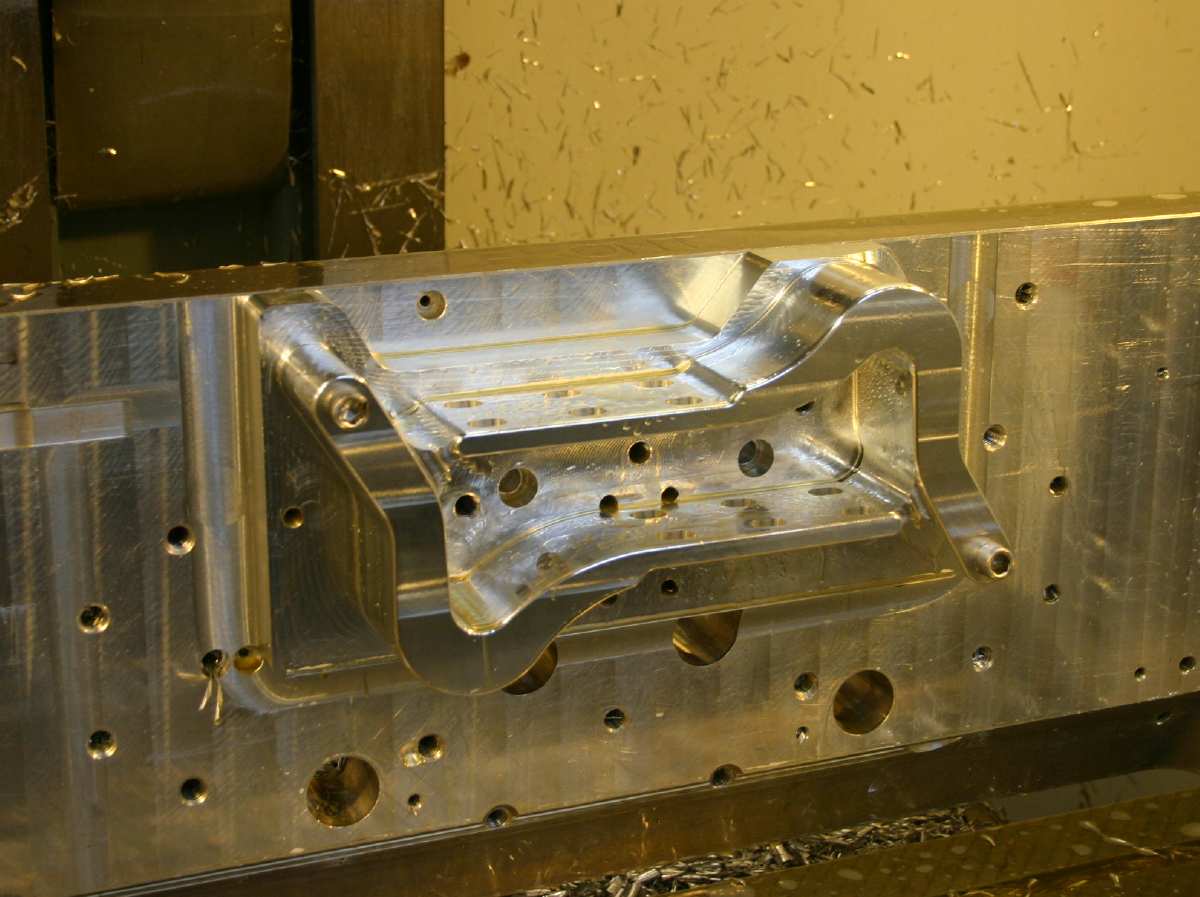
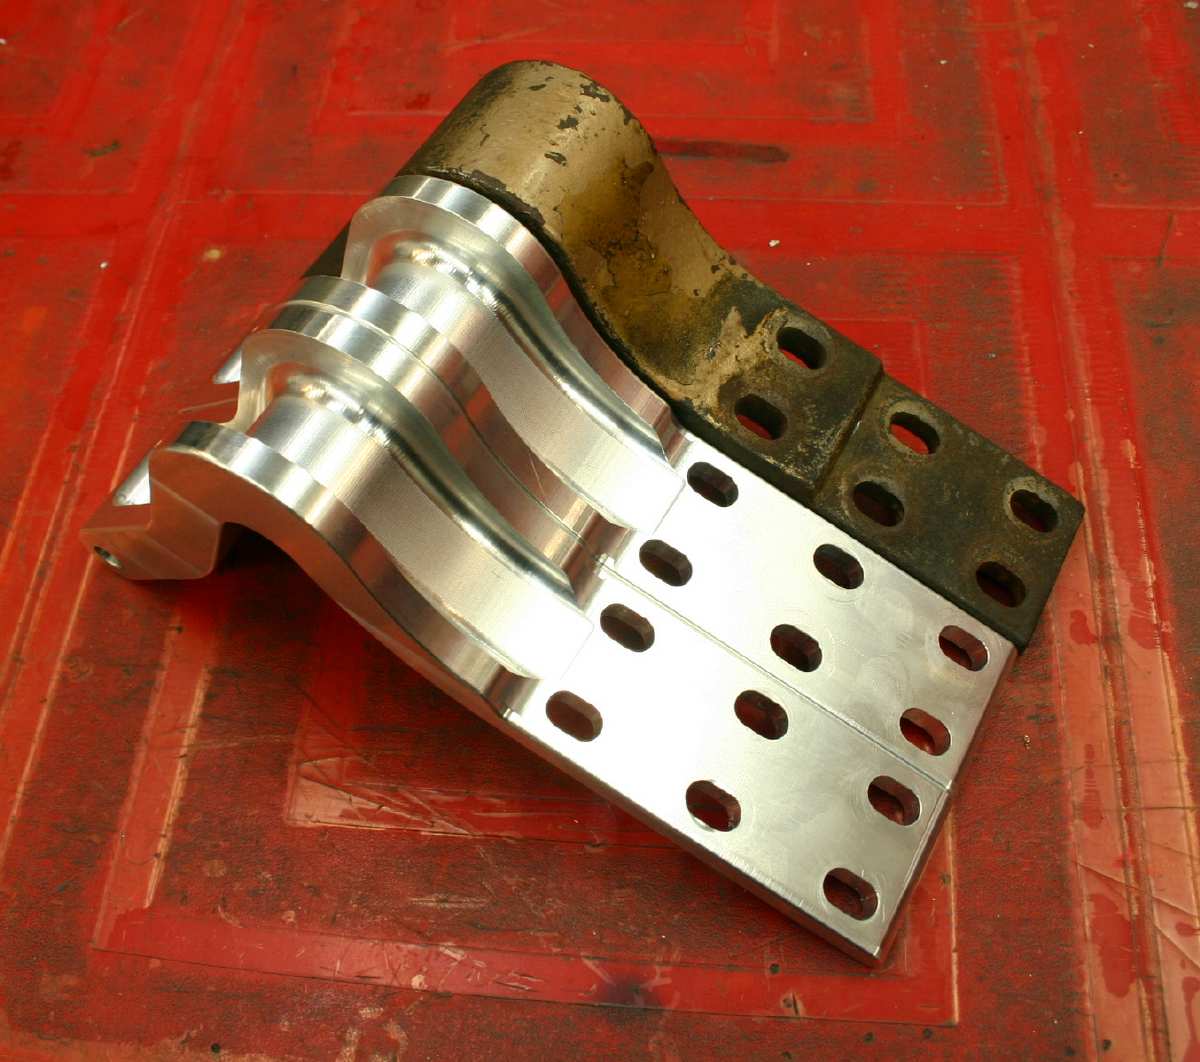
Here's a picture of the chassis for my car. At this point, it has been fully welded and removed from the extensive jig and fixturing Mongoose uses to insure perfect alignment of the tubes and suspension pick-up points. Note the lightening holes a-la the originals, and the incorporation of a flanged cross-member to facilitate transmission removal from beneath the car.
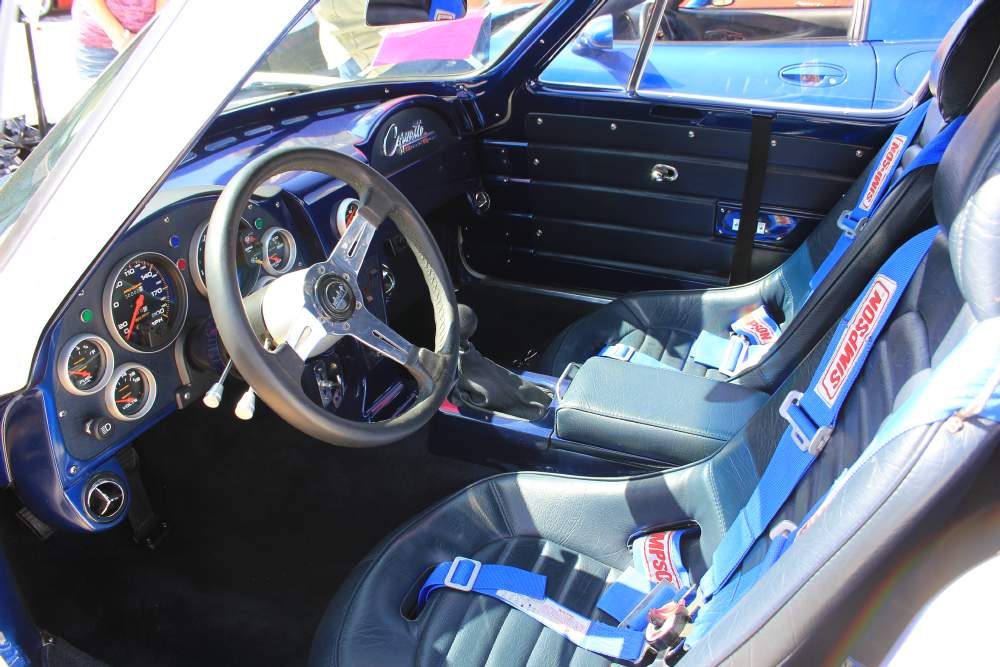
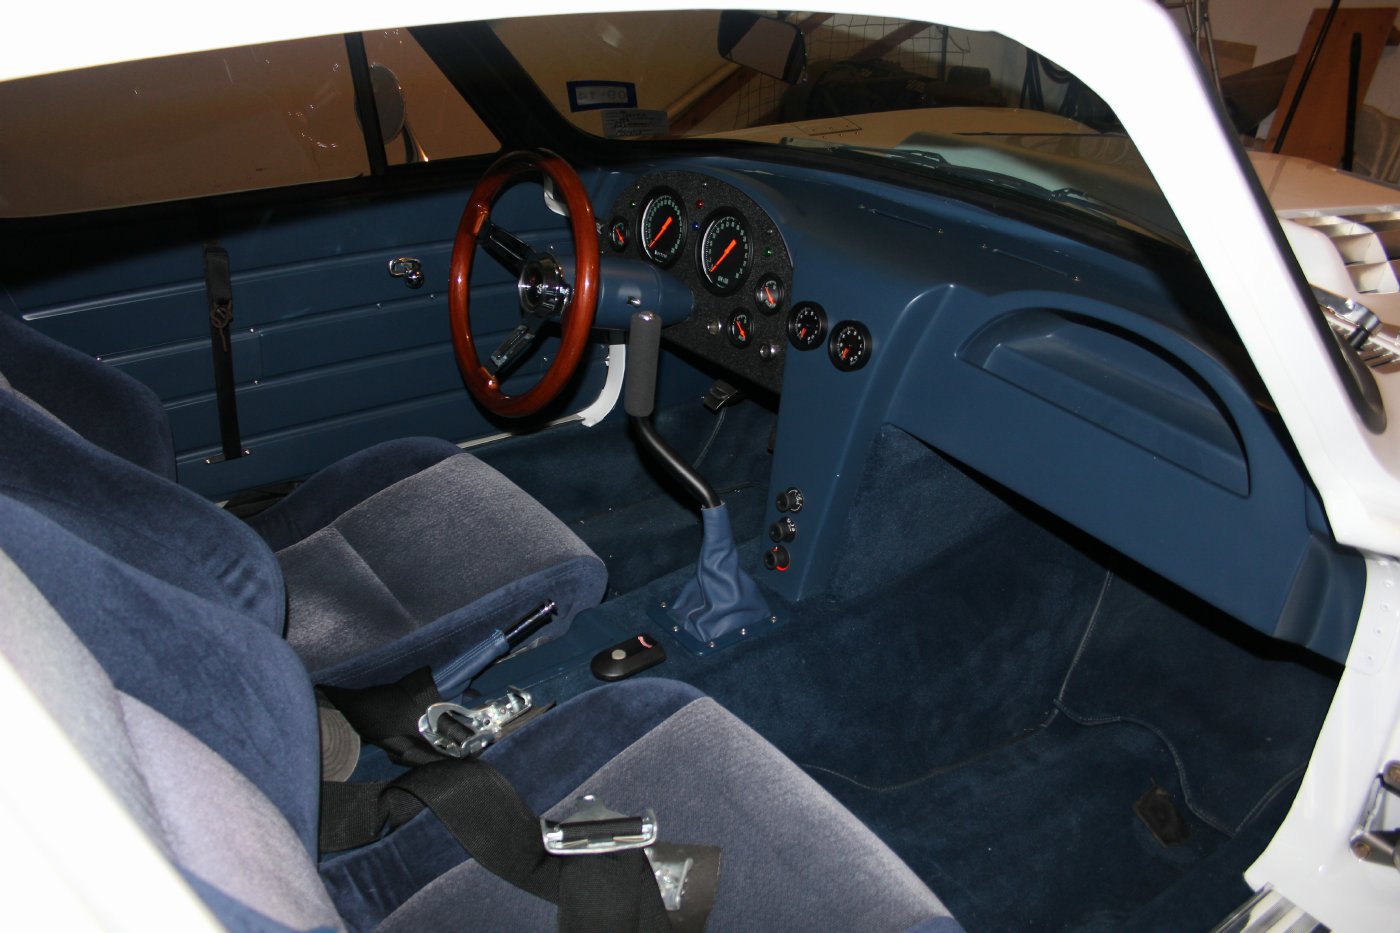
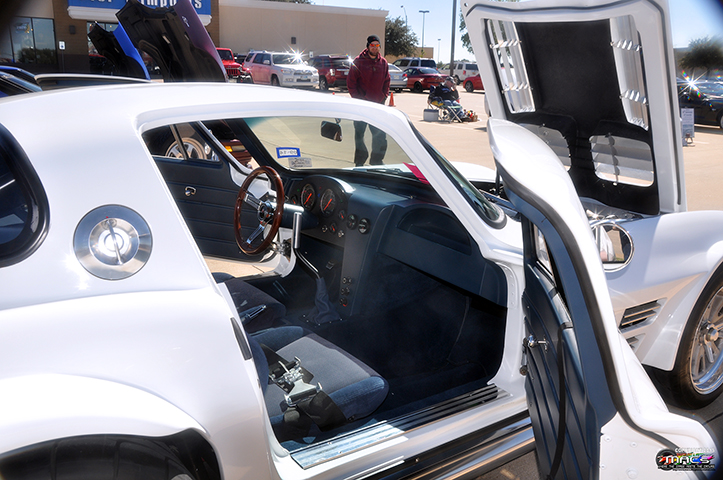
The interior in my car will be as close a possible to what you see in a real (restored) car below.
Classic Instruments is working to duplicate the face-look of the Chevy gauges, including the 200 MPH speedometer using their All American series 5" tach & 5" speedometer and 2.125" cluster gauges. The speedometer will be colored the same as the OE, but it will read to 8000 RPM. All things considered, the interiors had a surprisingly stock appearance.
Latest Construction Pictures from Mongoose Motorsports

As you can see in the series of pictures above, the main body sections are coming out of the molds. Note that the parting seams left in the body by the mold sections are very small, necessitating a lot less body work.

And the cars first engine has also arrived. Mongoose will install the engine and transmission prior to dropping the body on the chassis. As I have more updates, I will post them, We're all expecting delivery of the car here in Texas sometime in the middle of October.
As I receive more information and when more pictures are available, I'll update this article. In the meantime, I'm doing my best to concentrate on my real job!
10-16-09 Update
I just received the instruments that Classic Instruments ( http://classicinstruments.com) custom-made for me. We went back and forth on the artwork a couple times, but they really nailed the look I wanted. See below:
And it's now November 14, and I have new pictures of the body in preparation for paint.
. 
As can be seen above, the body and floor-pan have been assembled on this fixture assuring proper alignment.
After the various pieces are permanently joined, the process of getting the body ready for paint has begun. The following pictures show the labor-intensive preparation involved.
Above you can see the underside of the hood and it's bracing. At right the door to body fitting is nearly complete. Looks like a closer gap than the production car had!
The rear struts for the roll bar that I opted for are clearly visible. As with the main hoop, flange plates are used to connect the struts to those rising from the ends of the main frame members. This allows me the option of removing the body from the chassis in the future.
Bodywork, including that of the firewall is nearing completion and the various pieces like the radiator core support bulkhead are being fitted.
November 20 Update:
Above and below left, the crew at Mongoose has done the final primer and are in the process of block-sanding prior to sealing the surface before painting.
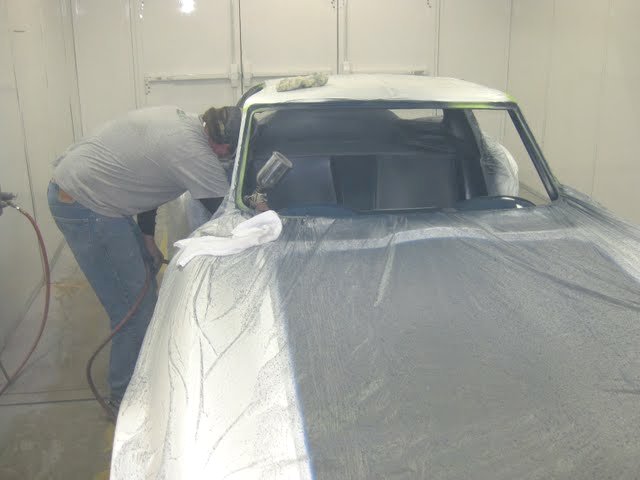
Painting the Car White
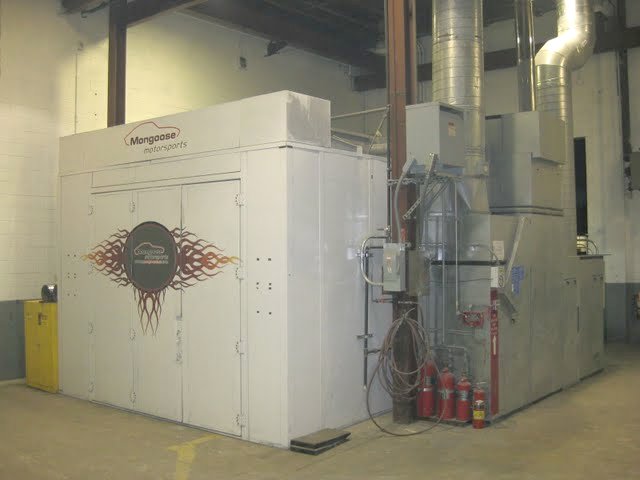
The paint booth at Mongoose Motorsports is no small or simple affair. It's air filtration and heating system are state-of-the-art. The overall size of the Mongoose facility is also apparent in this picture.
In the pictures below, you can see that the sealer has been sprayed on the body.
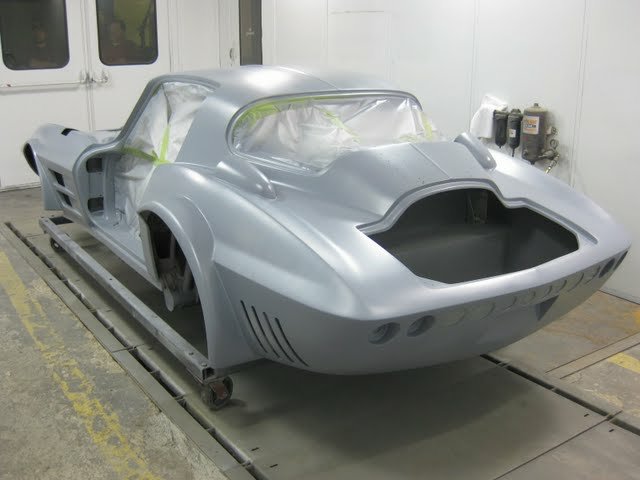
And below, you can see the car during and after being sprayed white.


And finally, the clear-coat has been applied below.
![]()
![]()
![]()
![]()
![]()
![]()
![]()
![]()
![]()
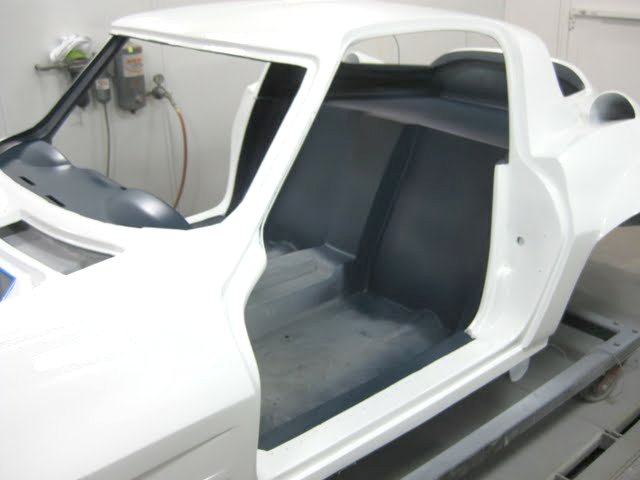
Gary tells me that this is the first solid white car they have done, and that you need sun glasses to look at it..... While the color is just Chevrolet Polar White, it does get your attention (above right).
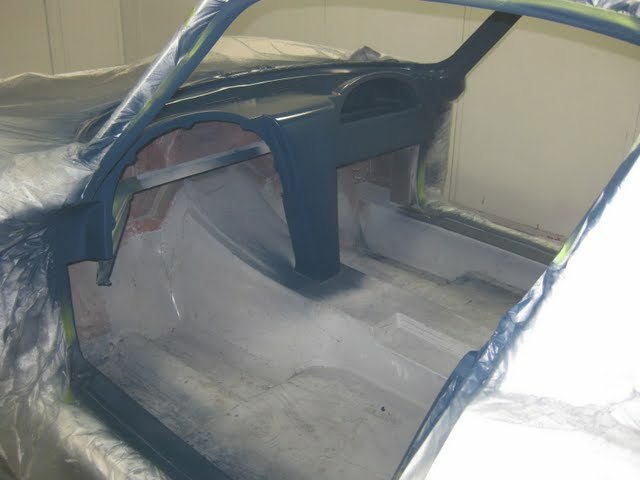

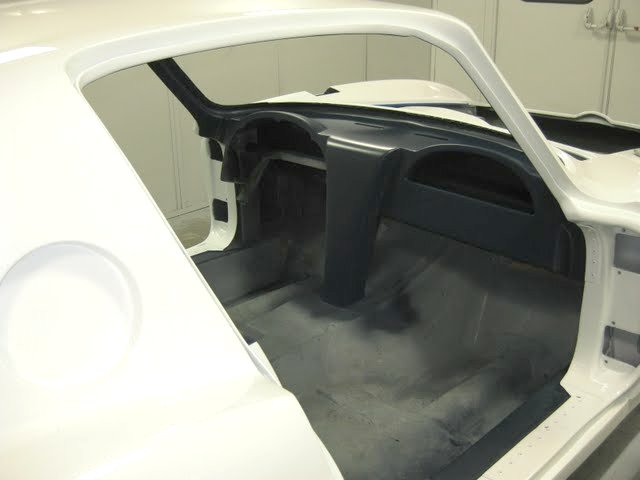
The body has been masked for application of the blue interior color. This is the same shade of blue that was used in the interior of the #50 car on display at Mongoose. With the quality of work these guys do, I never for a moment entertained thoughts of having the car painted locally.
It's 11-23-09, and they've lifted the body off the dolly it was painted on to access the underside for painting (below).
After the paint has set-up, the car is once again placed on a dolly and taken to the assembly area where it'll be mated to the chassis (below).
From what I'm seeing, I feel like my decision to do the car in white was a good one. I think it's absolutely beautiful....
Update 12-05-09
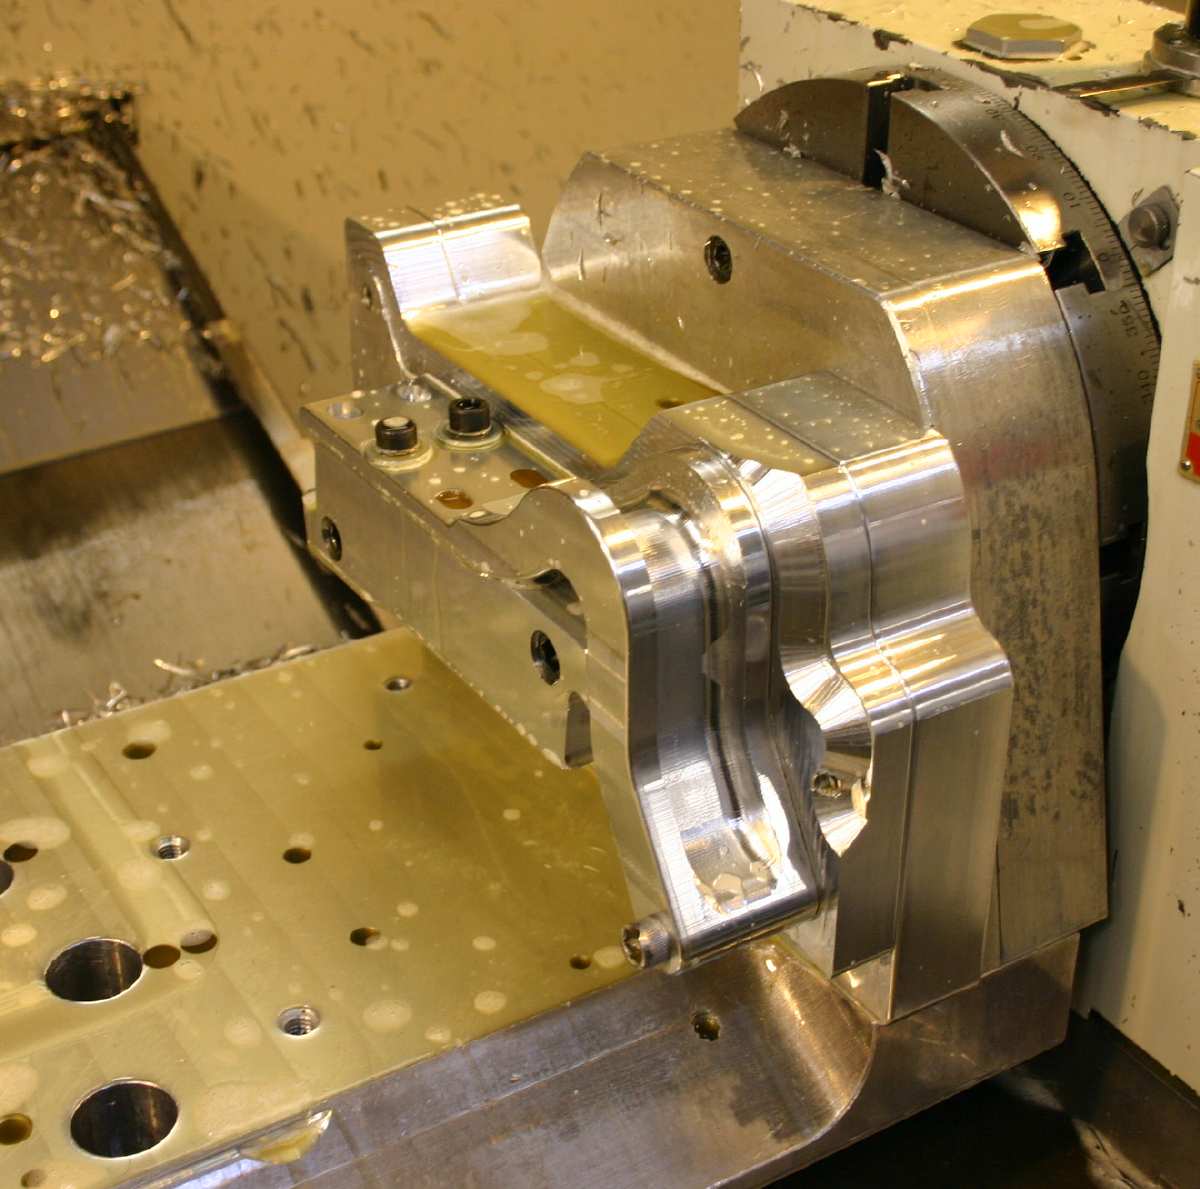
In the four pictures above, you can see the chassis after media blasting. In the lower right-hand pic, the chassis has been attached to a rotisserie for painting.
In the paint booth, and out off the rotisserie, the chassis looks great in the semi-gloss black finish I specified.
Almost hate to cover that up with a body!
Another front view. Heater/defroster set-up to the left.
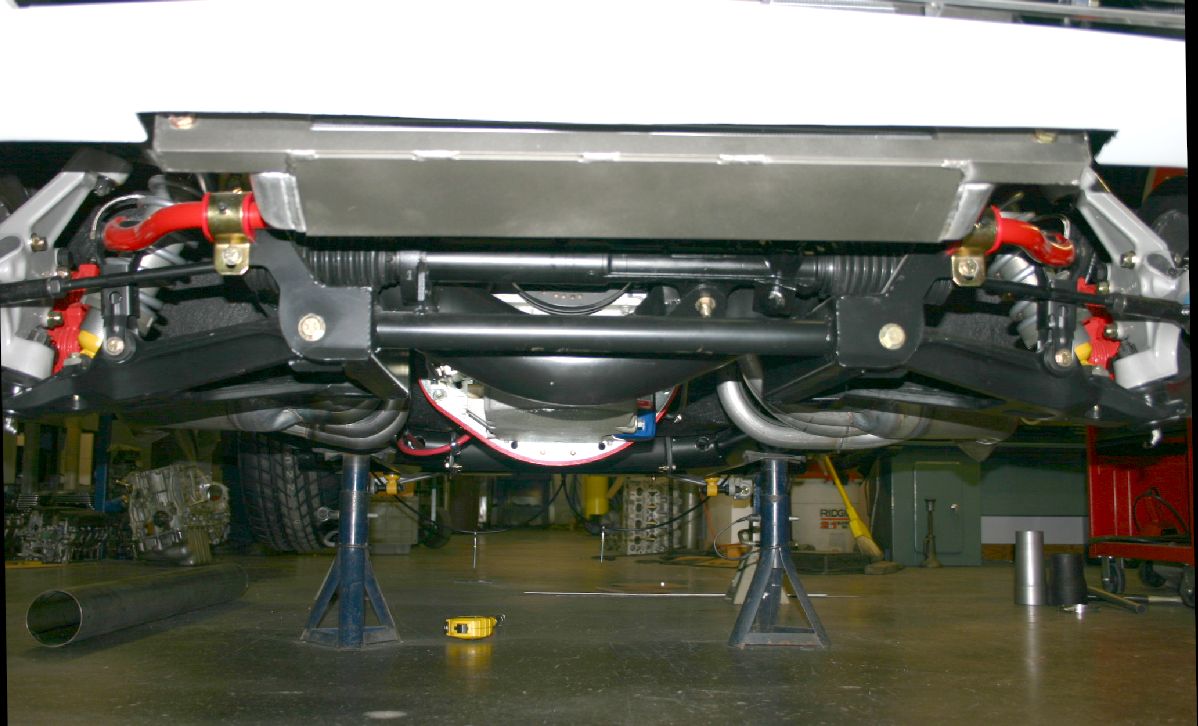
Suspension mounted on painted chassis with up-close front suspension at the left. Note, I requested the lower A-arms be painted black to minimize their visibility.

Rear-end and suspension assembly mounted to the chassis and view of the chassis from below.
Things are really beginning to go together at Mongoose. I shipped the instrument cluster we built to them today. They will have it Monday, and I suspect next week will see everything really going together.
12-08-09 Update
Above you can see the ABS plate I used to mount the instrument cluster. I think it looks better than flat painted aluminum. We also put a 90° bend at the bottom for additional rigidity.
No explanation necessary for the pictures above.
The level of detail Mongoose puts into their cars is simply outstanding.
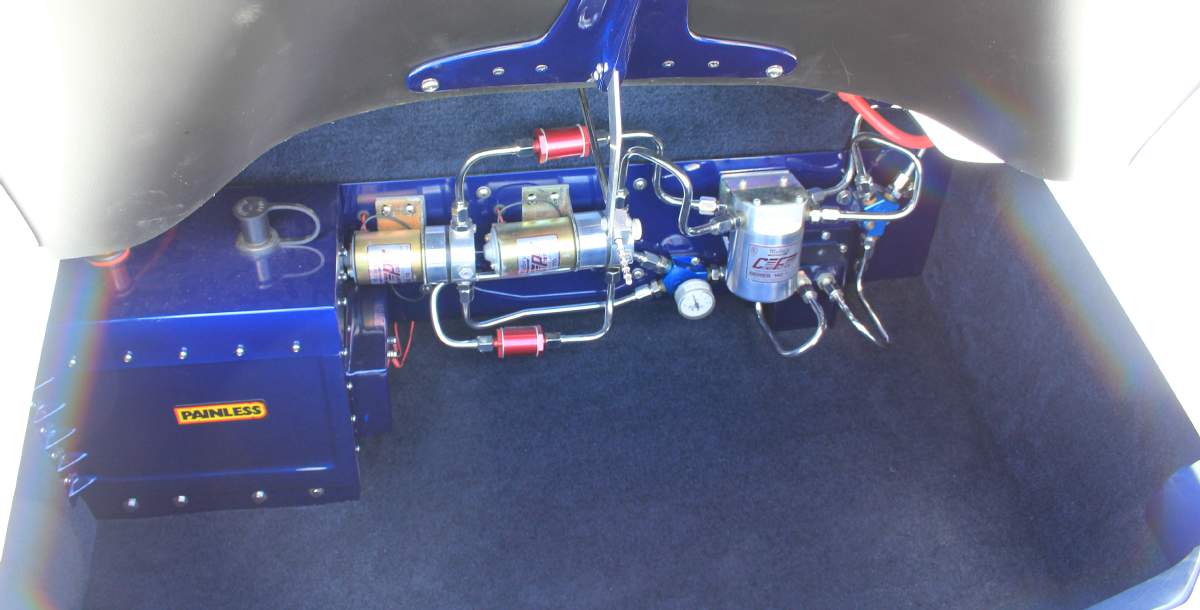
Above and below are views of the Mongoose gas tank mounted in the chassis. As with everything else on the car, it's beautifully crafted.
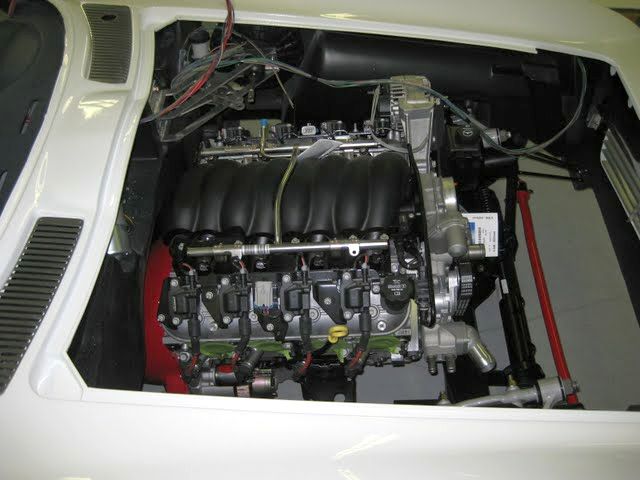
And now the LS3, ClutchMaster's flywheel/clutch assy, Mcleod scatter-shield, and Tremec 5-speed are bolted in.
![]()
![]()
Tail lights are now functional and vents for cockpit air/heater/defroster are installed.

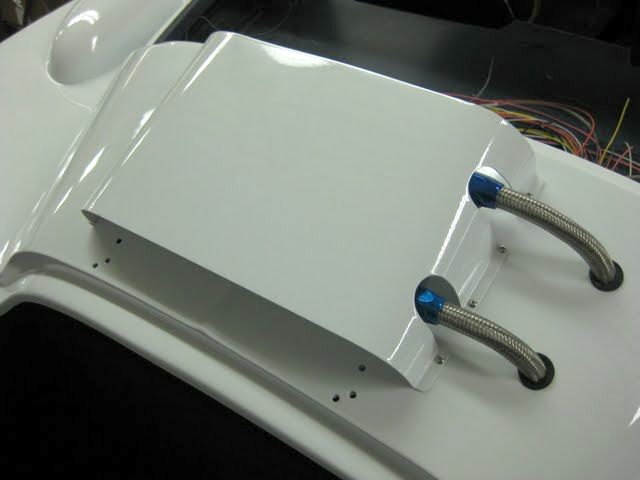
Trunk is beautifully finished out and the differential cooler/duct is installed
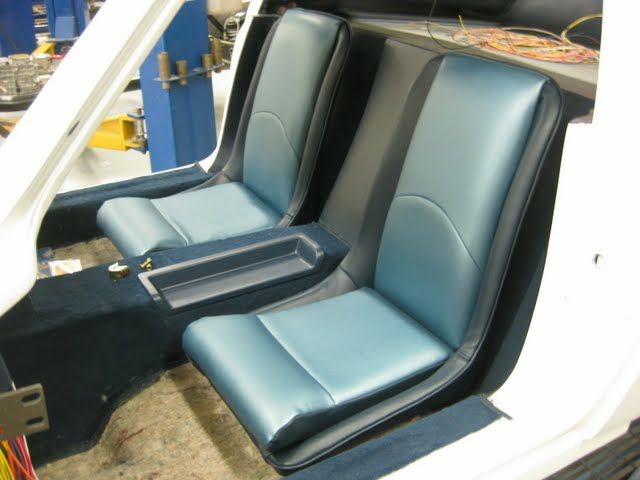
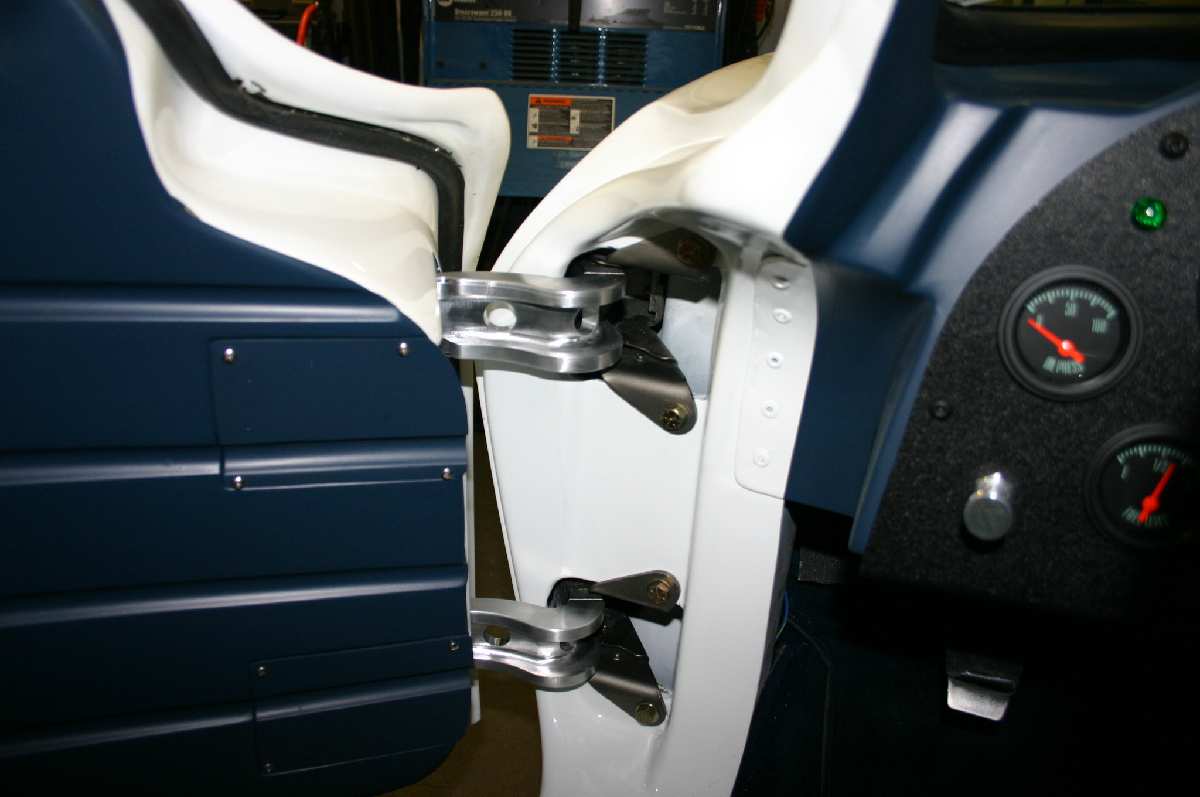
Center and side carpeting is in place and Gary has the unenviable job of handling the wiring chores under the dash. Seats are in for picture purposes at this point. Note the door hinges are lightweight pieces I speced for the car. No ten pound hinges here!
12-14-09 Update
We've all just returned to work after our annual pilgrimage to the PRI show in Orlando Florida. The show was good, however, most companies attending (including the tool manufacturers on Machinery Row) had dramatically scaled-back the size of their displays. Attendance was also down from what we're used to, so the economy is really taking a toll on businesses and racers alike.
I received the pictures below from Mongoose this morning. As you can see, the driveline is installed and the body is being lowered on to the chassis.
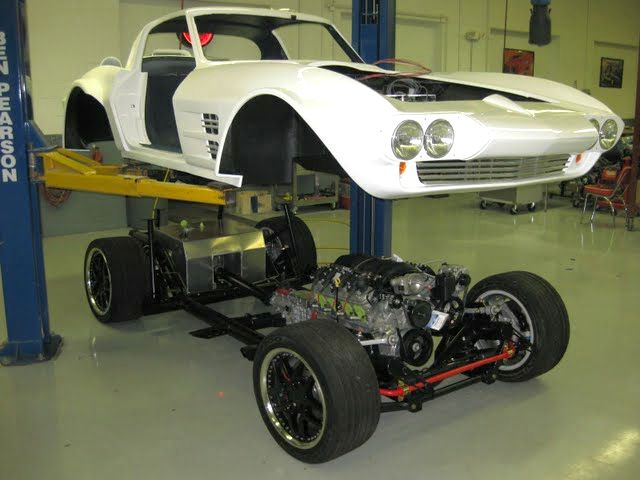
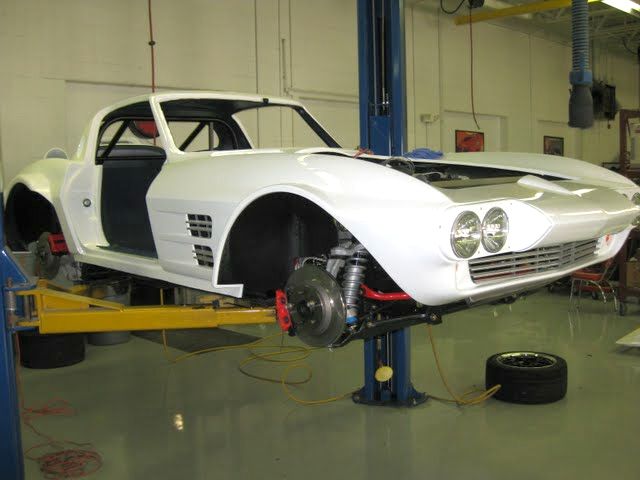
I think all of the pictures above are pretty self-explanatory. The guys at Mongoose have assembly of these cars down to a fine art and once again, you can see how clean and organized their workplace is. If you are looking for a Grand Sport that's "customized" to fit your every need, Mongoose is the place to go for the job.
12-22-09 Update
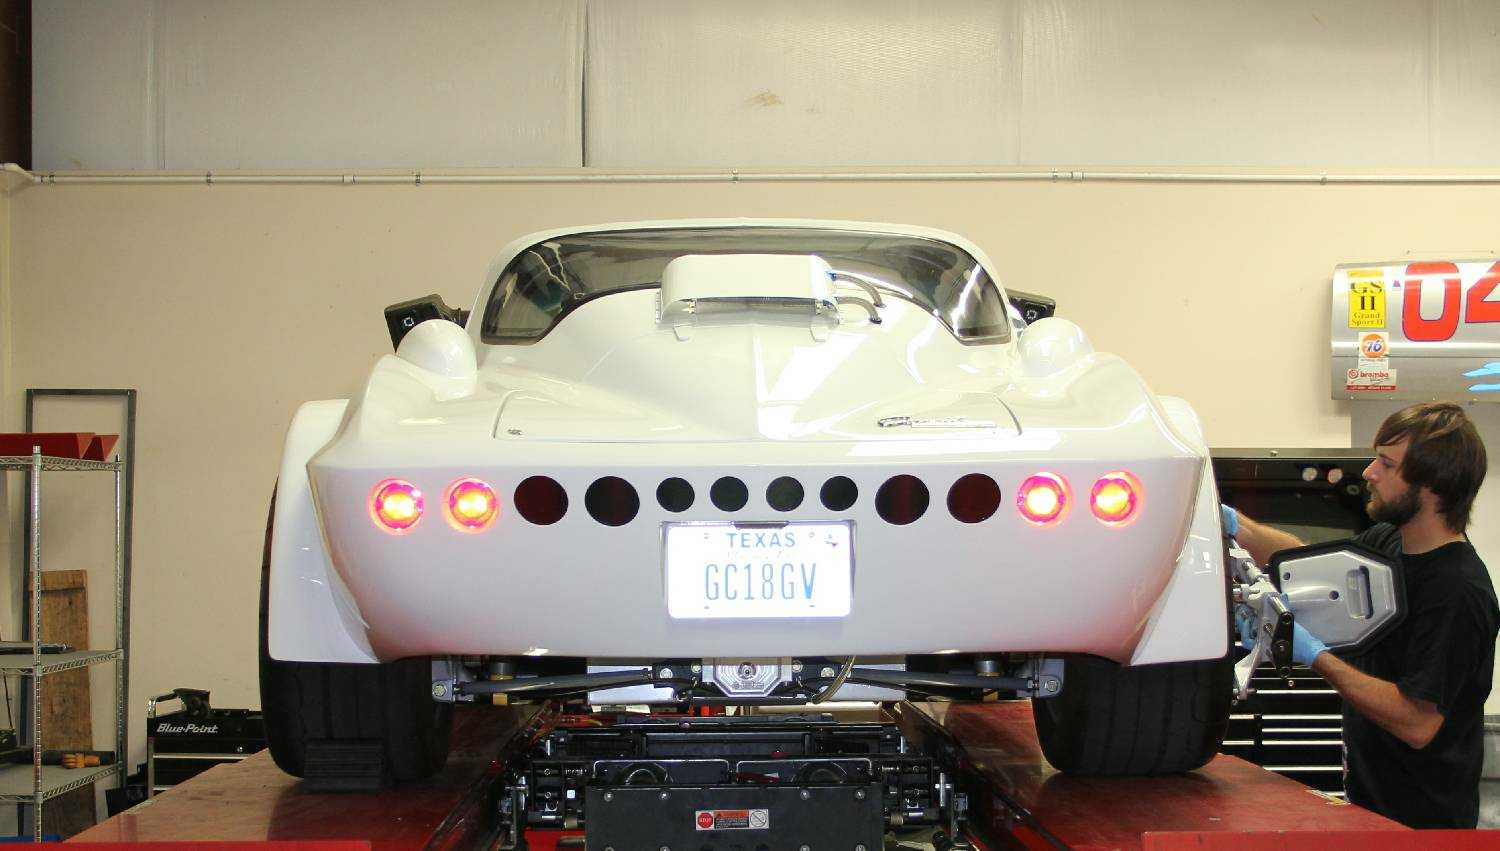
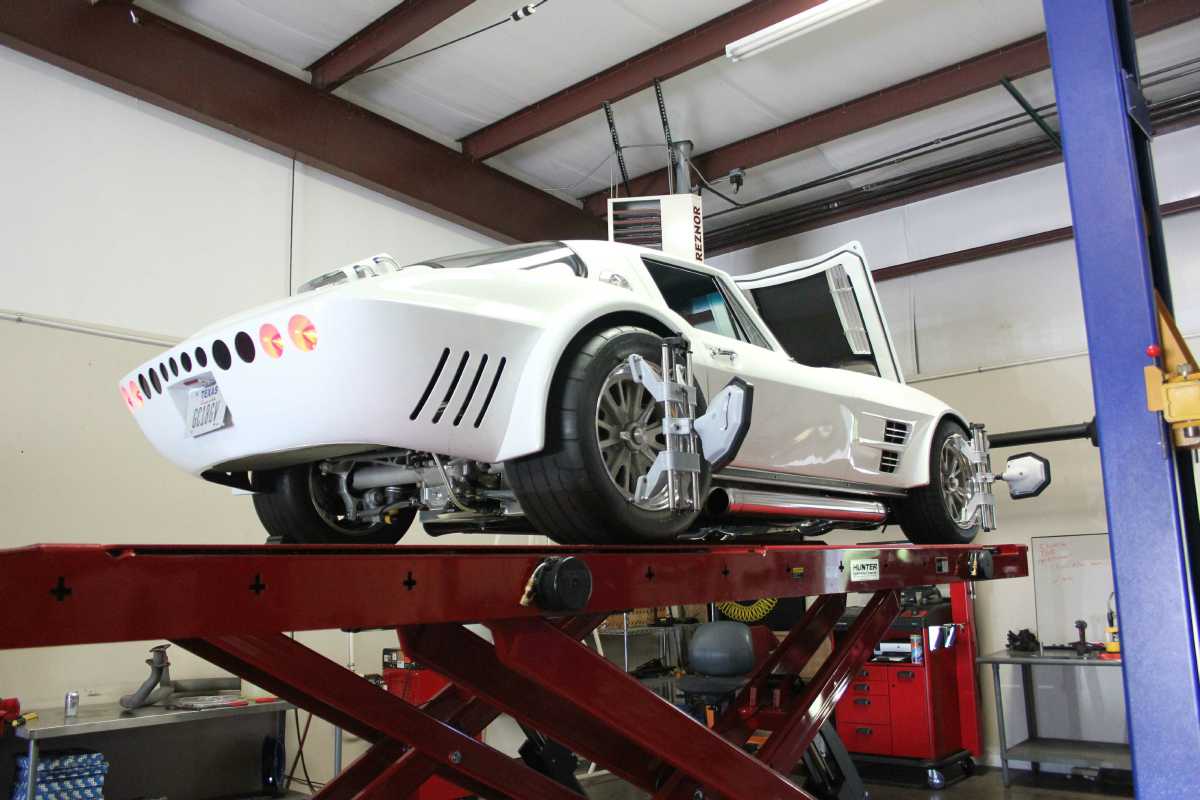
Here are a few of the latest pictures of the car with the pin-drive wheels and finally sitting on the ground.
Note that the glass is installed front and rear.
Once the car is here, we'll make a decision on how the car looks with the bare hood louvers. If we decide to leave them in their aluminum finish, we'll have them coated to prevent oxidation.
Until I figure out how to solve the rear tire size availability issue (by machining everything to accept a smaller diameter wheel/ larger sidewall tire combination, I'll likely throw a pair Toyo drag radials on the rear to reduce some of the space between the tire and the fender lip. .....We'll see.
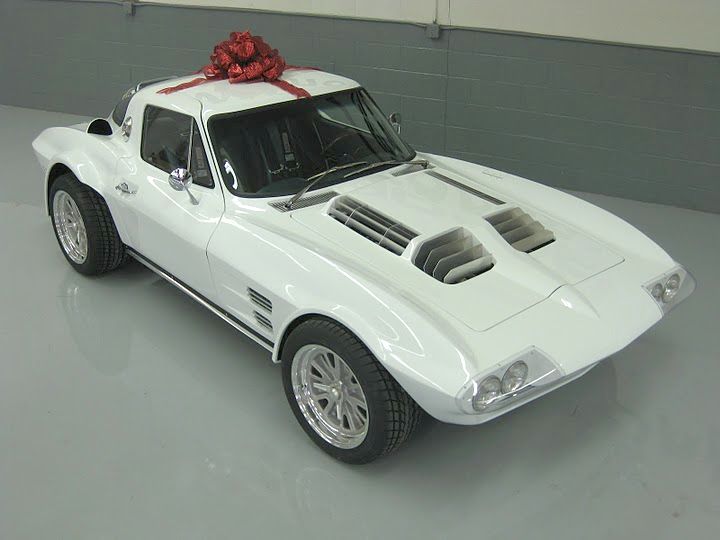
12-25-09 Update
As you can see from the pictures below, Gary and the crew at Mongoose have been burning the midnight oil finishing up my car. It appears that it's pretty much complete at this point and ready for delivery.

The interior has come out just as I expected, with the fit really nice everywhere. We may add a trim edge to the dash bezel once it arrives and I may also machine up some black-colored rings to add to the instruments to give them more depth.

I'll be locating the heater/defroster controls once the car arrives and I have an opportunity to "experiment" a little with their placement. I can't get over how nice the interior looks on the car. It's just outstanding.
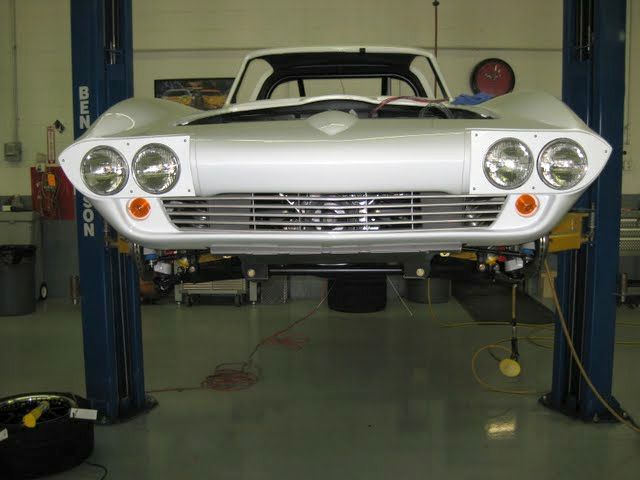
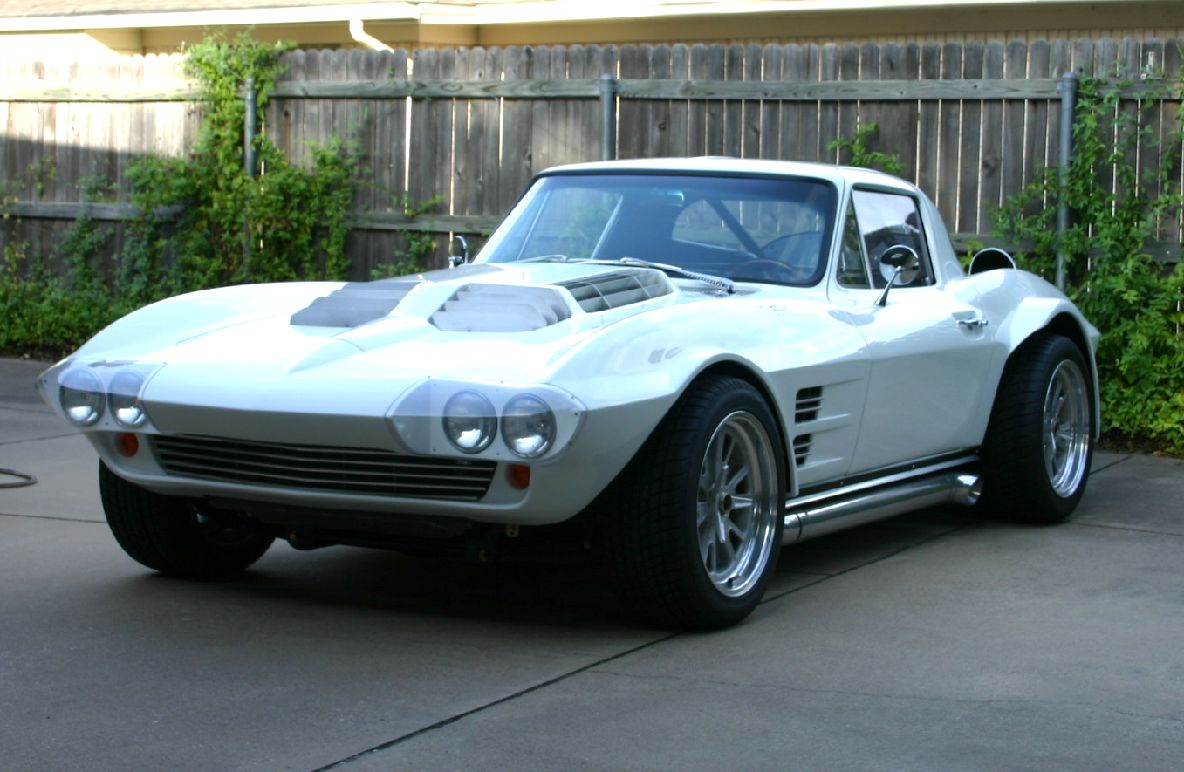
And the lights work too! What a great looking front end.
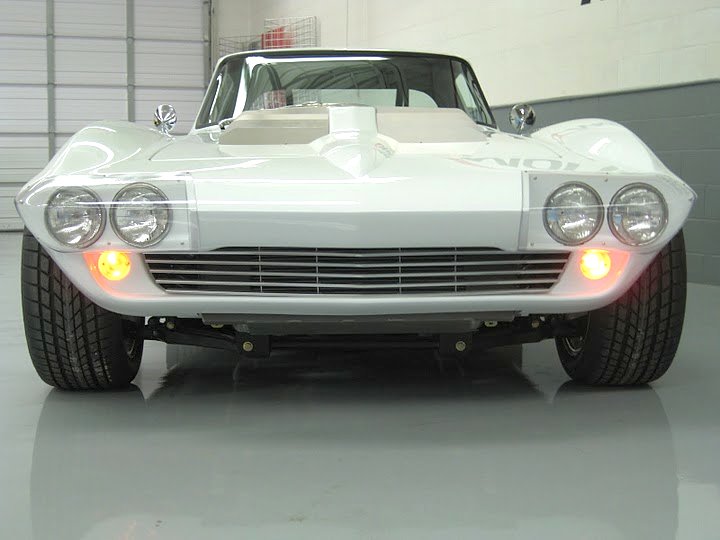
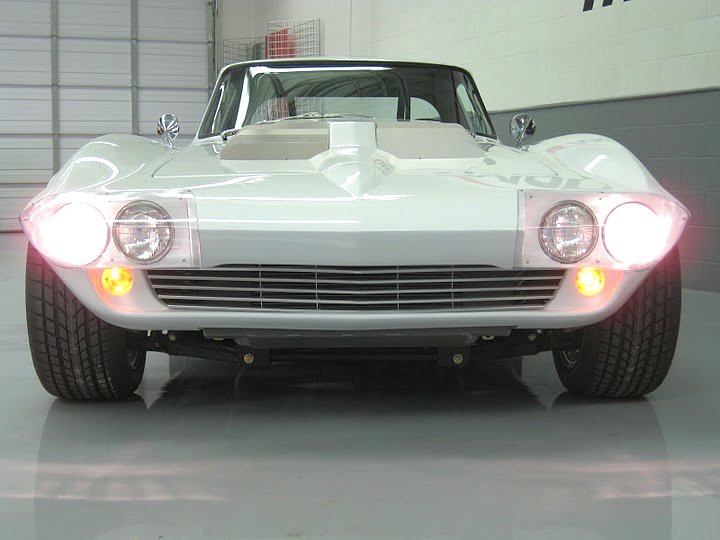
Right now we're all thinking that the bare-metal look on the hood louvers has worked out well with the overall color scheme of the car. Matching header/side-pipes should also add to the look.
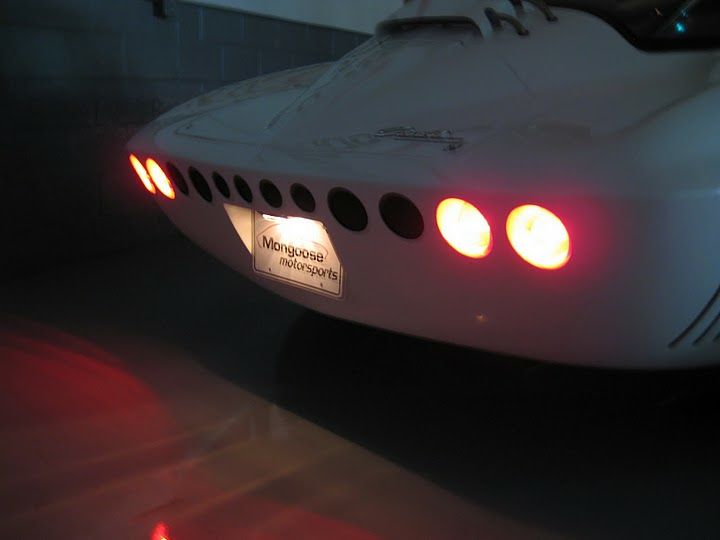
No captions necessary.....
....And it looks good in the dark too!
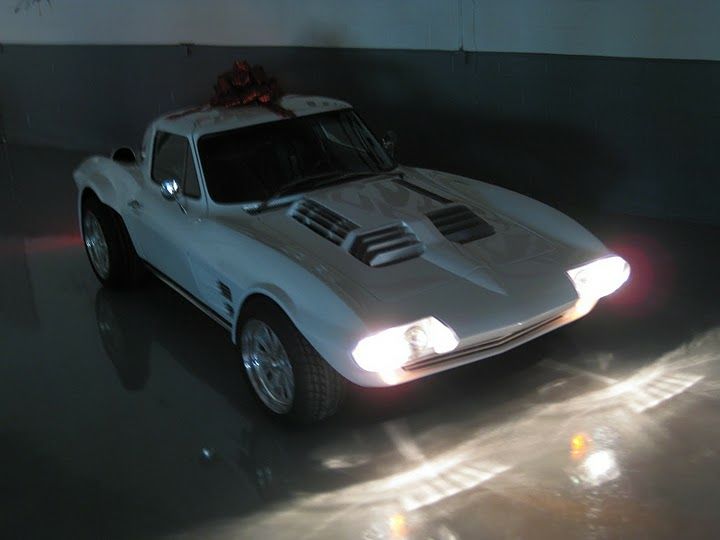
My Father's health has been declining rapidly of late. I finally shared the pictures of the project with him and there was excitement in his voice and a smile on his face. We haven't seen him "happy" in 7 months, so this has been a wonderful Christmas present for him. Anticipation of going for rides in the car has given him a purpose in life again, and there's no way I'll ever be able to adequately thank Gary and the guys at Mongoose for pulling this off for me.
And here's the view most will be seeing of the car....
And a huge thanks to Mongoose Motorsports
We have some meetings with clients on one of the engine-efficiency programs we're involved coming up the first week of January, so delivery of the car should be occurring just after they are concluded.
01-10-10 Update
We experienced the coldest weather in 13 years this last week in Fort Worth. Gary and Steve (from Mongoose) arrived at 6:00PM last Wednesday evening, as the temperatures were going from cold to very cold.
![]()
We proceeded to unload the car in the dark at the rear of the building.
![]()
![]()
There's a pretty good incline from the street to the rear entrance of our building. We were amazed that it only took two of us to push the car up the hill and into the building.....and then we found out why. The car only weighs in at slightly over 2000lbs dry, making it the lightest GS Mongoose has ever built for the street. We also unloaded the red Mongoose car so some of the swarm of visitors that stopped in could be properly "entertained".
We managed to clear an adequate space in our shop (which we configured to prevent us from working on cars).

I haven't had a proper cover made for the car yet, however, I was pleased to see that the cover for my Acura Integra Type R fits the car from floor to floor.
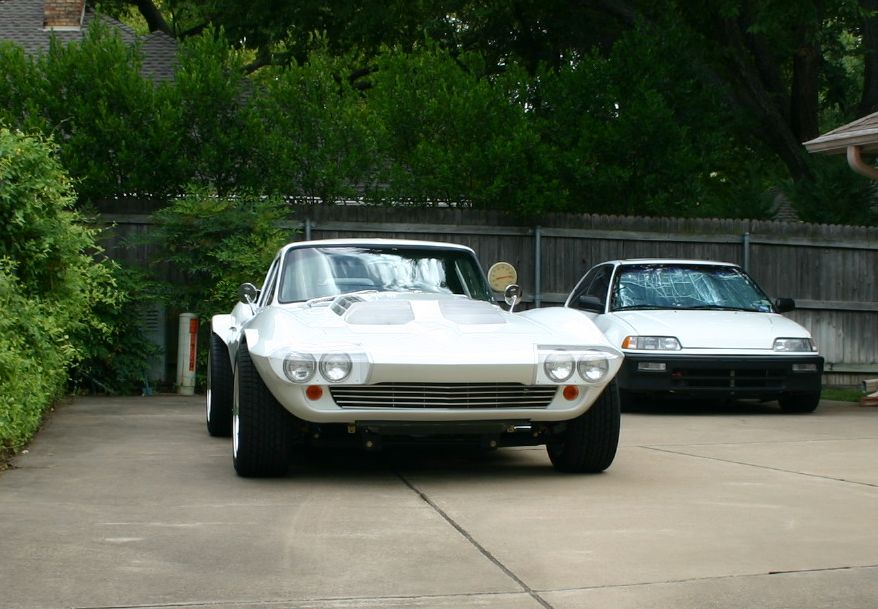
A close-up of the hinges shows one more reason the car is so light. We tried to save weight everywhere possible. Remember, aside from trying to make the car in the spirit of the originals, I've been fooling with Honda's since 1989 and lightweight is "everything" on them. It's pretty amazing that this car is damned near the same weight as my Civic (http://www.theoldone.com/articles/Larryscivic/Larrys_Civic.htm)!
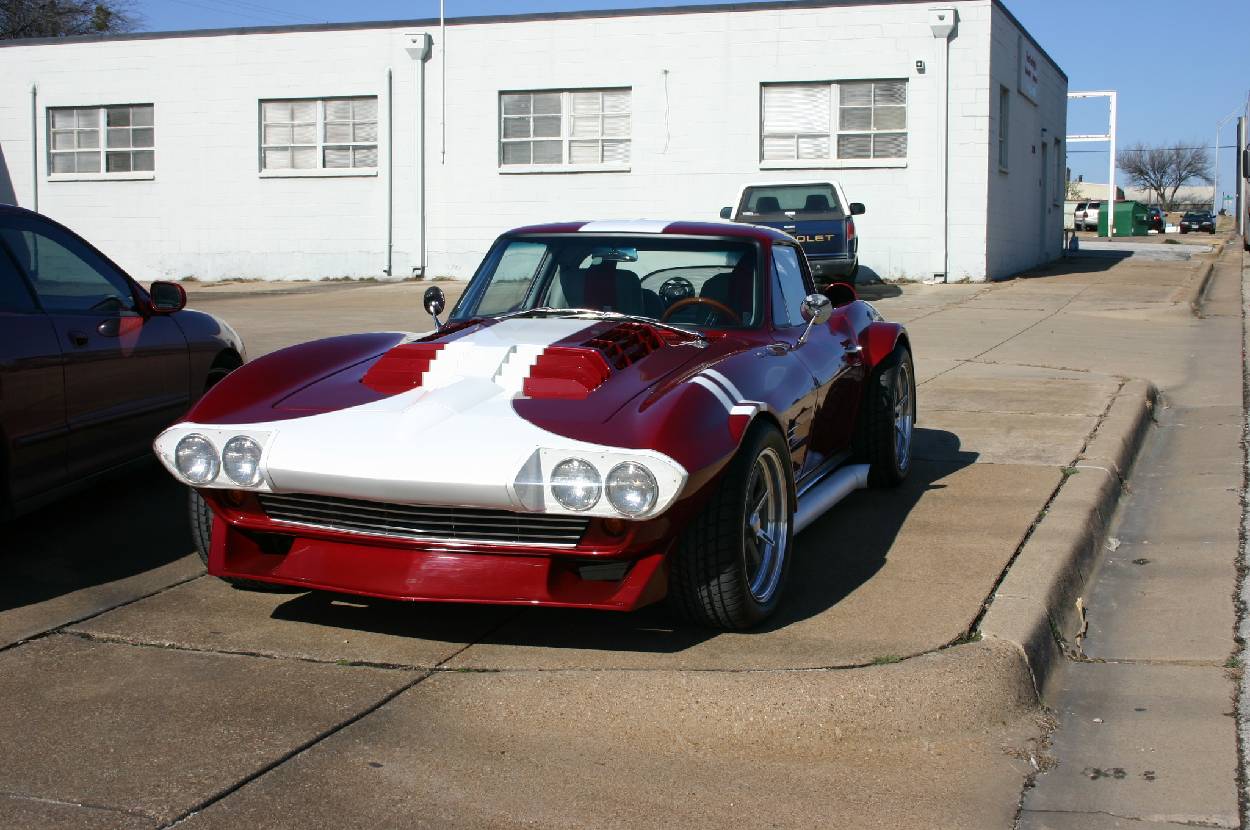
As you might imagine, the red car attracted a lot of attention. It also afforded a number of people the opportunity to sample it's performance first-hand. I suspect there will end up being a number of Mongoose cars in the Fort Worth area as a result.
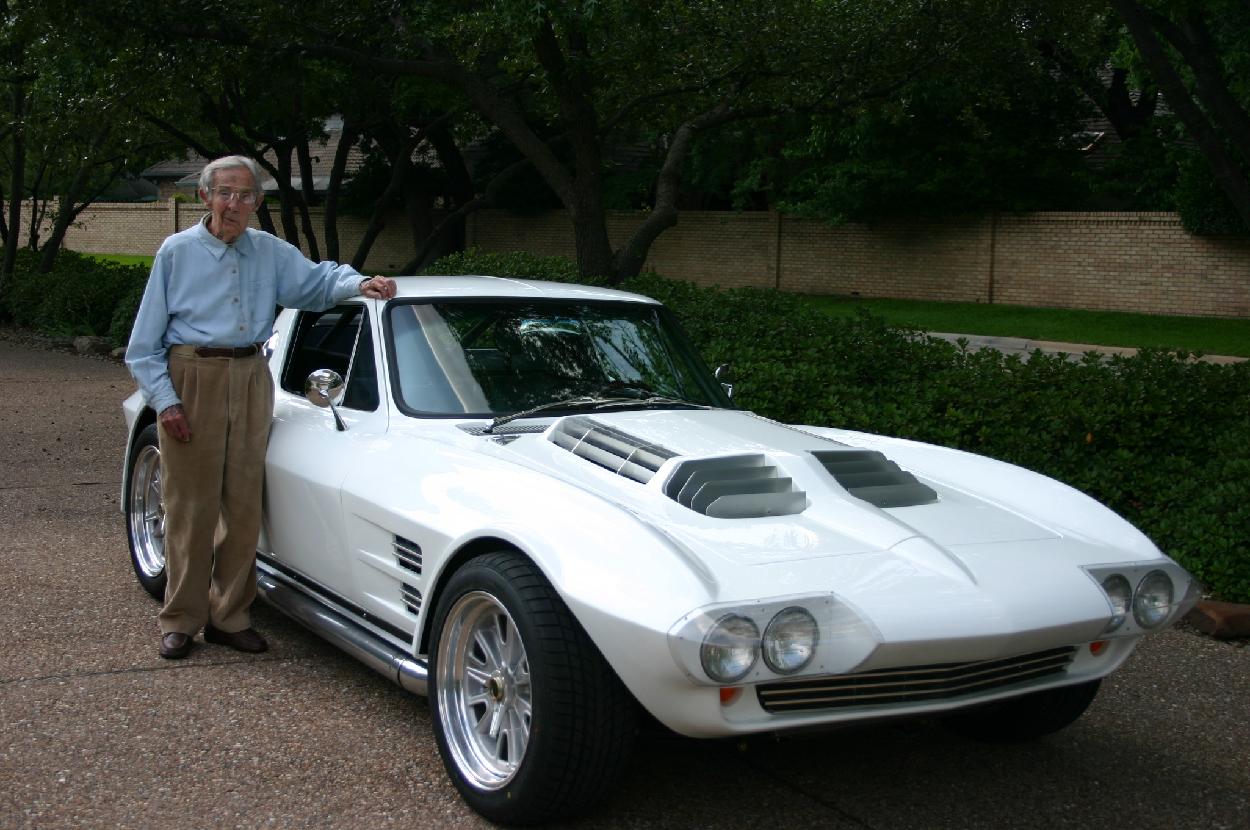
And....Thursday afternoon, I went to the house and brought my Father to take a look at "the" car for the first time.
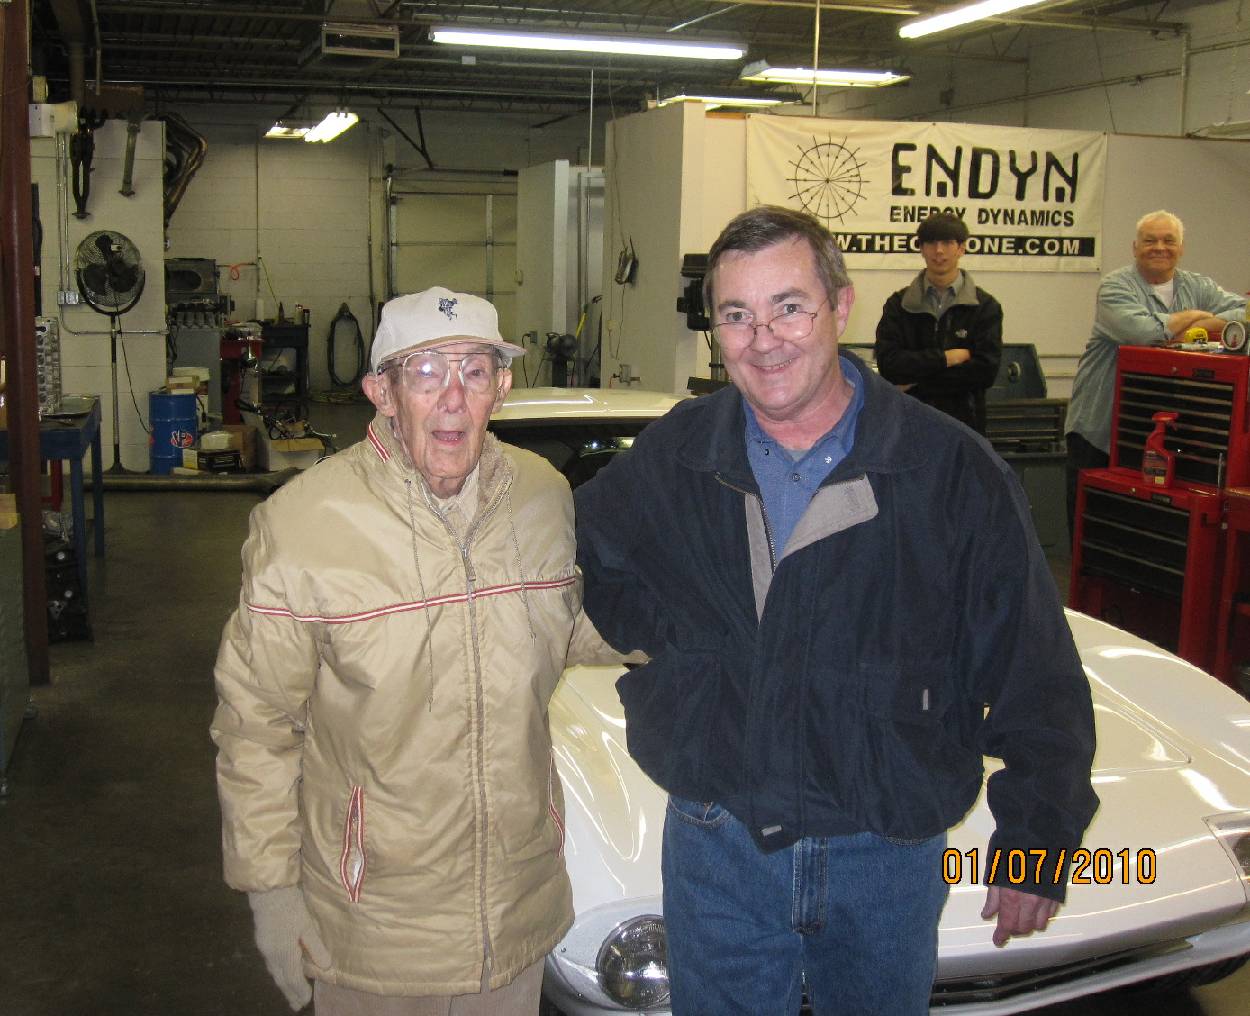
To say he was simply overwhelmed would be a gross understatement. He was able to meet with Gary and Steve, as well as some of our business associates from DHPS in Tennessee. His presence and remarks about the car made the entire project more than worthwhile for everyone involved. Dad sat in the car for quite a while pretending he was driving, and of course we knew the old engineer connected in his mind when he asked what the weight distribution was. It's not often you can give a person something that means so much and we all came away with some memories we'll never forget. ....And once we have the car running, there will be many more.
I'd also like to thank Gary, Steve, and everyone involved at Mongoose Motorsports for making a 46 year dream come true. They built a car that is exactly what I wanted. Their quality of workmanship is outstanding. When it comes to cars of anything mechanical, I'm tough to please, and they managed to come through with flying colors.
I plan to represent Mongoose any way I can in the future. Anyone interested in seeing one of these cars for real can contact me, and anyone needing technical advice can do the same. We will also be building some fixtures for the headers / side-pipes we build, so anyone interested in running an LS can obtain an identical set.
Now, I have to spend the rest of my Sunday afternoon honing some valve guides and massaging a cylinder head.....work must go on you know.
02-17-10 Update
We have finally made some time to work on the finishing pieces for the car. We're so busy right now that finding time to fabricate parts has been all but impossible
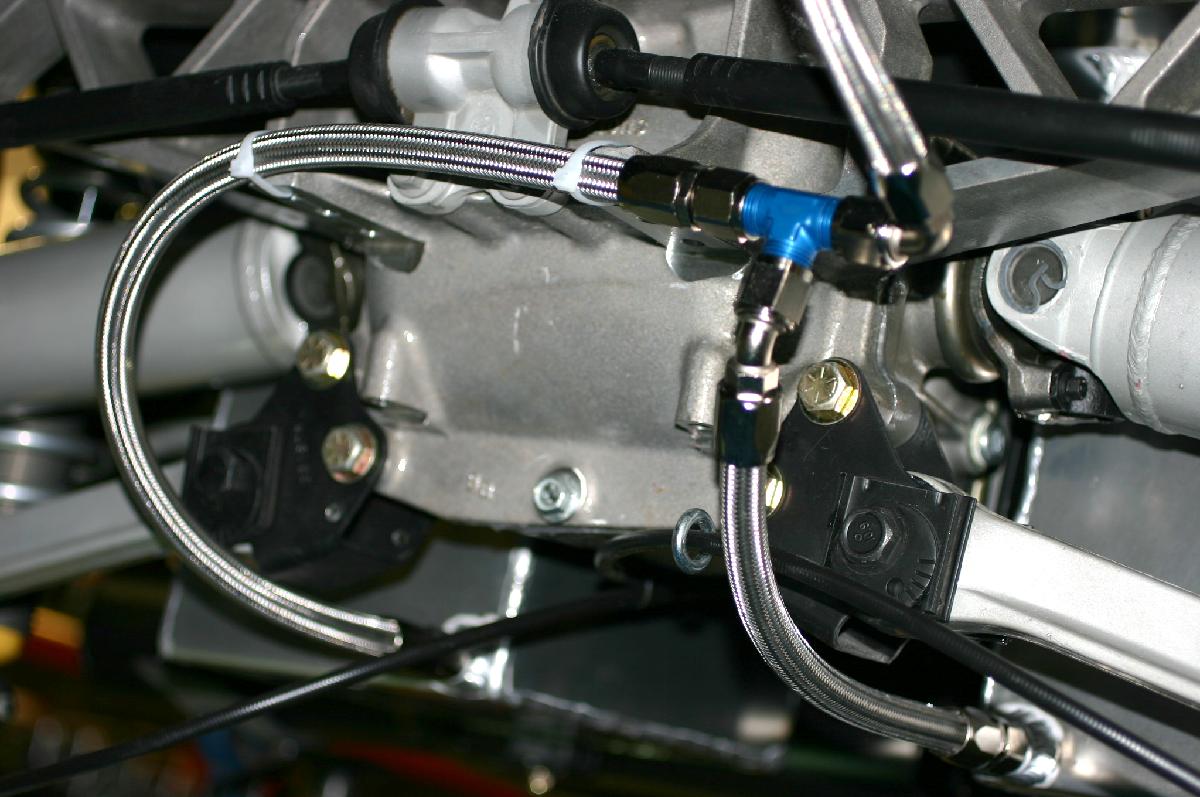
I never liked running braided steel fuel lines the entire distance from the fuel pump system to the engine, so the first order of the day has been to fabricate a 1/2" stainless steel fuel line that fits the chassis and contours of the car.
. 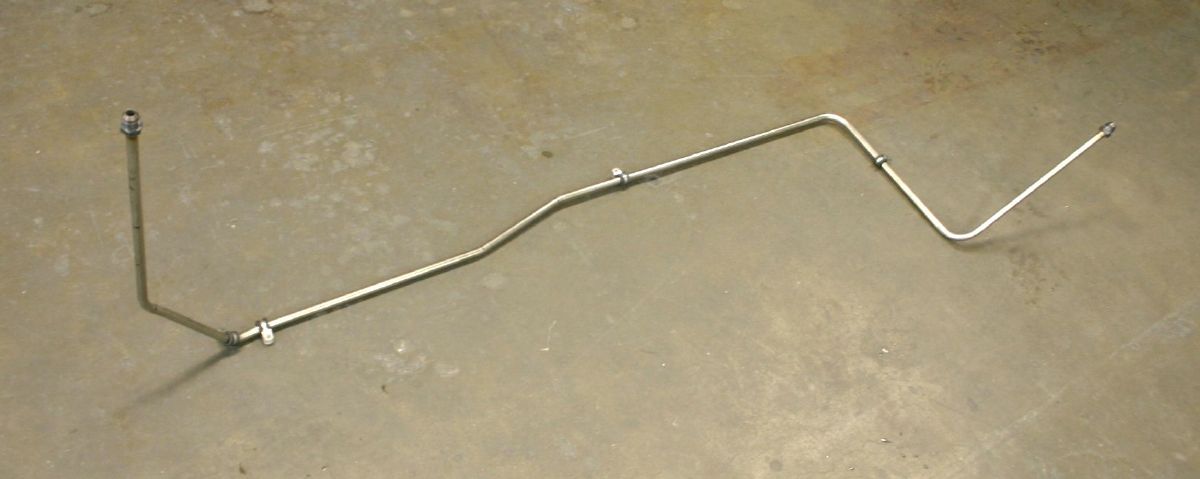
We were all pretty amazed that the line came out so good...and that we didn't need to use the second piece of tubing I have bought (just in case).
We welded a tab on the rear frame rail to support the "pump" end of the line. There will be a secondary fuel filter placed between this connection and the fuel pump/regulator.
Under the hood, the fuel line terminates at the firewall. We will use a looped piece of -8 braided steel tubing to connect it to the fitting on the fuel rail (red cap).
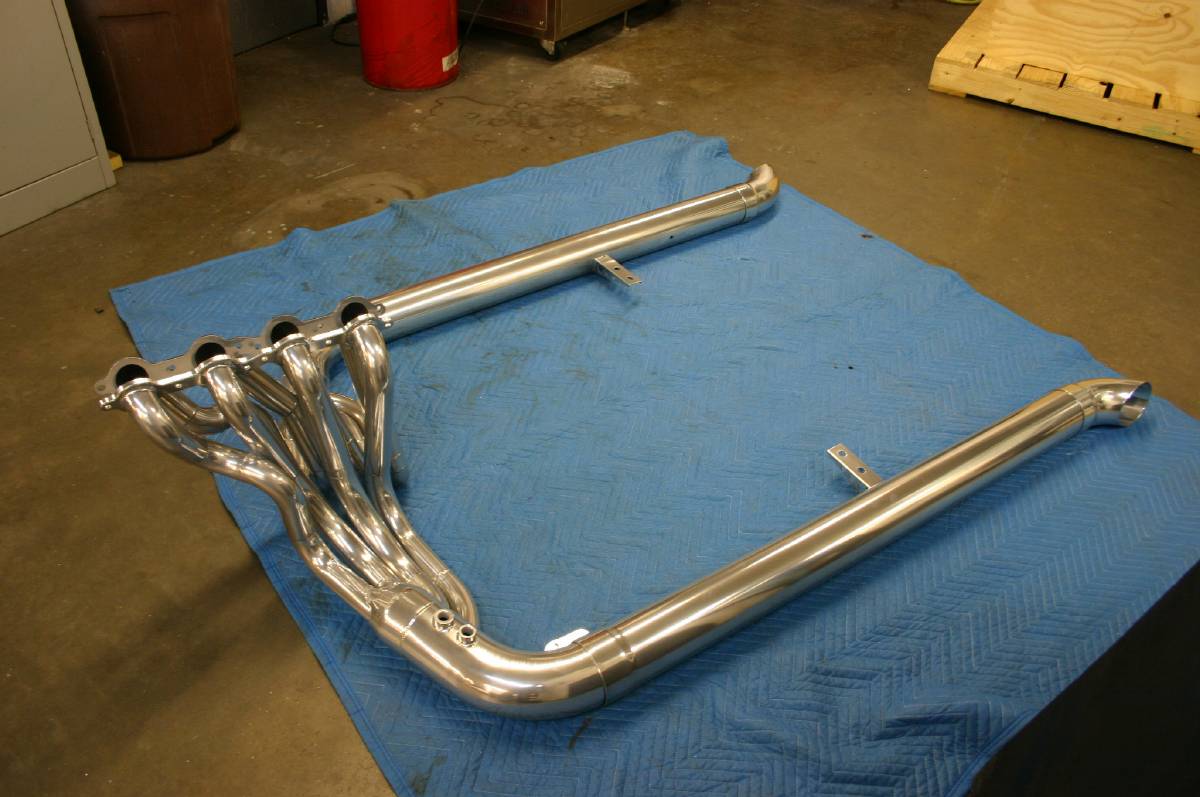
And now the part we've been dreading....the headers. After doing some research, I decided on using 1.750" tubing for the primary tubes. We have some experience with some LS engines in the past that have produced 580HP with 1.750" headers, so the size should be optimal for the present engine combination. (The tall-deck "big" engine we have planned , will require a new set with much larger pipes.)
After a lot of cutting and fitting, we ended up with the headers you see in the pictures below.
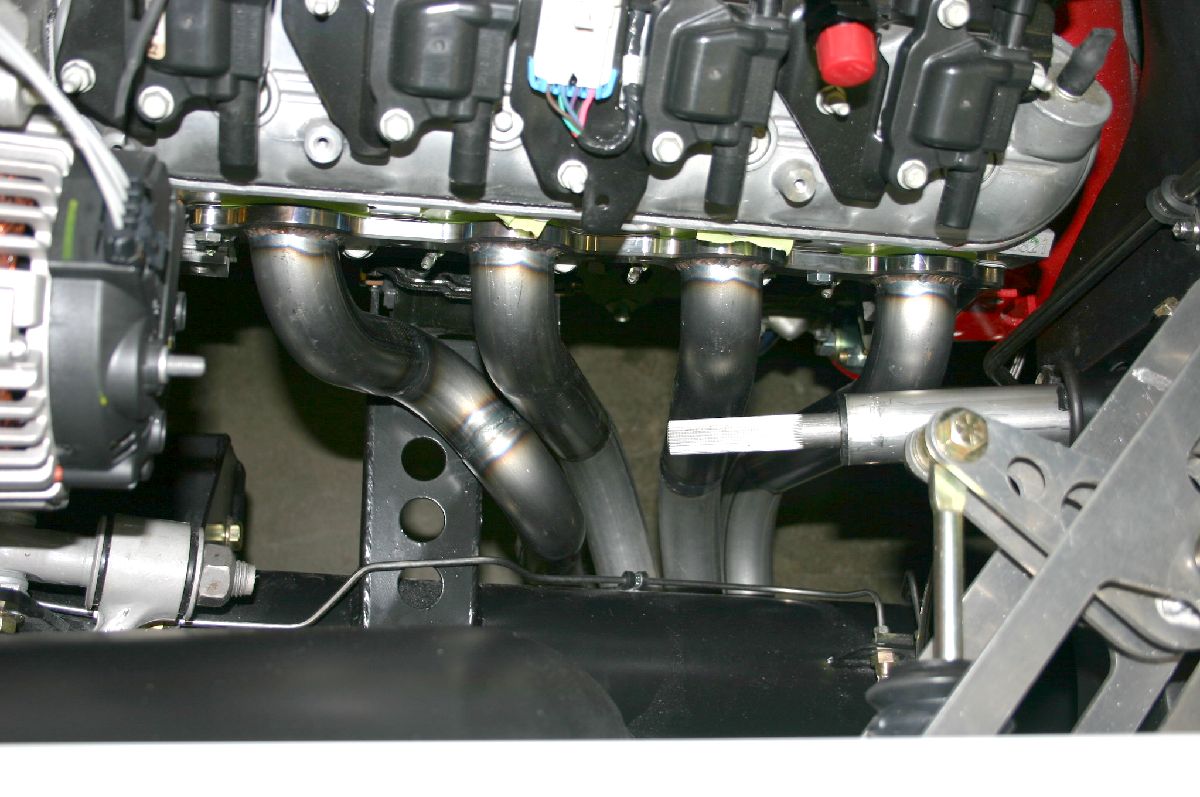
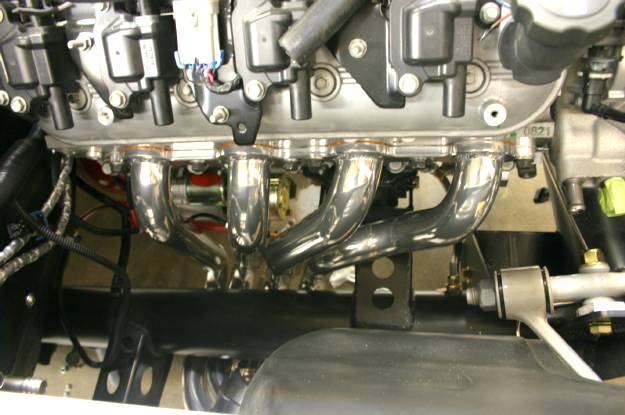
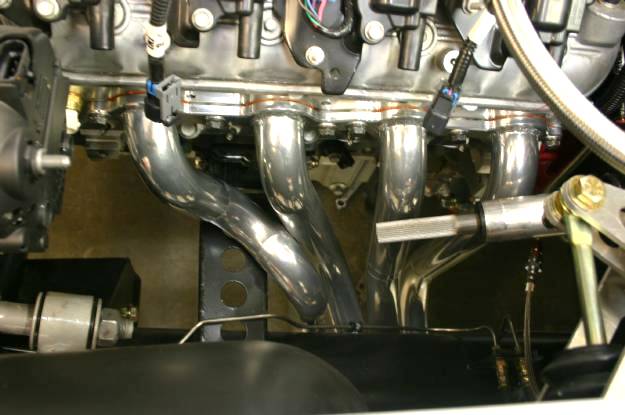
The motor mount presented more of a problem than the steering shaft. We were able to clear everything nicely, and we also have plenty of room for the sparkplug boots.
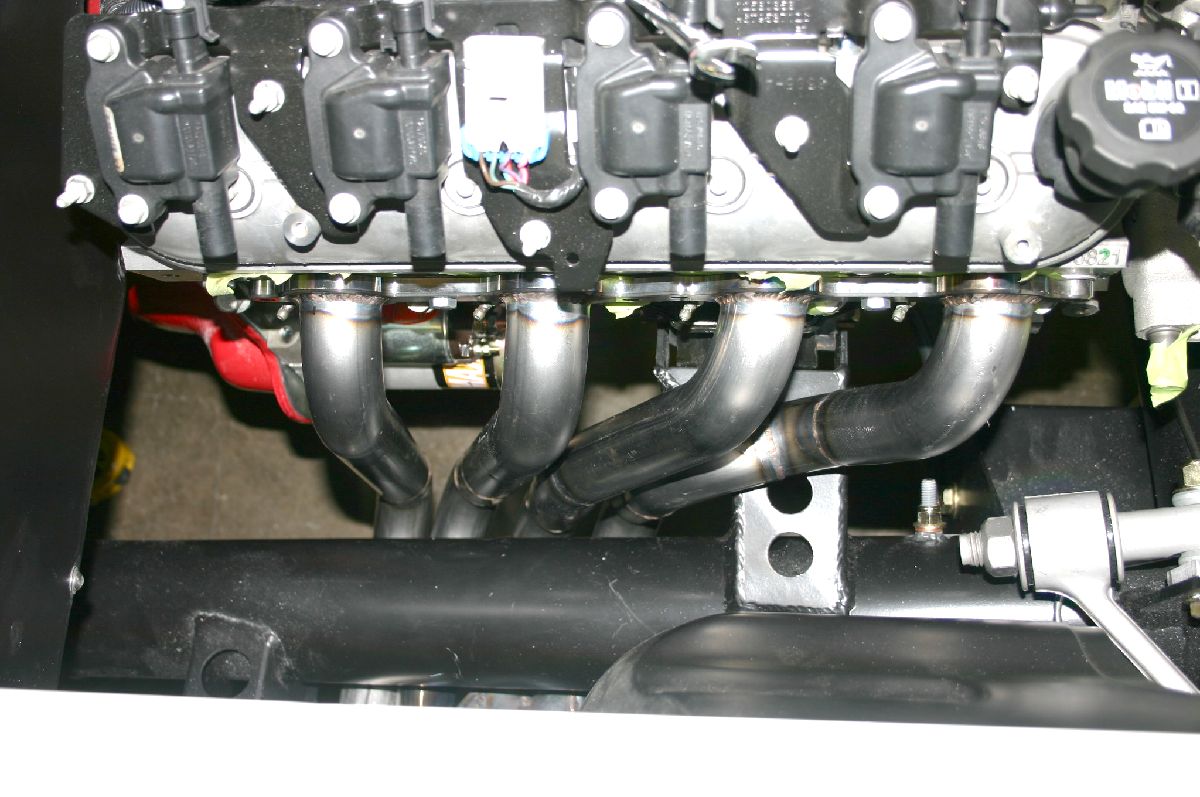
Passenger-side was a little tighter due to the engine off-set in the chassis. Once again, we have plenty of clearance...and the header slips into place without removing the starter.
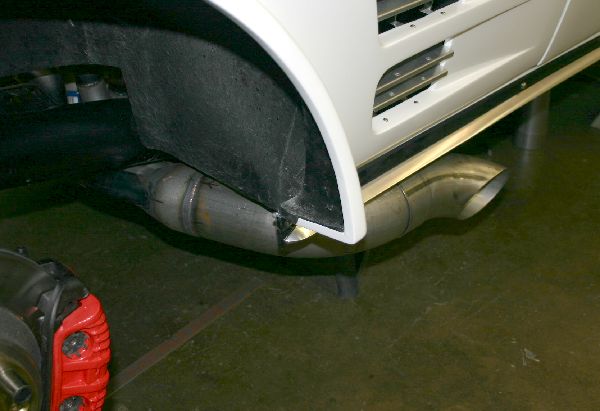
We're going to fit the side-pipes next, but everyone here would like to hear it with the turnouts on the collectors, so rest assured, it'll be run that way at some point in time.
With the side-by-side merge collector, we have excellent ground clearance, and the headers remain true to the original Grand Sport design.
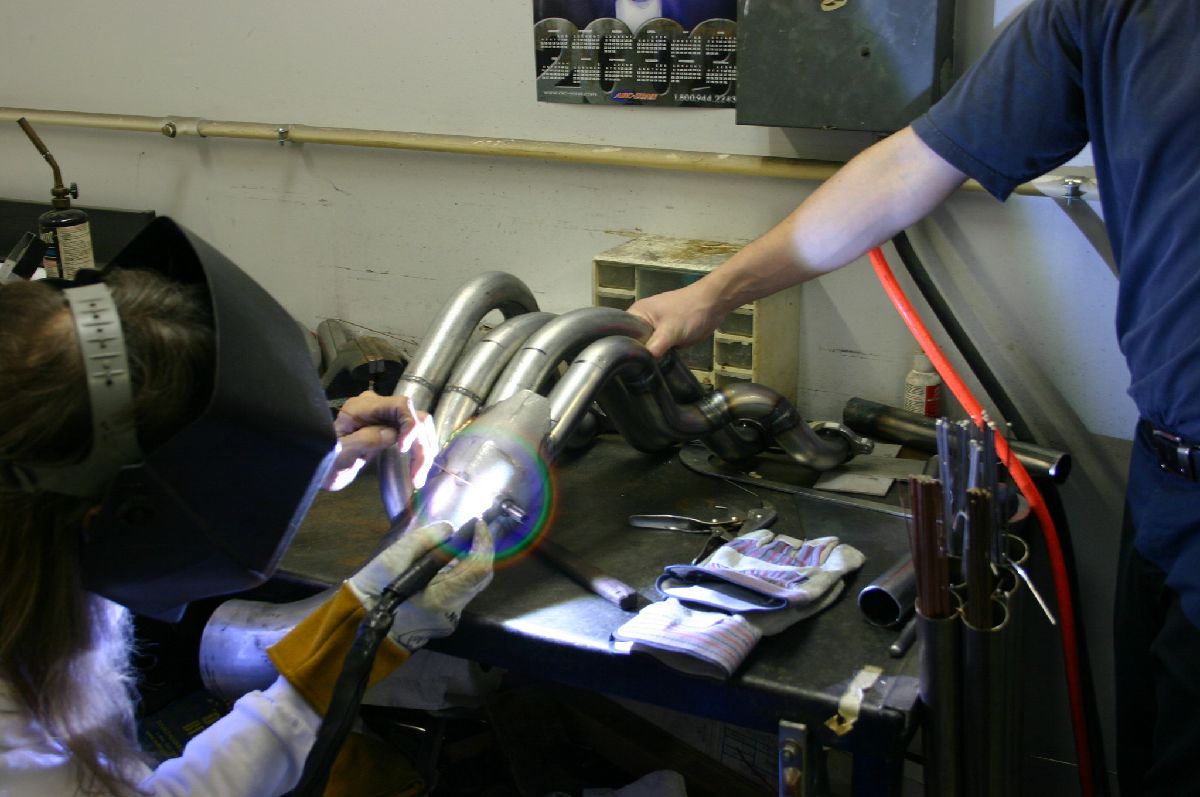
And of course, a lot of the fitting and all of the welding was done by Mike Garvie.
02-27-10 Update
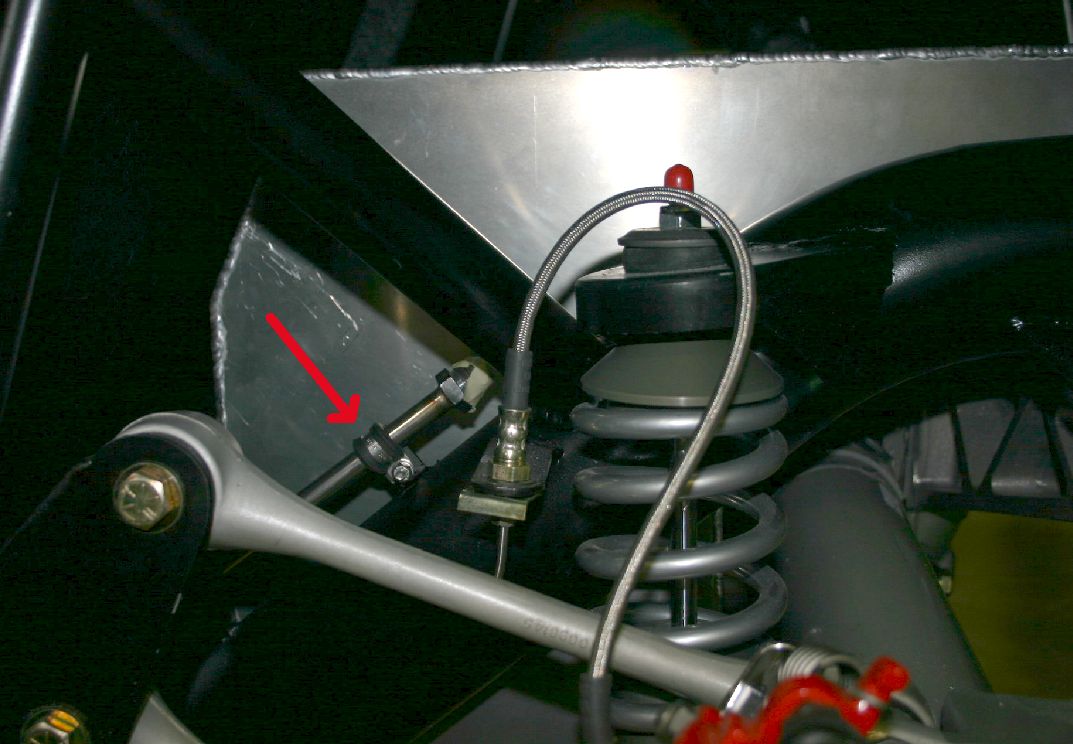
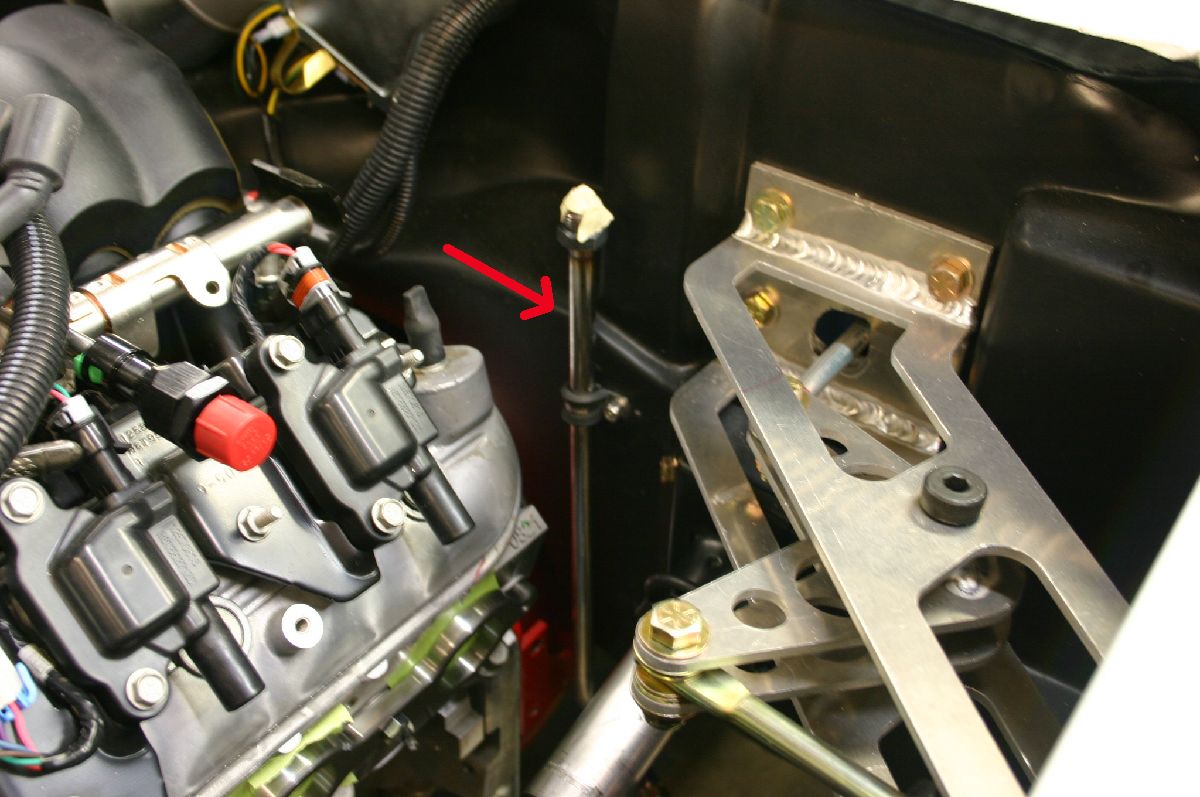
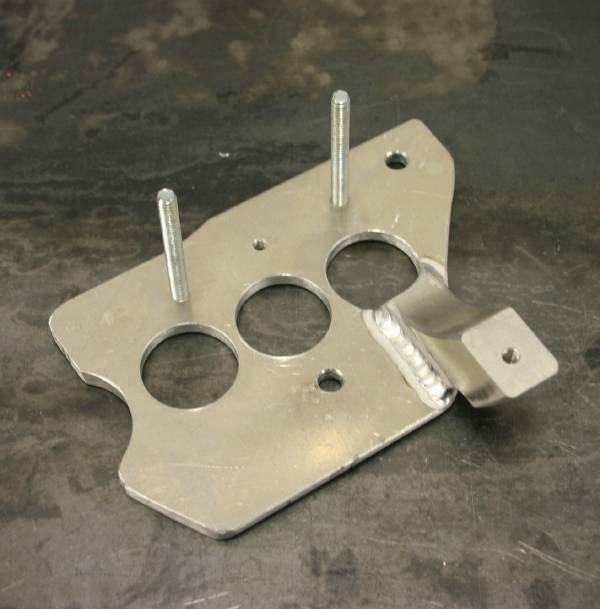
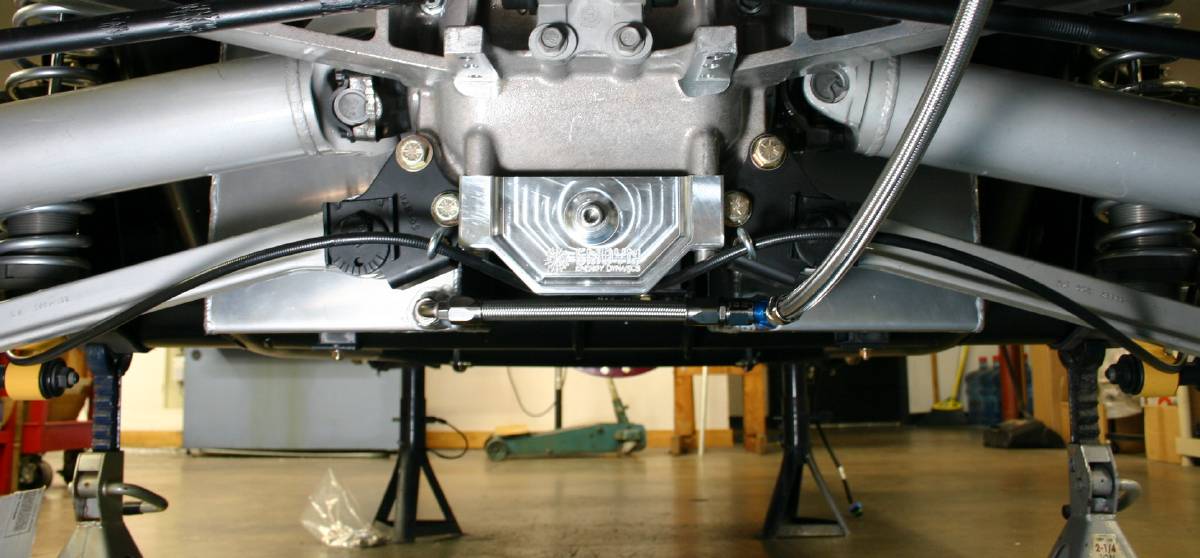
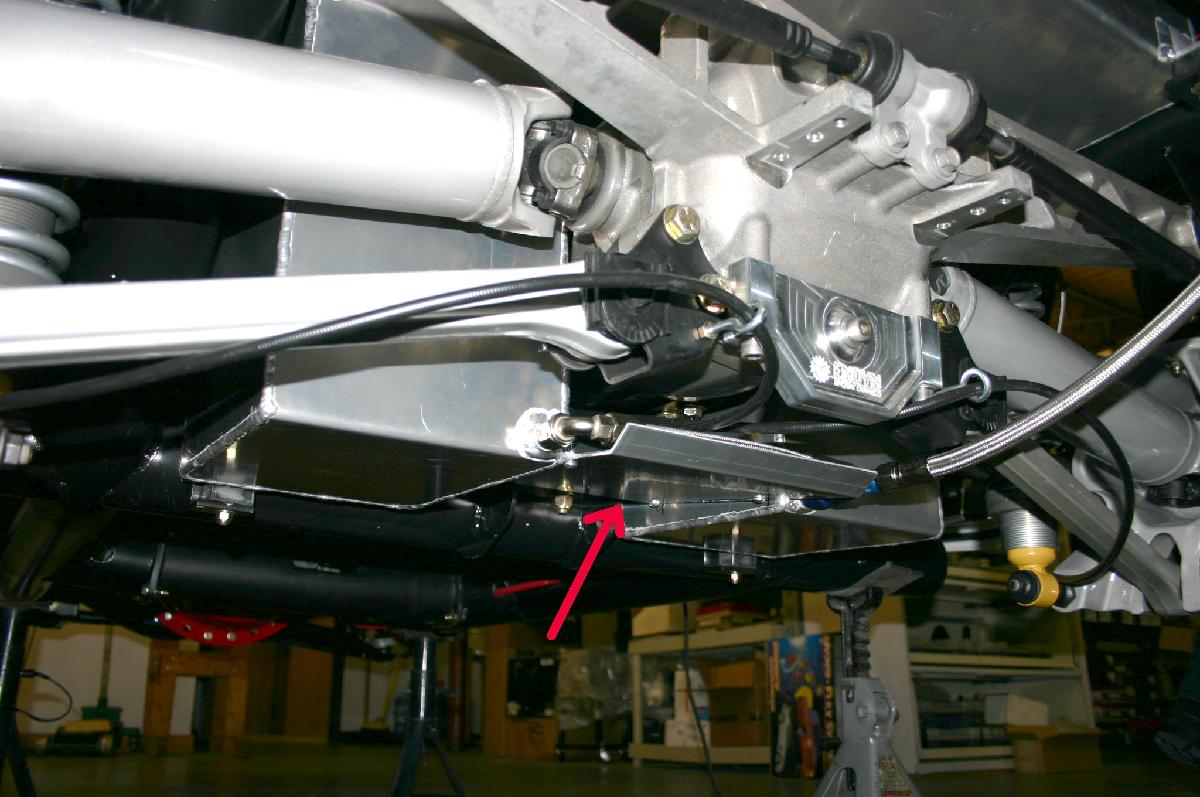
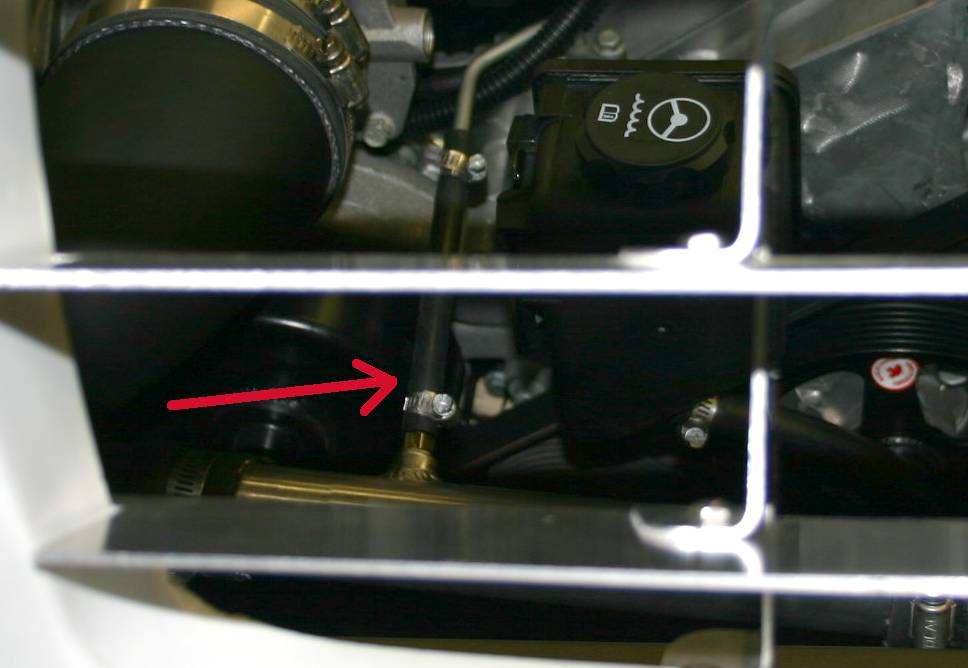
We configured the fuel lines a little differently than some of the more conventional systems I've seen on these cars. I'm using Kinsler fuel filters, as well as a Bosch fuel pump. The positioning of these pieces necessitated the off-set fuel line arrangement you see here. The tie-wraps holding the lines in place will disappear in favor of some proper clamps once we build the central jacking pad assembly that will bolt to four of the threaded attachment holes on the rear of the differential cover. With the position of the lower control arm pivot brackets and the emergency brake cables, there's no good way to shove a floor jack in from the rear to lift the car, so we're going to solve the problem by building a lightweight and functional jacking post.
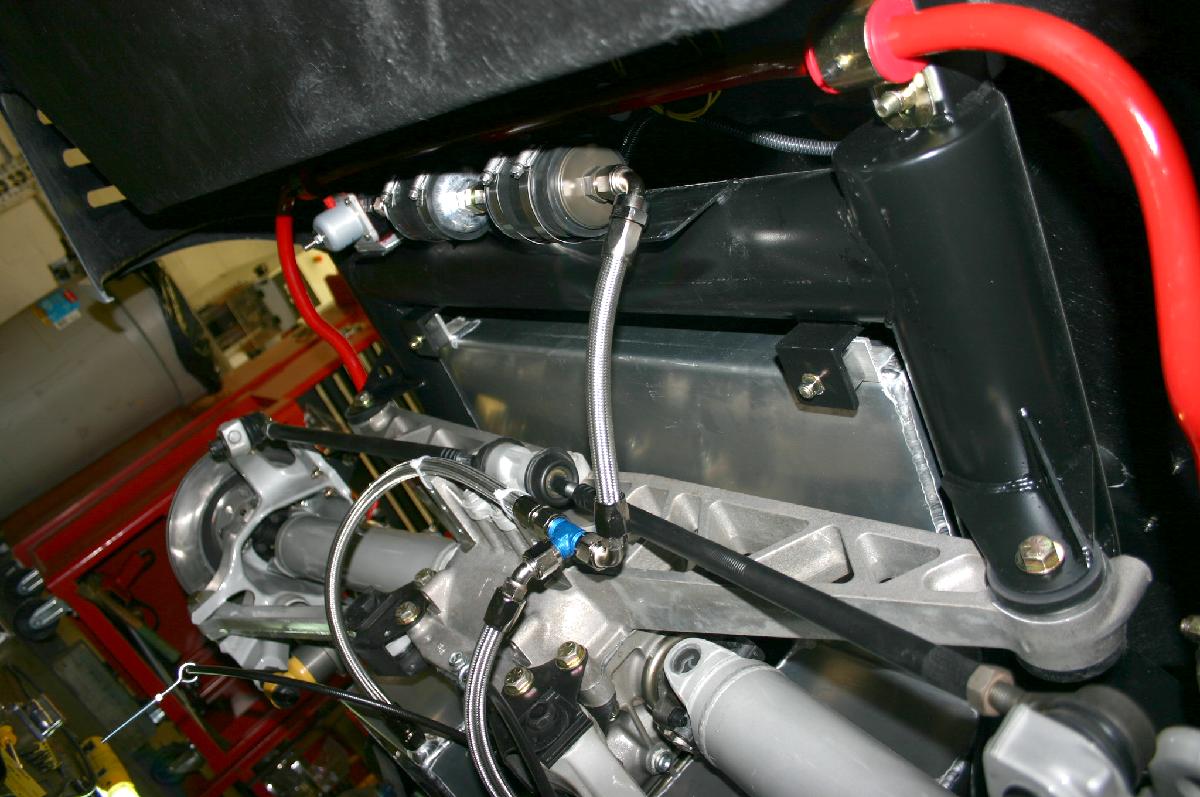
As you can see the Kinsler fuel filter is followed by the Bosch pump, and both have rubber surrounds that are clamped to mounting brackets we welded to the rear cross member. The fuel pressure regulator is mounted to a plate we fabricated and welded in- place. The rubber surrounds cut pump noise and provide some vibration insulation. This Bosch pump is the same as I use on my Honda's and in out dyno room. It's adequate to 700+HP and so bullet-proof that Porsche uses them on their turbo cars..
The fuel line emerges from the fuel pressure regulator at left. Another post-pump Kinsler fuel filter is next in-line before the flexible fuel line connects to the half-inch stainless hard line at the left. This filter will also receive a rubber surround before being secured to the top of the frame rail. Above the tank you can see the line that connects the bypass on the regulator to the tank for fuel return.
We're going to make a second fuel line to connect the engine's fuel rail to the hard line on the firewall this week for evaluation. Even with the loop, I think a more flexible line might be better suited since the engine isn't solid-mounted.
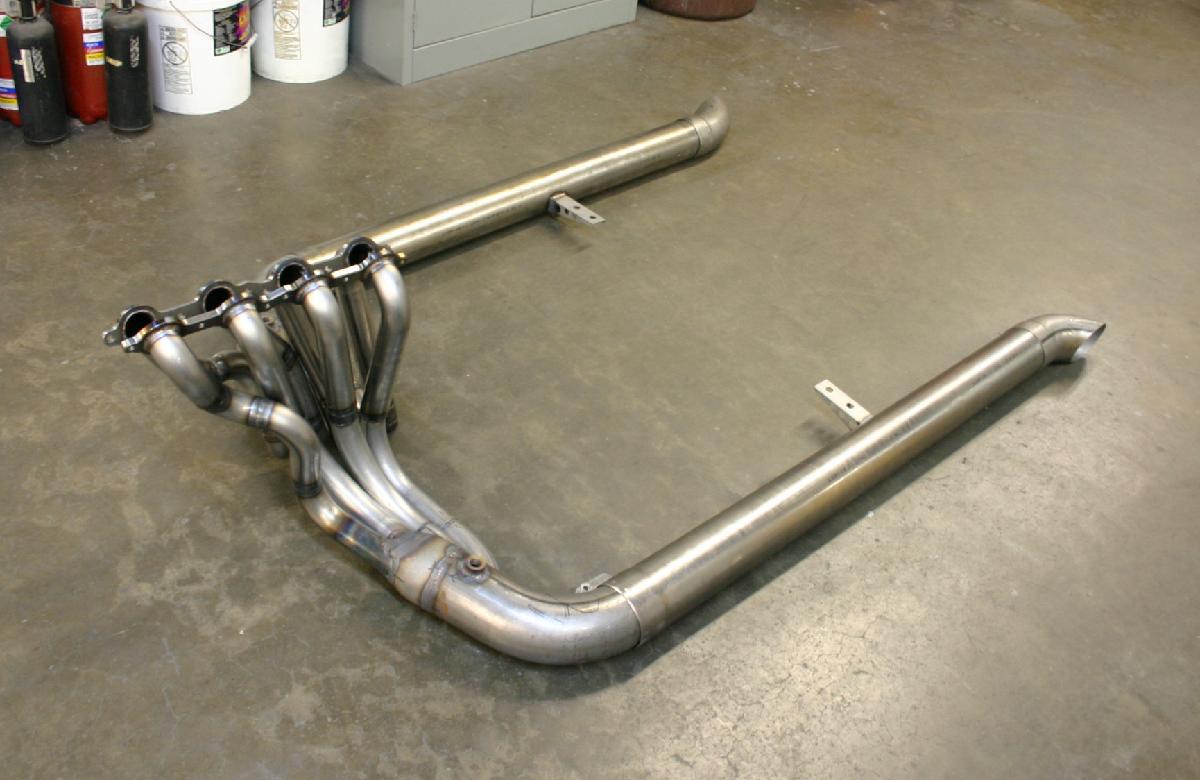
Here's a picture of the headers and side pipes off the car. As you can see, the headers are unique in configuration. The lead two pipes also extend inside the collector for optimal scavenging. Note the tabs that link the side-pipes to the collectors.
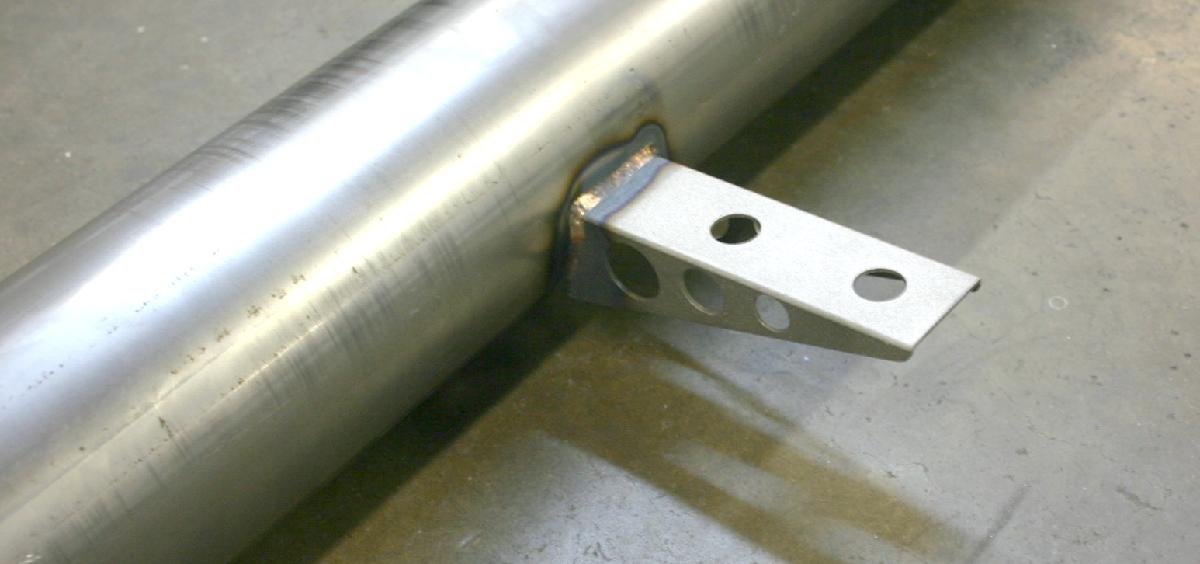
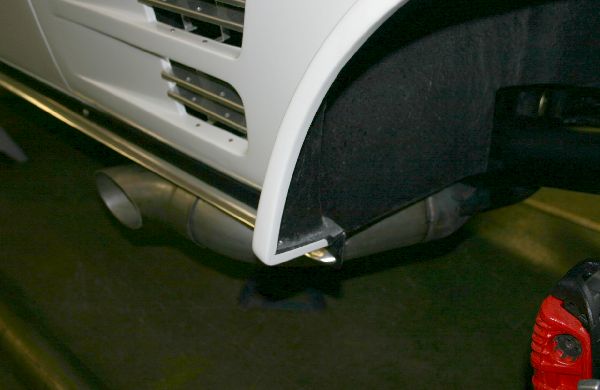
Close-up of the lightweight side-pipe to chassis mount.
I designed an intermediate plate that bolts to the underside of the chassis mount that Mongoose provided for hanging the pipes. It has slotted holes, which give 3/4" of lateral movement for adjusting the angle of the piped relative to the side of the car. This plate also has two .600" diameter holes that locate the poly bushings we machined for shock mounting the lightweight brackets welded to the pipes. This combination of pieces allows me to easily adjust the pipes in and out, as well as up and down.
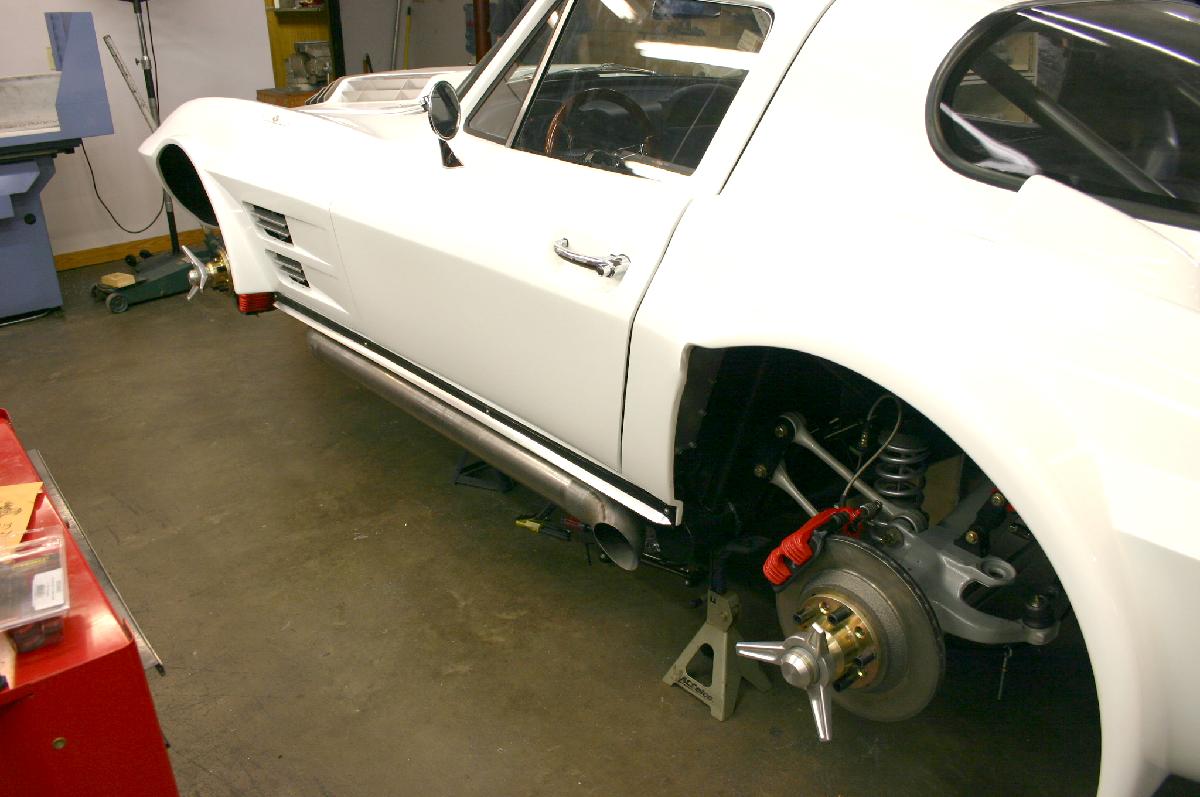
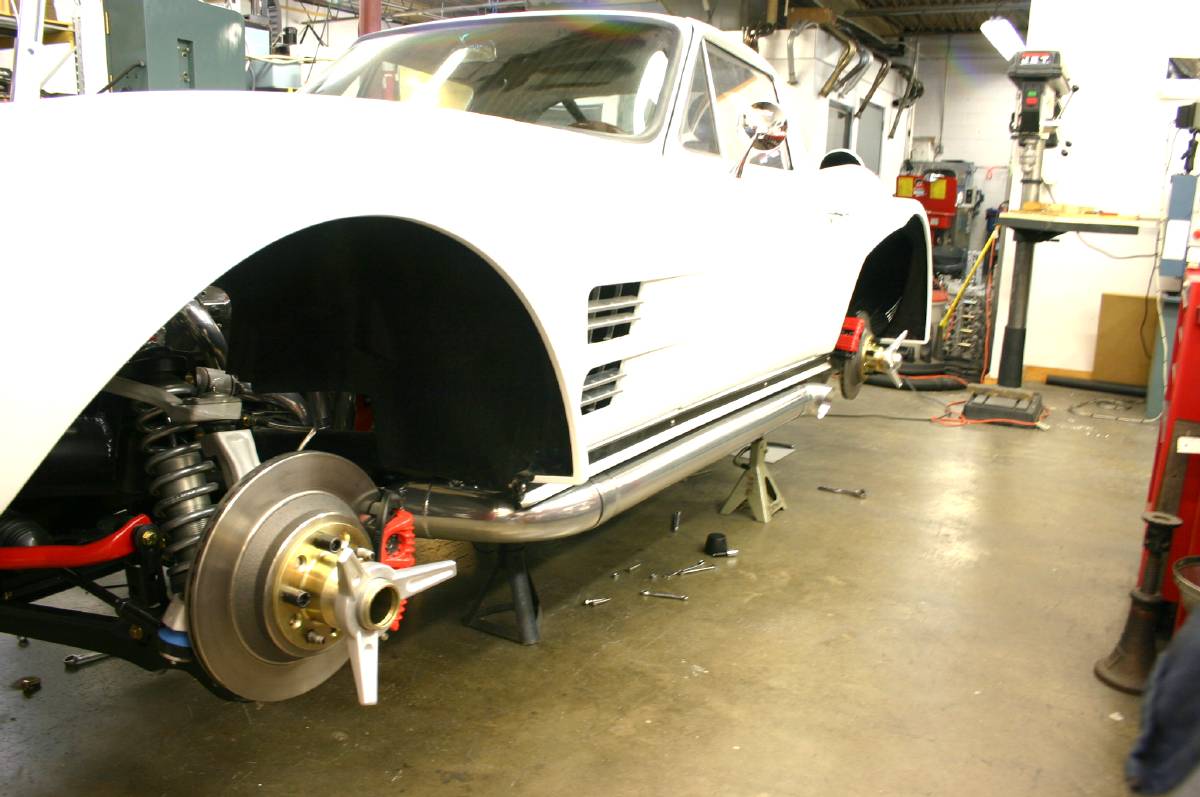
The two pictures above show the pipes on the car. Approximately 2/3's of the pipes are under the car, which provides the look (and step-over clearance) I want for the car....and if I want more showing, all I have to do is loosen two bolts per side and move them.
I'll be taking the exhaust system to the local business we use for coating Monday, so hopefully, by the end of the week, they'll be back on the car for good. Now we're going into wiring harness "Heaven" for a few days, and she should be making noise soon.
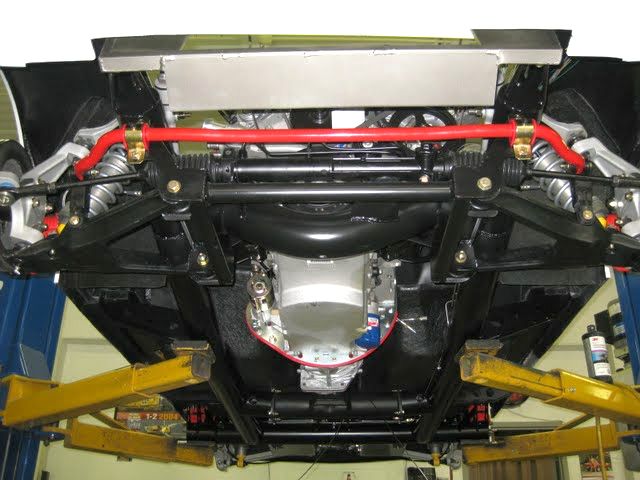
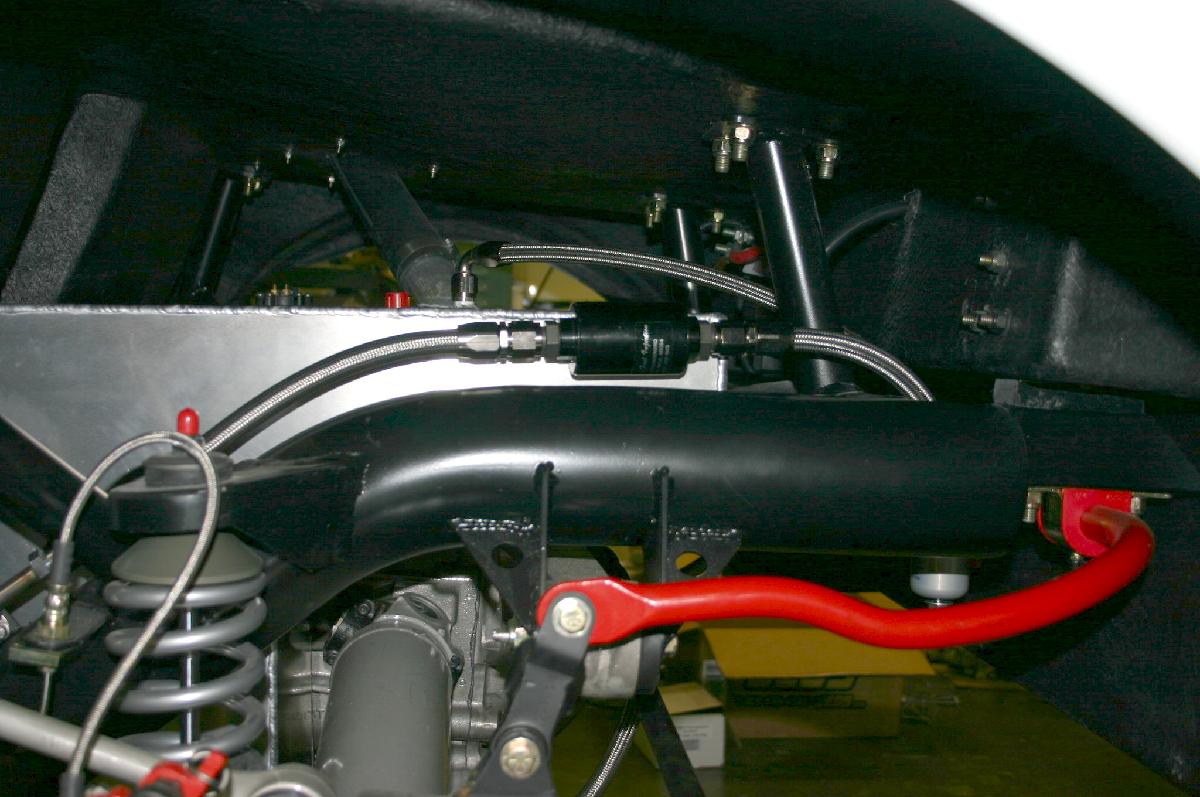
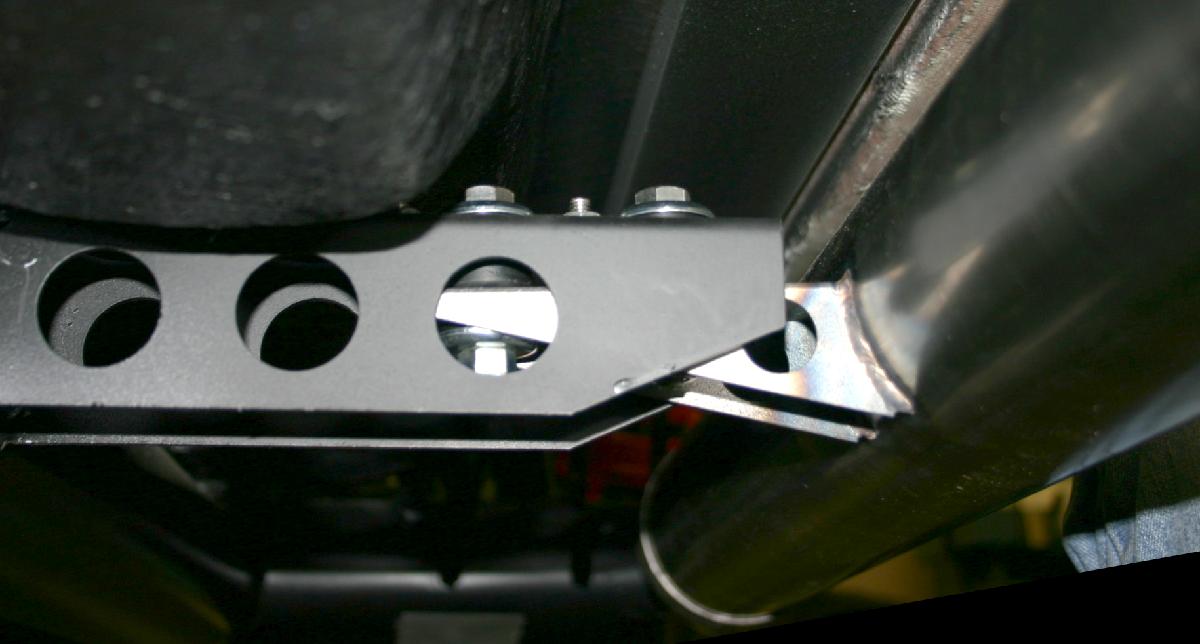
And now we have sturdy place to jack the rear of the car...
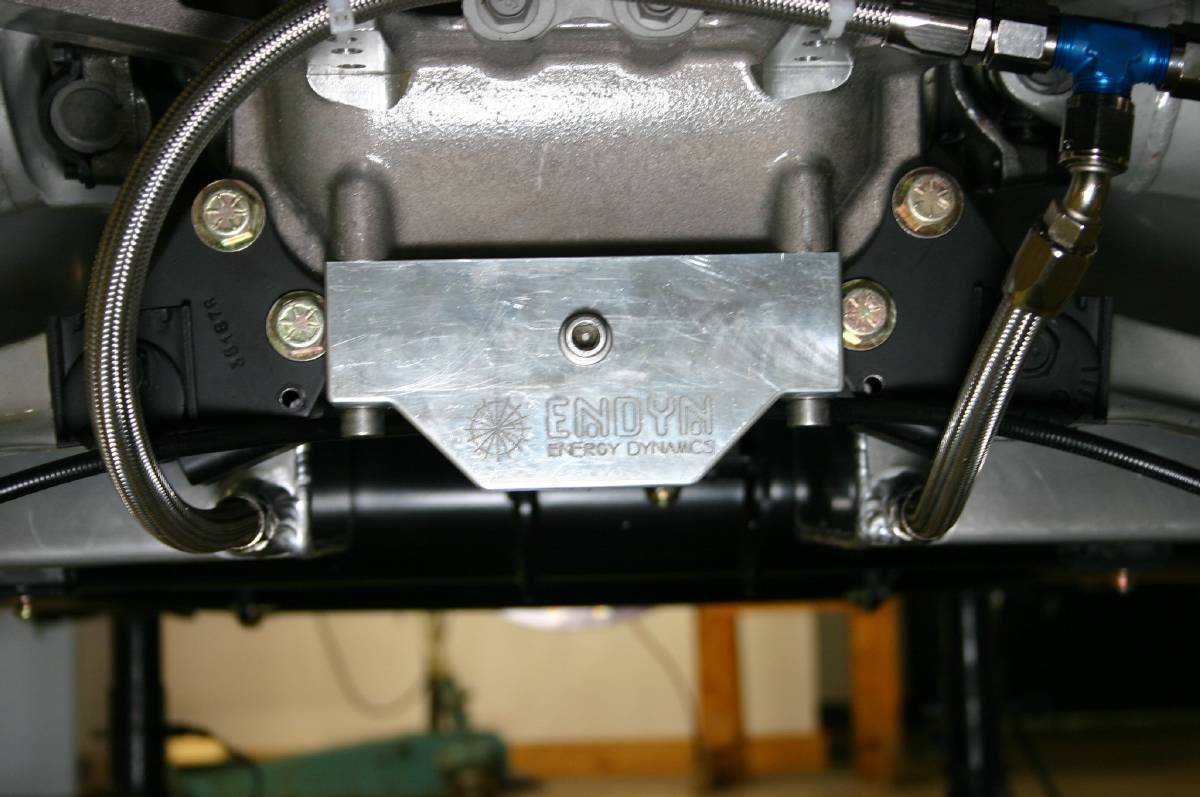
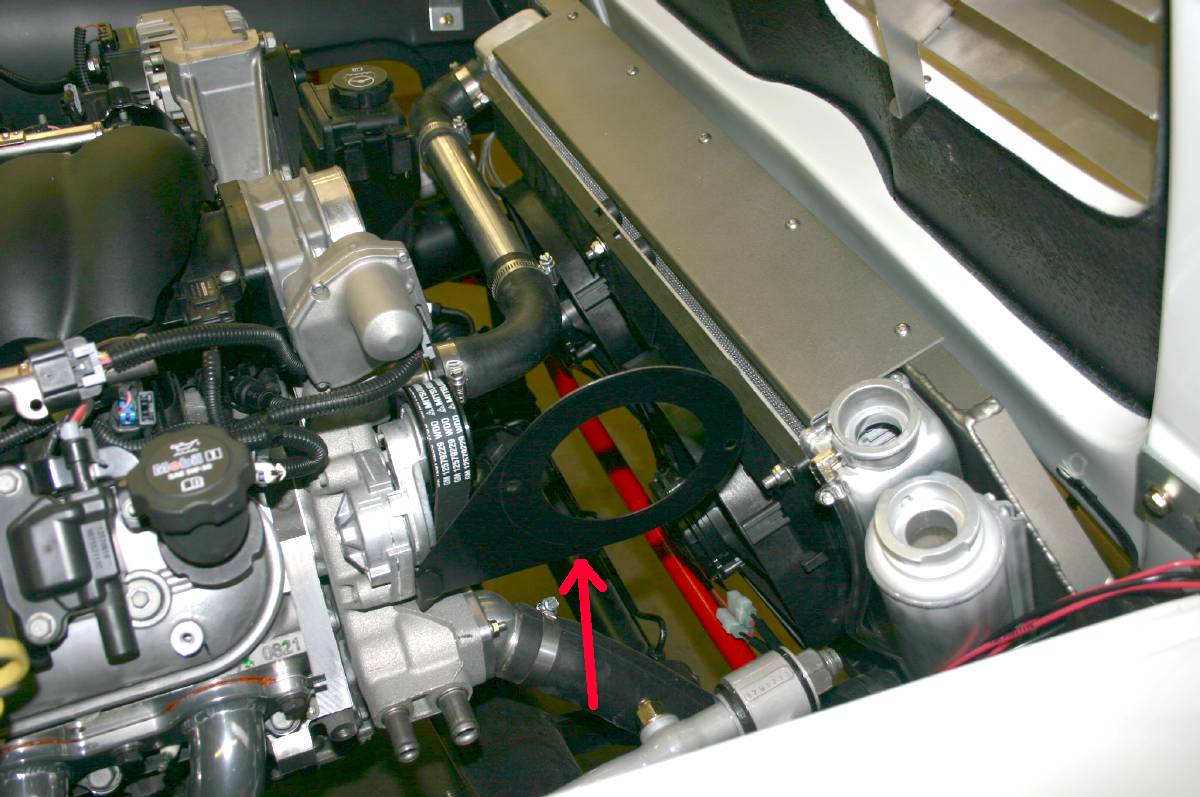
The beginnings of our billet thermostat housing. There are none on the market that I could find that aimed the hose in the right direction to intersect the lower radiator fitting, so "extreme" measures were necessary!
Just kidding....I mentioned to Bob Butler that the jacking post was too heavy. Yesterday, he whipped up one that weighs half of the original. See below:
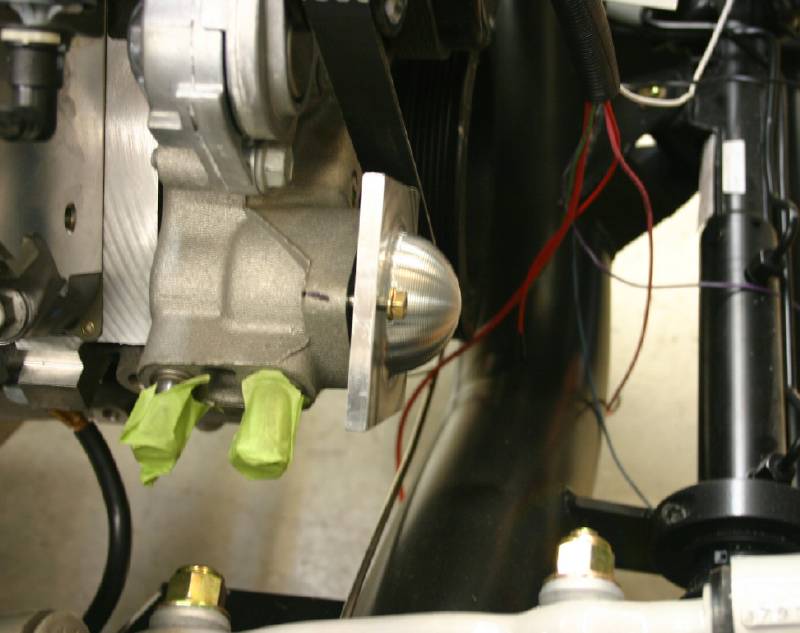
Next up was designing and fabricating a proper mount for the electric throttle pedal assy that GM sent with the wiring harness for the LS3.
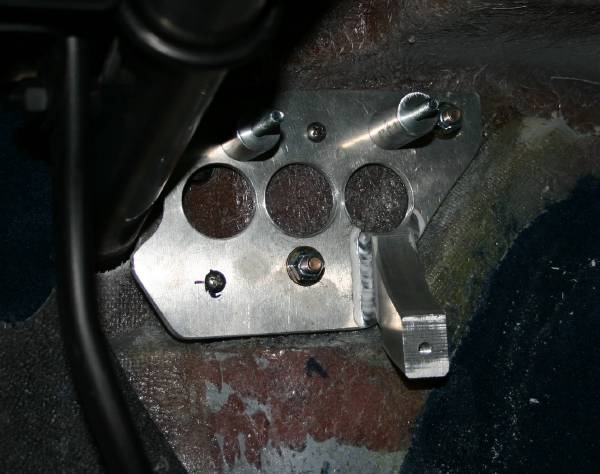
The plate is 1/4" 6061 aluminum for rigidity. The holes are to lighten it a bit. Small upper screw is the attachment point on the firewall for the fuel line. Small screw (lower left) anchors a hunk of epoxy that we form-fitted to the irregular fiberglass surface where it drops away from the flat the majority of the plate is attached to. We also put a lightweight 1/8" reinforcement plate on the outside of the firewall, so my lead foot won't cause any issues...
Got to thinking about the fuel line arrangement and the design of the fuel tank. If the tank isn't filled to a certain level, one side could run dry before the other, since there's no balance tube connecting the two sumps. The easiest way to remedy the situation was to simply connect the two sump outlets with a piece of -8 line, and then go directly to the pre-pump filter. This should not only even things out on the fuel supply, preventing the pump from potentially sucking air, but it also weighs a lot less than the combination we originally built. I'm currently fabricating a plate that that will protect the cross-over line from road debris. We welded some tabs on the inside of the two gas tank sumps for the plate mounts. The plate is also angled downward toward the rear to prevent anything from hitting it head-on.
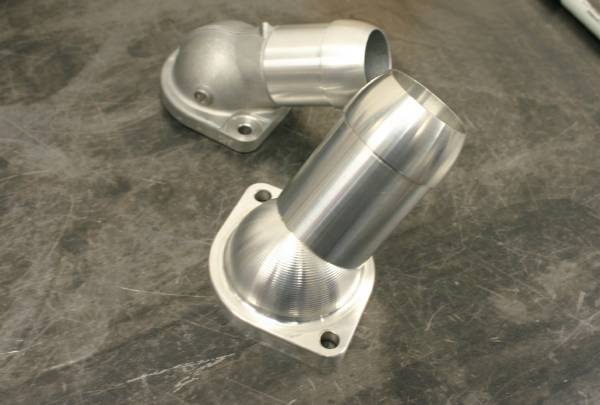
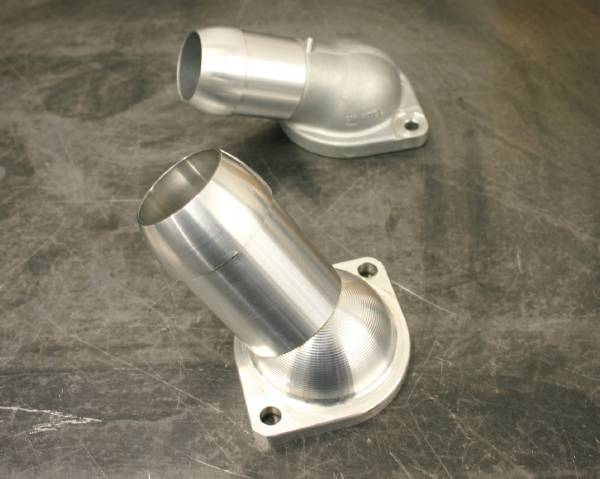
Above you can see two views of the finished billet thermostat housing. This steps the outlet to 1 3/4", which is the same diameter as the lower radiator fitting. Garvie welded the two pieces together inside so there are no visible welds. The angle on the new housing also makes plumbing it to the radiator a snap.
03-14-10 Update
As mentioned in the previous update, we fabricated a protective plate that's positioned between the two gas tank sumps. The angled plate should prevent debris from hitting the fuel cross-over line.
I spent a week or so pondering what to do on the cooling system. As it gets hot here in Texas, Gary and I had already decided on the use of a large radiator. Adequate cooling fans were next on the agenda.
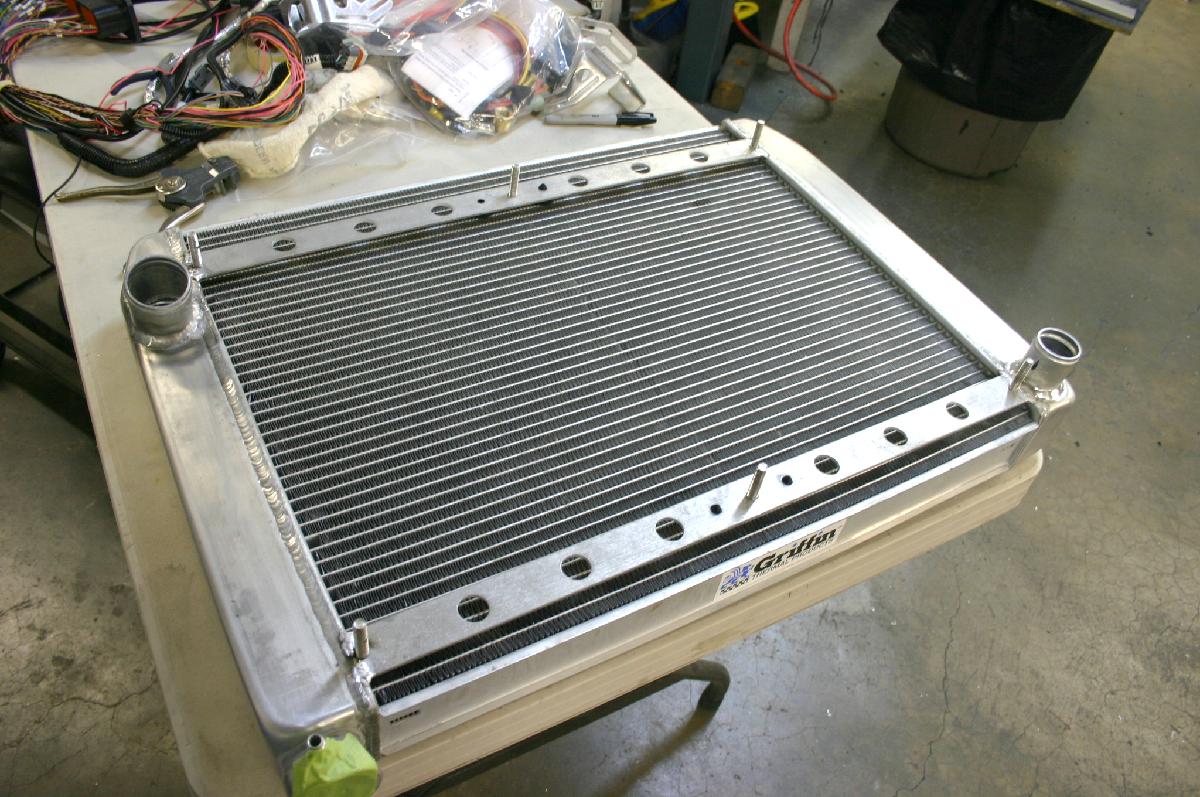
I decided to use a Spal cooling fan assembly comprised of two 11" fans. I've had some experience with a number of the aftermarket cooling fans, and the Spals have always been the most dependable. The particular unit I purchased was actually a little too wide for the radiator, and using the supplied mounting hardware just wouldn't work at all. The "fix" was to weld 5/16 threaded studs to aluminum strips that were in turn welded flush with the radiator's end tanks. Assuming everything was measured and positioned correctly, the studs would pass through the fan assembly's mounting holes.
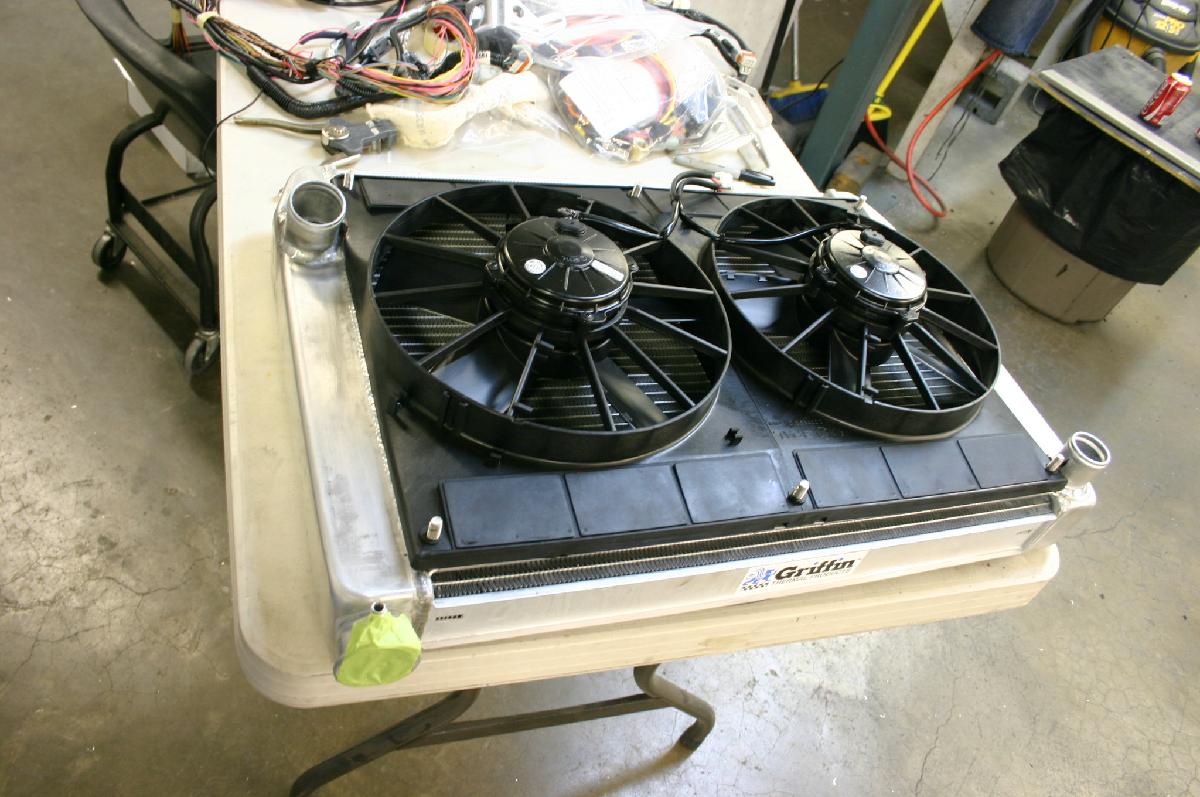
And there it is....maximum fan area for a radiator of this size. The rectangular sections are hinged rubber flappers that allow more air to pass through the shroud assembly when the car is at speed. We also added a drain plug to the radiator, making any future cooling system draining a lot cleaner.
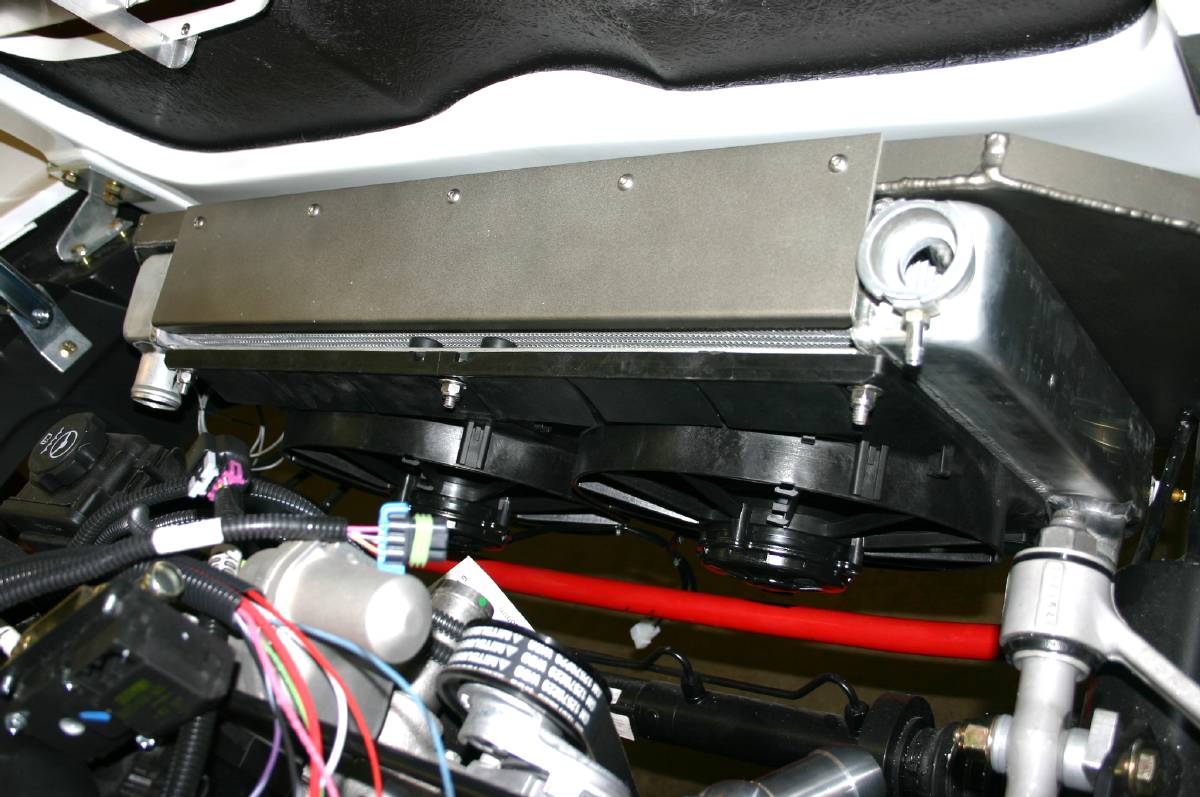
We also made rubber inserts that capture the upper and lower radiator core, so there's no metal to metal contact in the mounts.
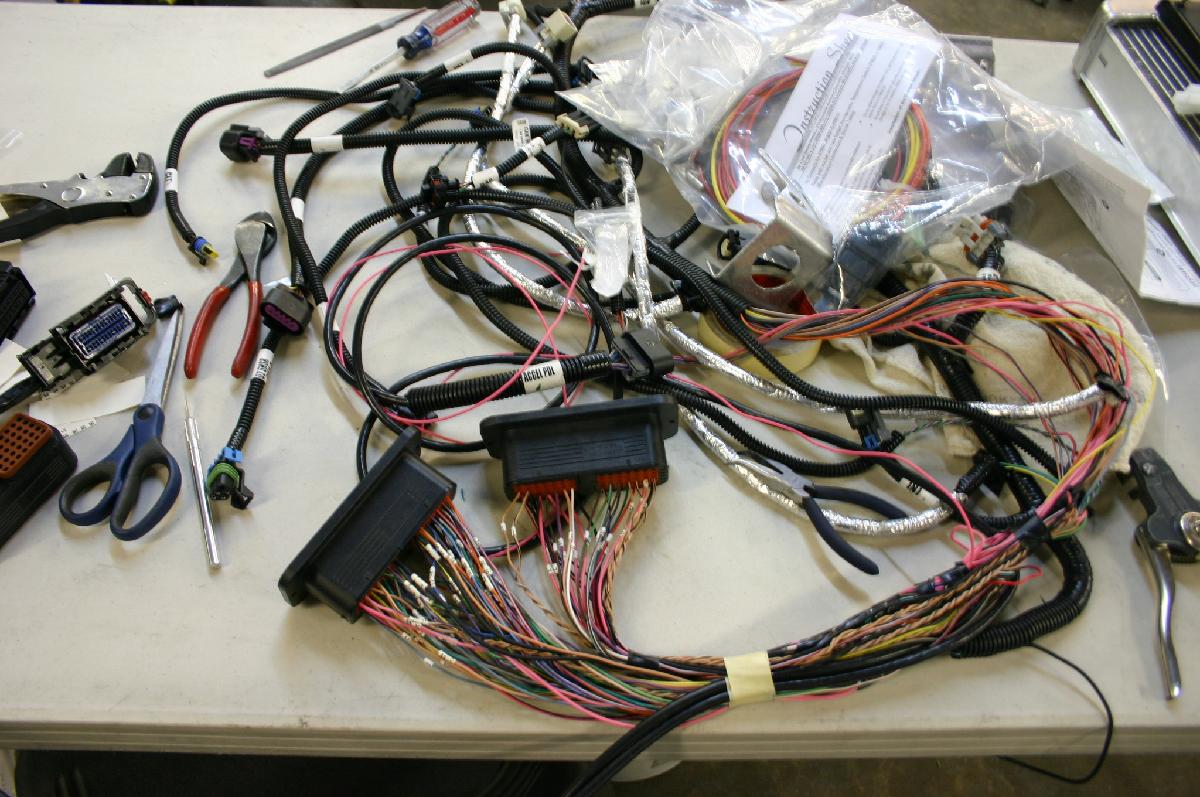
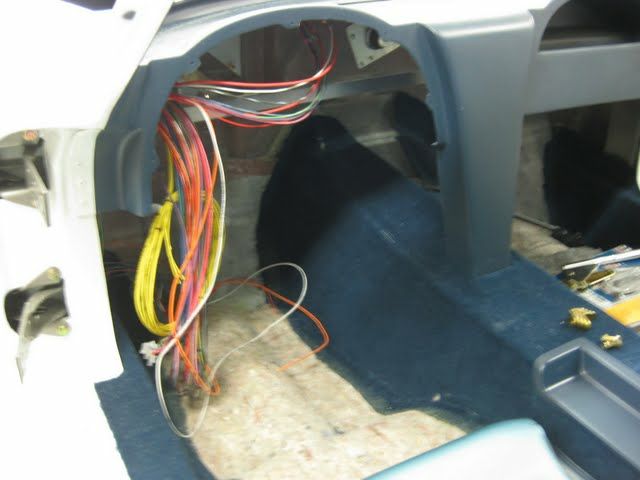
And of course, everyone's favorite...the ECU wiring. After discussing the best way to shorten the wiring harness, Josh decided that we should just cut the harness at a point just inside the firewall and install connectors after we'd removed the unwanted harness length. We bought two Deutsch connectors, wire end pins / sockets, and what has to be the world's most expensive crimping tool. All of the wires were numbered at both ends prior to cutting them to avoid any mix-ups...especially with so many wires of the same colors.
We've fabricated this plate with bolt holes for attachment to the aluminum body structure plate inside the right-hand passenger-side kick panel. It has stands on the back-side to space it outward .650", as well as stands and fingers for mounting the ECU and the fuse box. The holes are for lightness and ventilation.
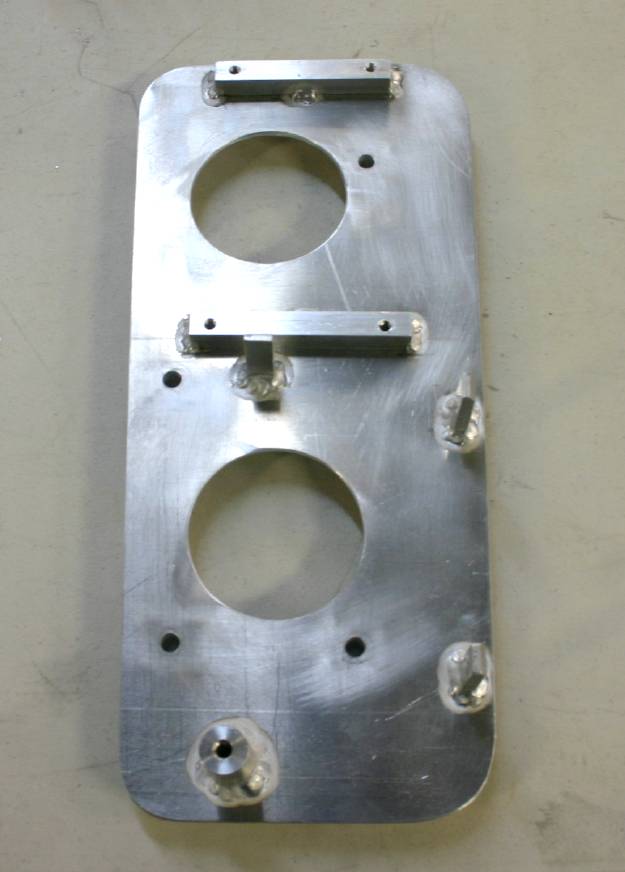
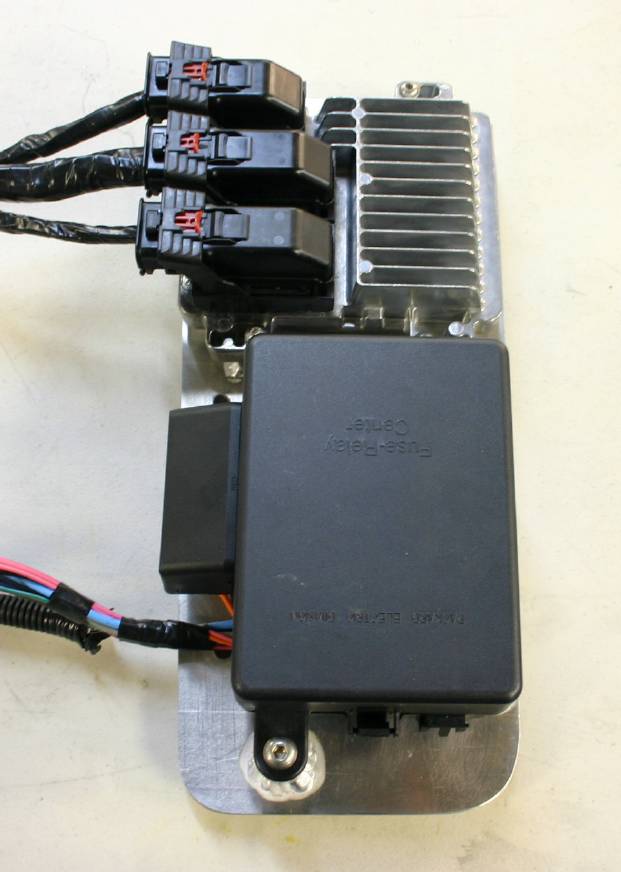
This pretty much eliminates the mess usually associated with the electrics and electronic engine management.
Headers and side pipes arrived today. Specialized Performance Coating (http://www.spcoating.com/) in Arlington Texas did a killer job making the headers and side-pipes get the look I was after.
Now, we're just finishing up all the wiring (integrating much of the aftermarket harness into the GM wiring to take advantage of ECU-controlled functions, as well as the factory fuse box. I also have to fit the hoses between the radiator and the engine, as well as those going to the heater.
04-26-10 Update
Every week, we get another 3-4 hours to think about how we're going to do this or that...and then get it done. Unfortunately, that's not allowing us to move very quickly. This last Saturday, we finished all the wiring except for the radiator fans, but that shouldn't be much of an issue, as we're going to wire them directly to the GM ECU's output. As you can see below, most of the engine wiring has disappeared from view.
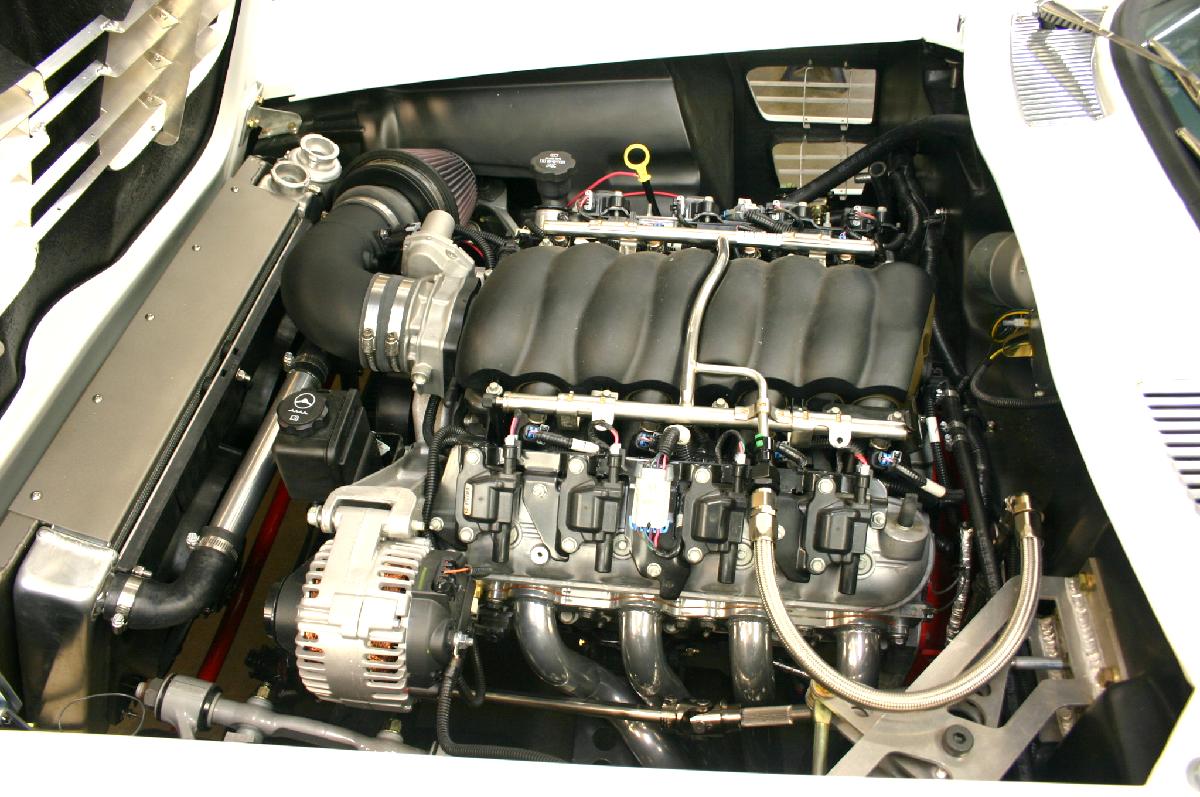
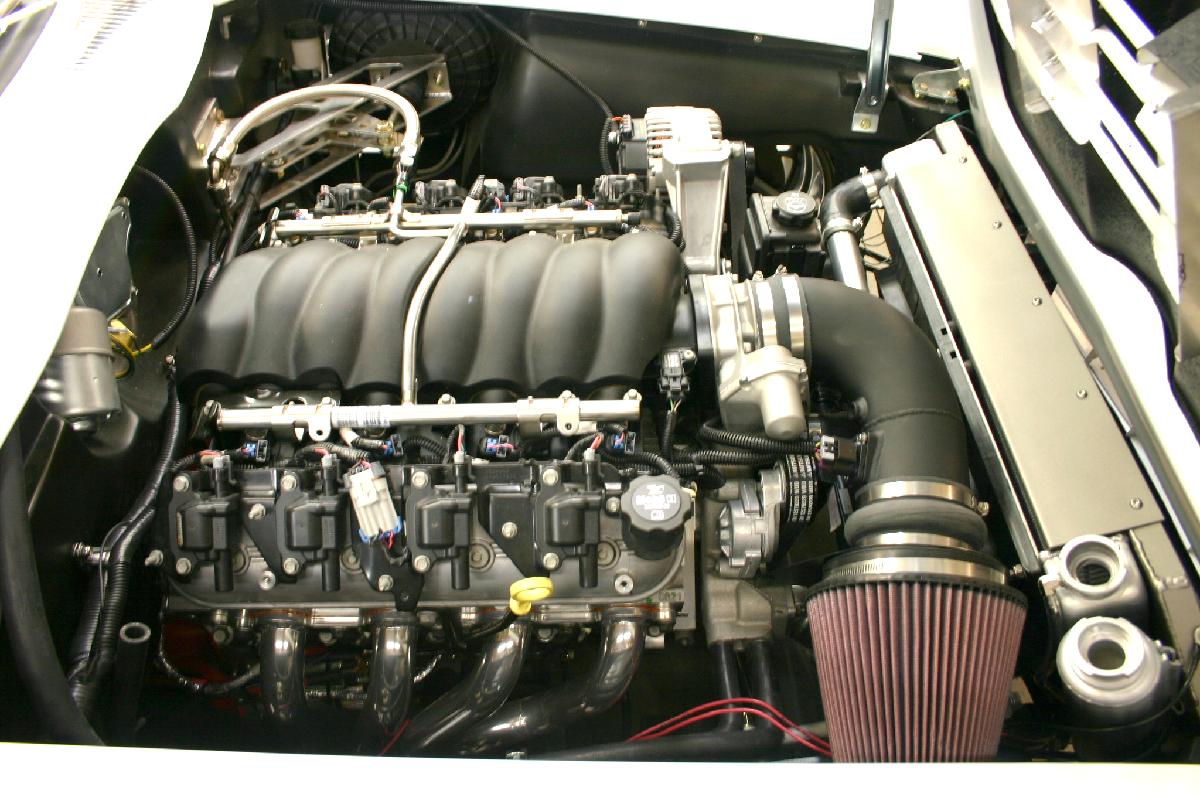
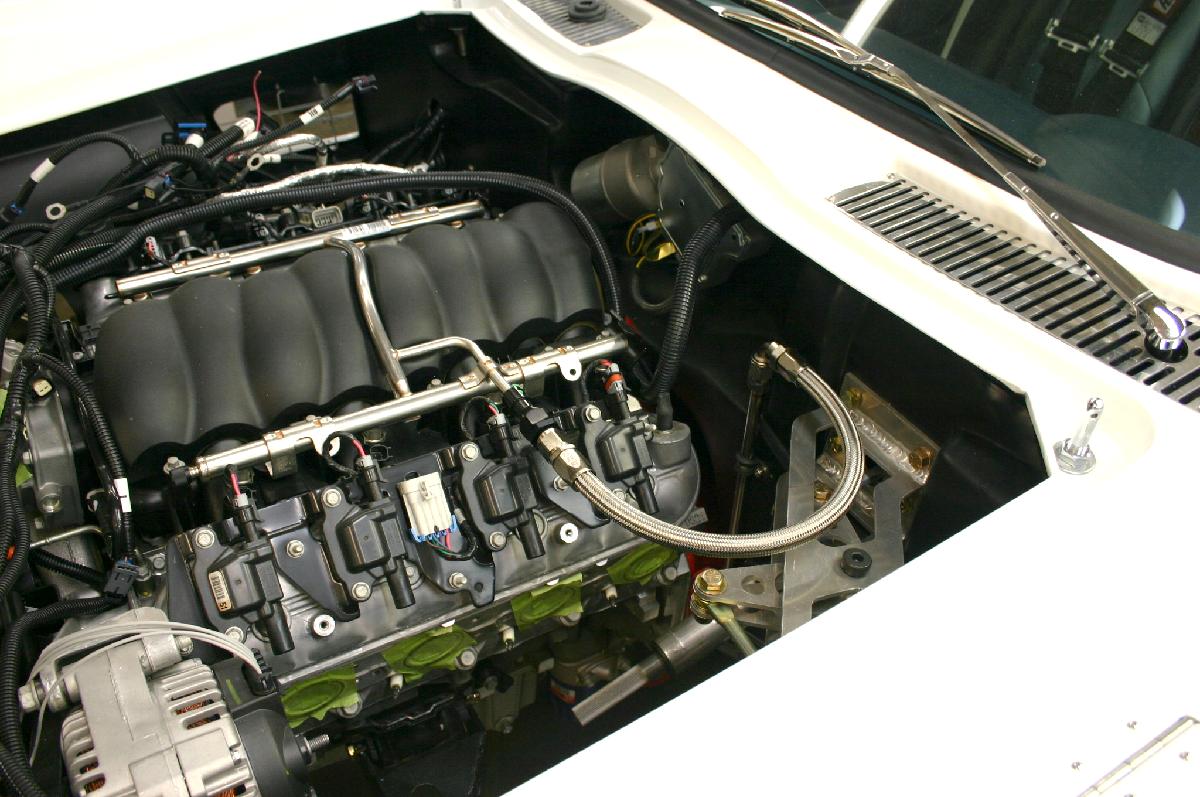
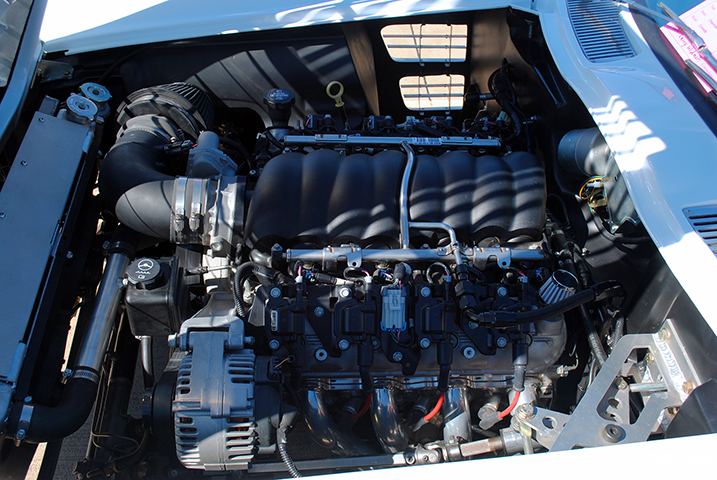
Above you can see the K&N air filter set-up we built. The base of the air cleaner has a steel bracket that attaches it to the belt tensioner, so it will move with the engine. There's also a lot more clearance between the tube and the radiator / fans that what you see in the pictures. We also mounted and plumbed the radiator's expansion tank in the small space to the right of the radiator itself. The red wires in the picture connect to the electric fans. We'll rout them (cleanly and out of sight) to the ECU. I still have to finish the routing of the heater lines, but that's just a matter of cutting them to the correct lengths at this point.
We did have to remove the front vents and weld in a couple pieces of aluminum which allowed us to notch the center area of back two to make adequate clearance for the air filter tube.
We've spent quite a lot of time re-machining the knock-off hubs and the inside flange of the front wheels to bring them inboard. I still need another inch or so, but we'll have to fabricate some suspension pieces to make that happen. The plan is to get it on the road as-is. We will also use some Honda bump-stops above the shock bodies to limit upward suspension travel in the meantime, eliminating the possibility of tire to fender contact on the fine roads here in Cowtown.
This week, I plan on cutting the lower lip off the scatter-shield to make it the same height as the oil pan. The flywheel and clutch assembly will remain enclosed, but we'll lose the two small lower bolts that hold the front cover to the bell-housing. I believe the car will be up and running next Saturday.
05-10-10 Update
All the wiring is complete and there was no smoke when we connected the battery to the rest of the system. Everything, including the wipers works fine. We started the engine for the first time and the idle is really nasty...so it sounds good. Everything went without a hitch, except there was an error code that popped up. The code said that the camshaft and crankshaft weren't "aligned" with the ECU. I'm thinking what the hell is this with a brand new crate engine? A call to GM's aftermarket group netted some instructions indicating that a GM scanner must be used to synchronize the cam, crank and the ECU. Now, I'm really peeved because I thought since I purchased the engine, wiring harness, and ECU, it should be plug and play. At any rate, we'll have a nearby dealership do their "thing", and it should be ready to roll.
I bought a Borgeson double universal joint to connect the steering shaft to the rack, as I perceived some slight binding with the single joint. We also built a bolt-on mount for the 3/4" steering shaft support. The steering is now smooth as silk.
We also installed an air bleed that connects the front of both heads to the upper radiator cross-pipe. This will allow the engine to bleed air out on its own.
Next up is a rough alignment here in the shop. My Dad's 94th birthday is Monday, and I'm going to do my best to take him for a short drive around the neighborhood Sunday. I can't wait...and neither can he!
05-22-10 Update
And this afternoon, it finally turned a tire under it's own power.
Pulling the car around to the front for some long overdue pictures....
....and I slammed the door too hard!
We're still trying to get the cam and crank synced to the ECU, so it'll be next weekend before I can take my Dad for his first ride.
05-29-10 Update
After purchasing equipment to do the cam alignment and failing on every attempt, we trailered the car to the local Chevy dealership so they could use their Tech2 scanner to fix the problem. They weren't any more successful than all the "experts" we'd had over here. Another couple days of talks with the GM Powertrain folks also lead us down an endless path. My long-time good-friend Jim McFarland put me in touch with the assistant to the head of the GM Eco-Rod program. I received four emails telling me that we couldn't receive the error code we were getting, because that function was disabled in my ECU. Well, the engine still ran rough, and still spit out that (P0016) error code which was for cam alignment. A final email from GM Friday instructed me to "simply" pull the timing cover off and look to see if the cam was positioned correctly..... I suppose that operation is simple if you've never done it yourself....
We removed the radiator, water pump, harmonic balancer, and front cover, only to find that you can't view the timing mark on the crank without removing the oil pump which sits directly in front of it. That, in-turn, requires the removal of the oil pan, and oil pick-up tube assembly. Once everything was stripped off, here's what we saw (see below).
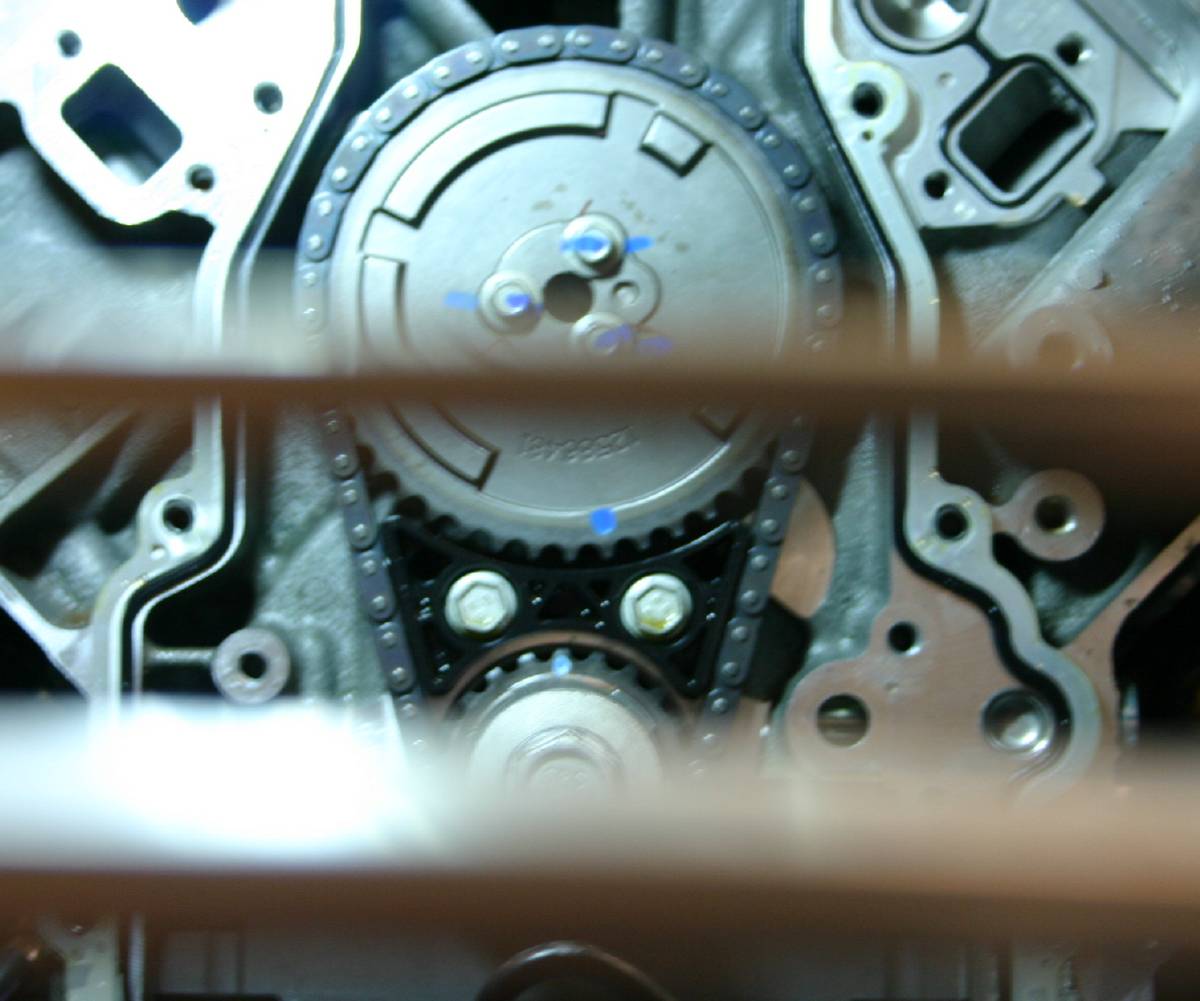
Note that the two (LARGE) blue marks do not line up with each other, so the engine was running with the cam off one tooth. If the marks were very small, I could be a little more understanding, but they aren't.
Other than my family suffering a multi-million dollar loss when GM took a dump, this has been my first personal experience with anything GM, and I've got to say that it hasn't been a good one. If they can't build engines better than this one, they should be out of business.
The engine runs with no error code, but it has a vibration that increases with rpm. I don't know at this point if it has "tweaked" exhaust valves from the cam being installed incorrectly, or if it's a dead cylinder. There were no error codes this time, however. As Dad's health is a major concern, I went ahead and drove the car home late Saturday. Followed a cop all the way home. but apparently she wasn't looking in her rear view hard enough to notice there was no inspection sticker!
I took Dad for a brief ride. About a mile from home, as sudden cloud-burst prompted a U-turn and a quick sprint back to the garage.
Here's dad with the car after a three-mile trip to the post office and back.
Next weekend, I'll do a leak test on the engine to determine if there are bent valves. If there are, I'll just begin building a replacement lesson here at Endyn. At least it will be a known quantity...
07-25-10
Everything checked out fine with the engine. Surprisingly, cylinder leakage was less than 2% on all of the cylinders, which isn't bad for a production engine with very few miles on it. A few random pics from the house below:
09-07-10 Update
After ten years of working 6-day (minimum) weeks, we observed Labor Day by taking a three-day weekend here at Endyn.
The weather improved the end of last week with high temps only in the low-mid nineties so the weekend proved to be a perfect time to exercise the Grand Sport a bit.
A combination of East vs. West and shameless advertising.
I managed to find some shade in the street in front of the house.

Dad wasn't up to a ride, but I was to put a few miles on the clock before Monday was over. Saying it's a blast to drive is a gross understatement. The car is easy to drive, and there isn't a great sensation of speed, so it makes staying under the posted speed limit virtually impossible.
I'm very impressed with the car's overall ride, which is stiffer than the red LS powered car at Mongoose. I attribute this to the considerable weight difference between my lightweight car and the fully-loaded red car. My Hondas' suspensions will knock your teeth out on all but the smoothest roads, so driving the GS is like being in a luxury car.
This is the first rear-drive car I've owned in many years, but having learned to drive racing karts, rear-drive handling characteristics are still intuitive. The power of my FWD Honda's has taught me to use considerable finesse when mashing on the "go" pedal, which is essential in the GS because this car will get you into a lot of trouble in a hurry if you don't use good judgment. Regardless of gear, squeeze it and you'll get going a lot faster than you anticipated, and with traction at a premium, you'd better be prepared to do some steering to keep it straight unless the road is concrete and absolutely flat.
I have a list of things I'll be doing with the car when I bring it into the shop again, so the car's evolution will begin again in another month or so, but for right now, the car is much better than I had ever imagined. This whole exercise of fabricating some of the finishing pieces has been a lot of fun for all of us, and I'll forever be indebted to Gary and Steve at Mongoose for making this dream car a reality. They build good stuff.
10-03-10
12-14-10 Update
The billet hinges aren't quite done yet. We should have some additional lightening (holes) in them in a day or two. They it's off to hard anodizing so the hinge springs won't wear the aluminum. Right now, weight is under a pound per hinge. Note that the fixture allows us to mill two hinges at once.
I have the transmission out of the car to replace the clutch with one that's more to my liking. We decided to machine a hole in the bottom of the Lakewood housing so we can "inspect" the relationship between the hydraulic throw-out bearing and the clutch fingers. While at it, we did a little measuring and found that the transmission location hole wasn't where it should be (it was off by about .020"). We also found that the transmission flange on the bell-housing wasn't parallel with the engine-side flange, and there was a "dip" in it as well.
To "fix" the tranny location hole, we added about .030" of weld to it's circumference, and then put the housing on the CNC machine (see below).
After locating the bell-housing by finding the centers of the dowel holes, we proceeded to machine the surface the transmission attaches to (flat) and parallel to the engine-side flange. As you can see from the picture above, the Lakewood housings are anything but flat.....another fine example of how far down-hill component quality has come over the years. I don't know if they are having this stuff made in China or not, but I think it's terrible that they sell crap like this.....
Next up was machining a transmission location hole where it should be relative to the block location dowels. When we were finished, the hole was .002" larger than the flange on the transmission (which was the minimum necessary for installation). After bolting the bell-housing to the back of the engine, run-out (measured with a dial indicator attached to the crank) was only .001", which is right on the money for Detroit iron...
Fresh rubber for the rear.....
Big Tires
Now I need to lower the rear a bit. The additional 3" tire diameter put the rear up just a tad too high. These tires don't spin as easily as the original tires, and when they are spinning, they'll put your head back pretty hard.
The current look is only temporary, as i still plan to narrow the tread-width both front and rear.
Adjustable upper control arms will be used with some shorter fabricated lower arms to narrow the front tread-width...and to provide good adjustability. (I'll also use grade 8 hardware).
Billet Hinge (Update)
Our fixture allows us to machine a pair of hinges from the same piece of billet. Next up is lightening....
Rather than using a long tapered end mill (like we use porting heads, Bob made this fixture that allows us to use a shorter took in combination with 4th axis rotation to perform the lightening operation. This fixturing is much more stable, quieter, and machine time is reduced by 35%.
A pair of the billet hinges along-side the stock Chevrolet "clunker".
We'll use hinges machined like this for cars with heavier doors. After doing a stress analysis, we'll machine some lightening holes for cars running lightweight doors. These will be available for sale to GS owners.
02-09-11
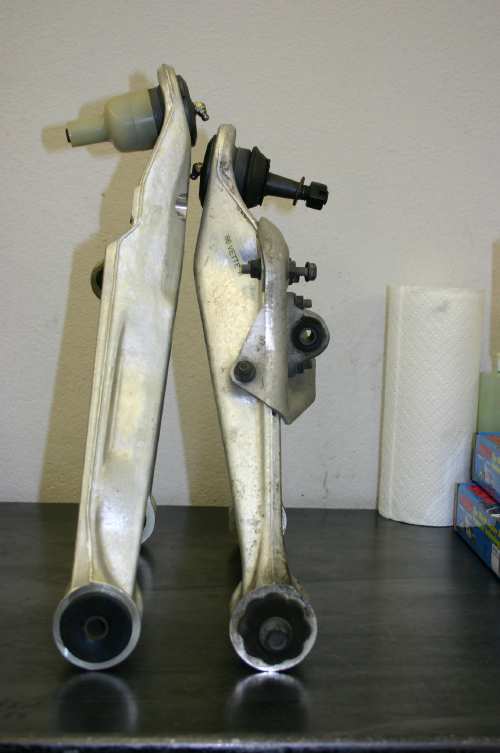
Just received a 1986 lower control arm that I purchased on Ebay. Here's a picture showing the late-model C4 piece next to the earlier model control arm. I haven't done an accurate measurement yet, but the early arm appears to be right about 2" shorter. Using a pair of these with a custom billet shock and sway-bar mount will make narrowing the front tread width a lot easier than fabricating all-new arms.
10-23-11 Update
A good business and personal friend donated this block to my Grand Sport project.
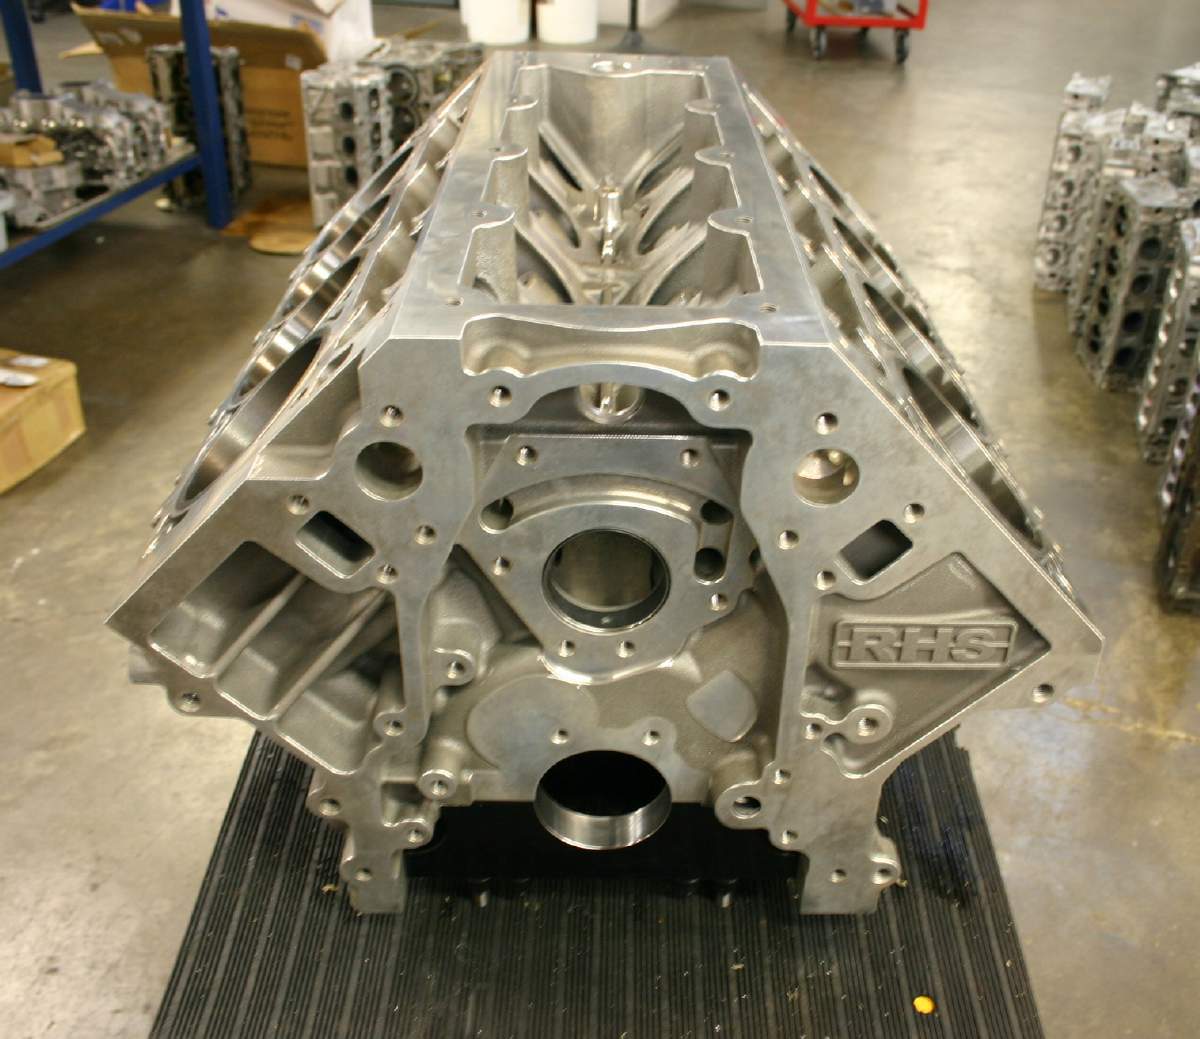
RHS sells this LS aluminum block that's cast in England. Among it's features are higher deck services and raised cam housing to accommodate a 4.25" stroke with ease.
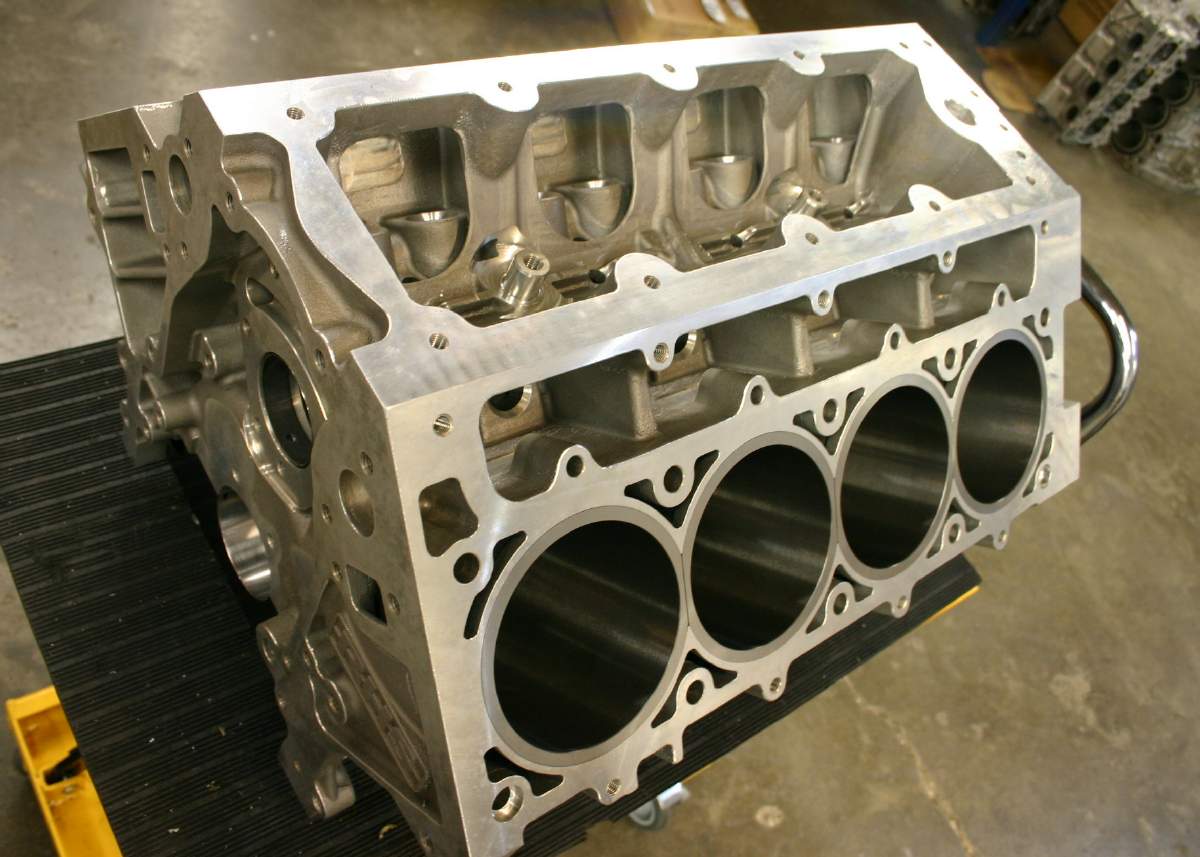
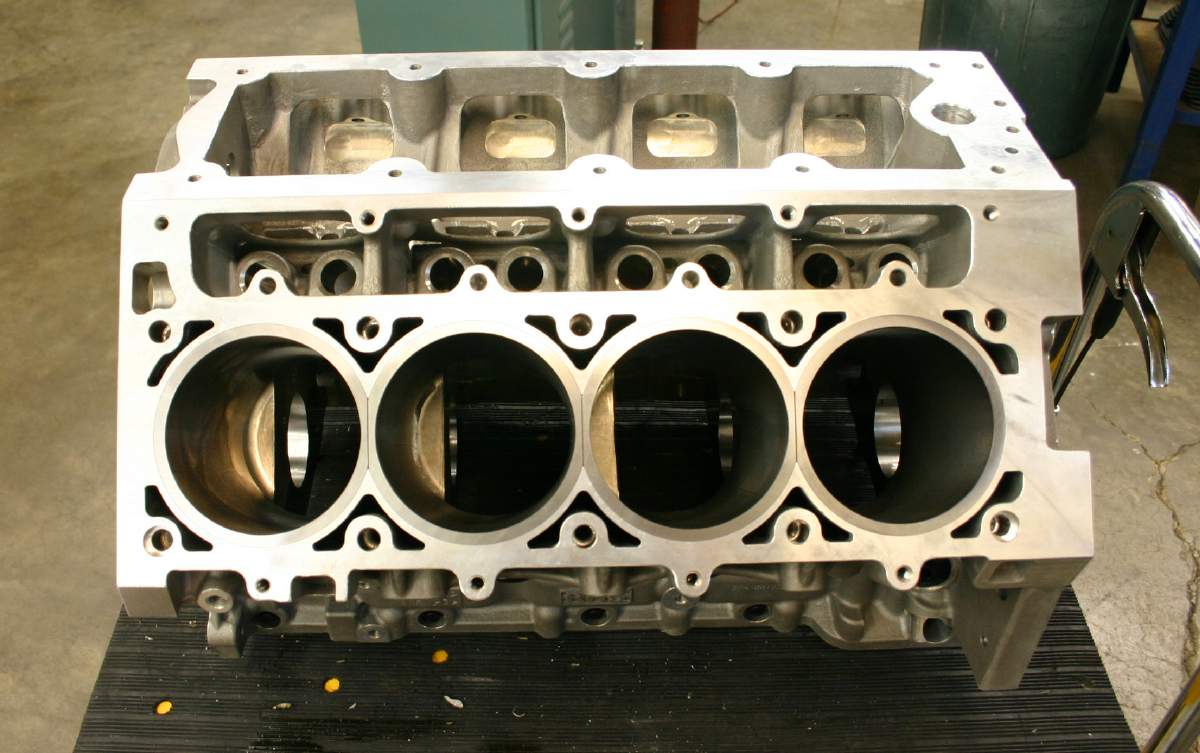
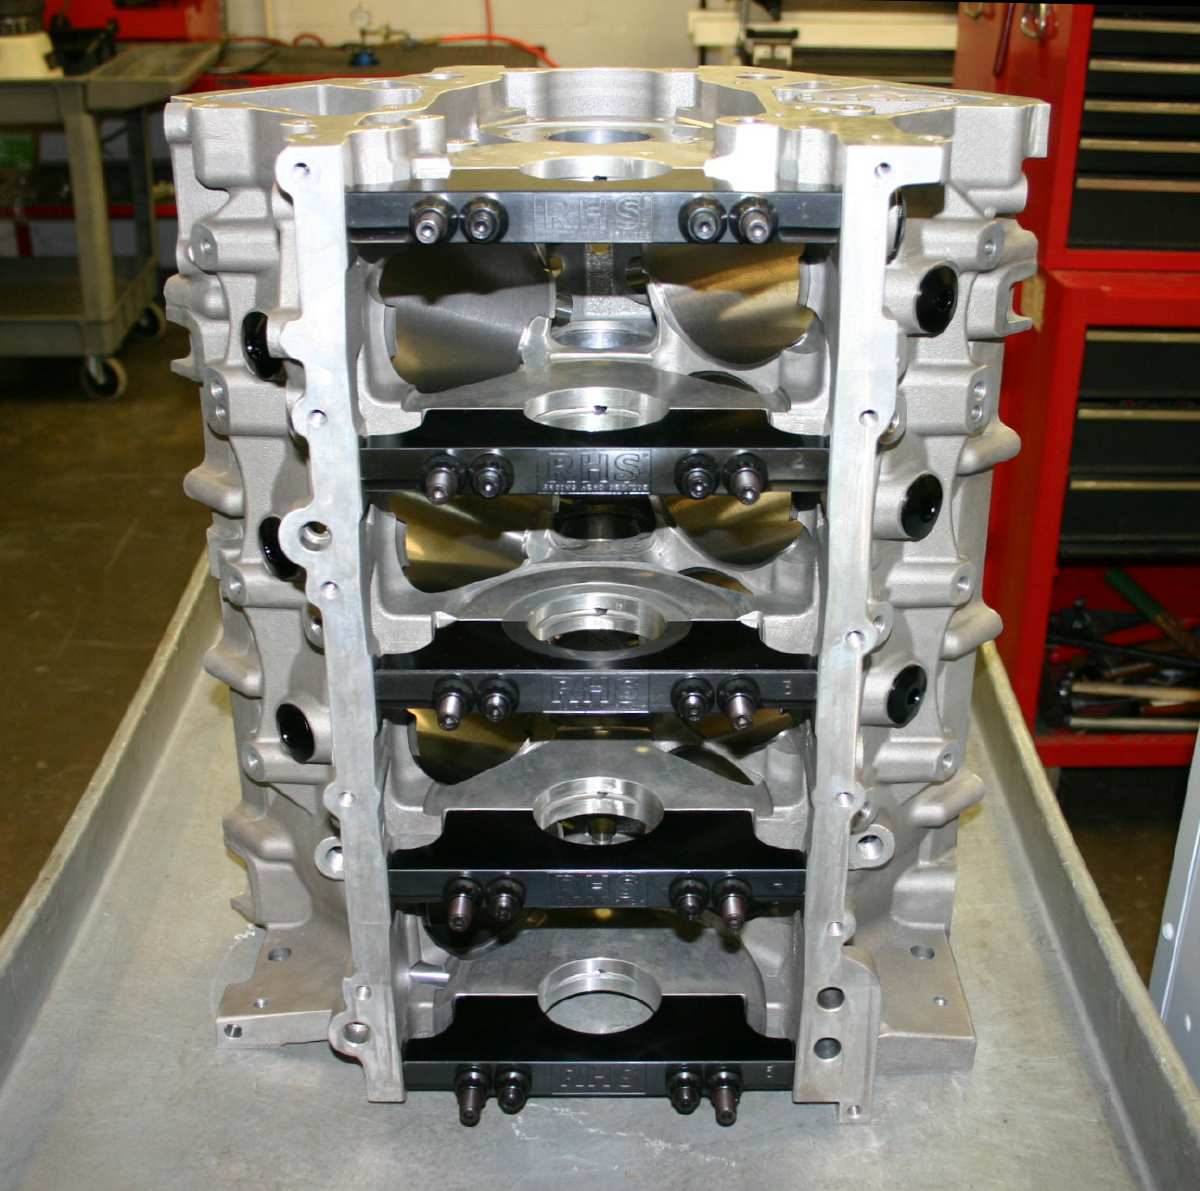
When completed, the engine will be a 4.125" bore x 4.25" stroke, which will net 454CID with relatively good lower-end geometry.
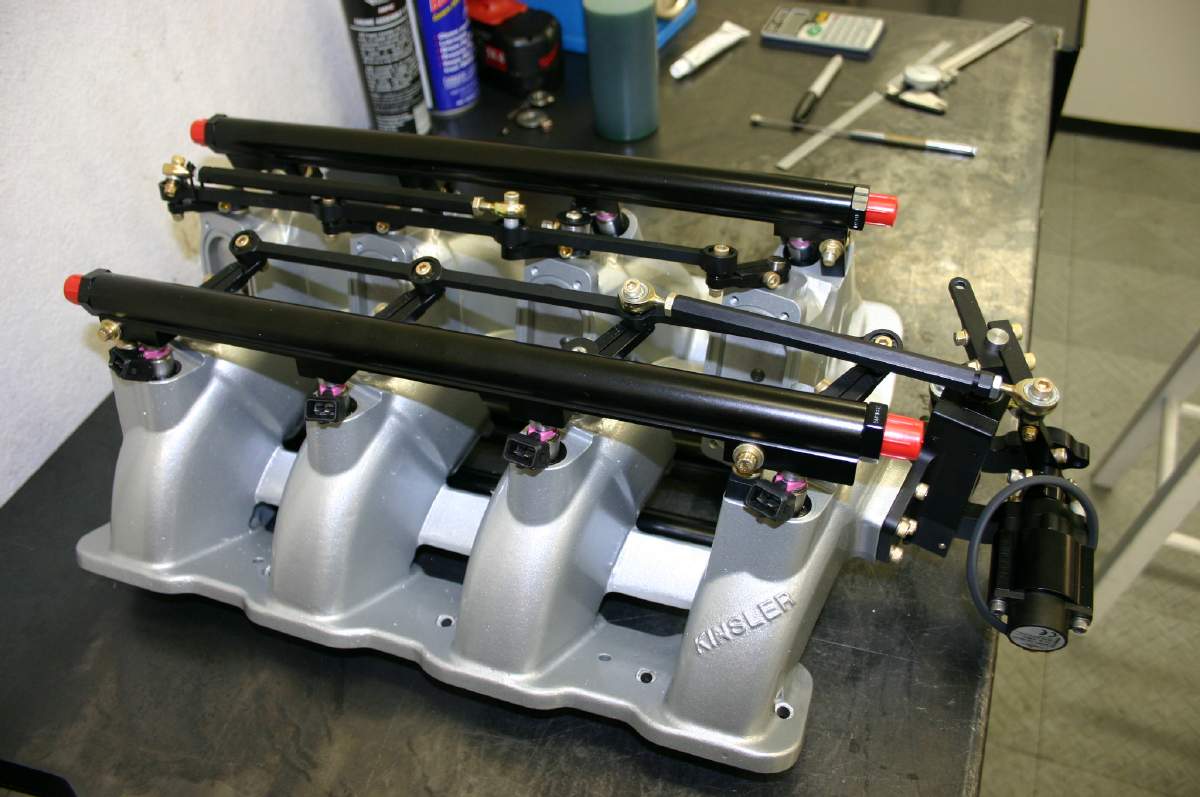
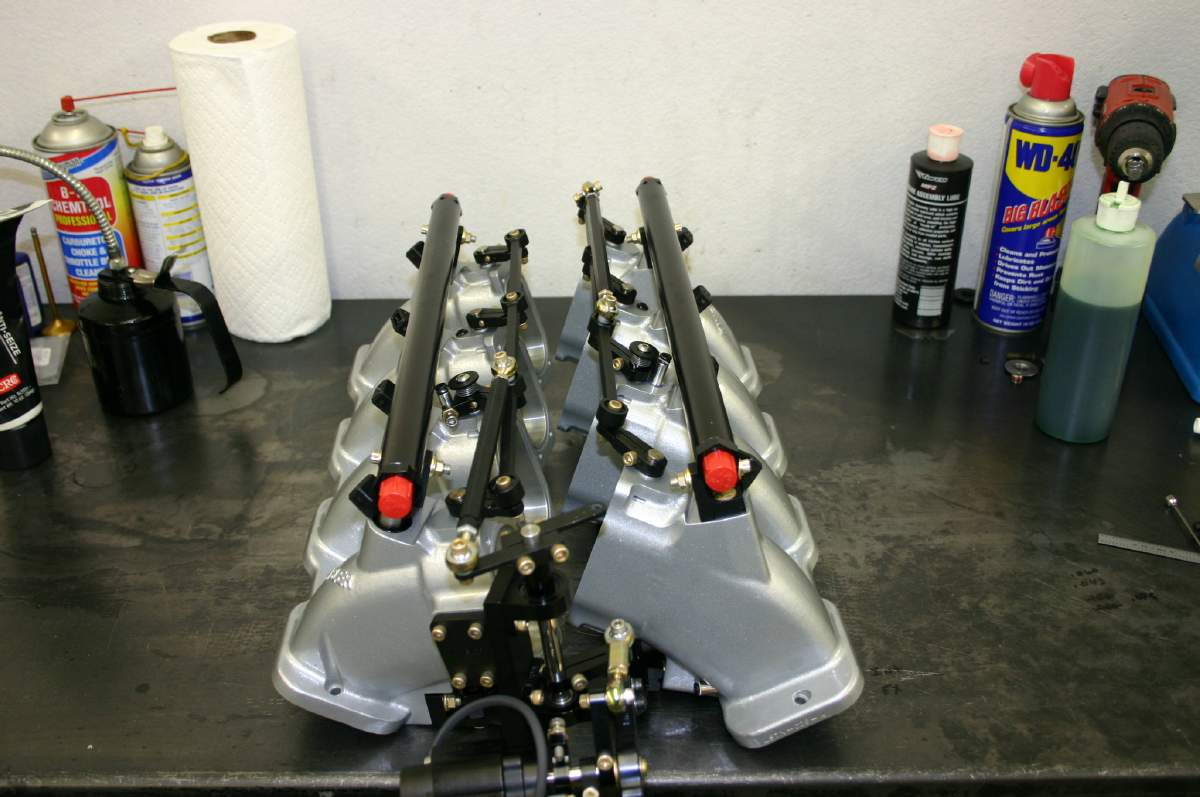
The Kinsler cross-ram I have on order is pictured below.
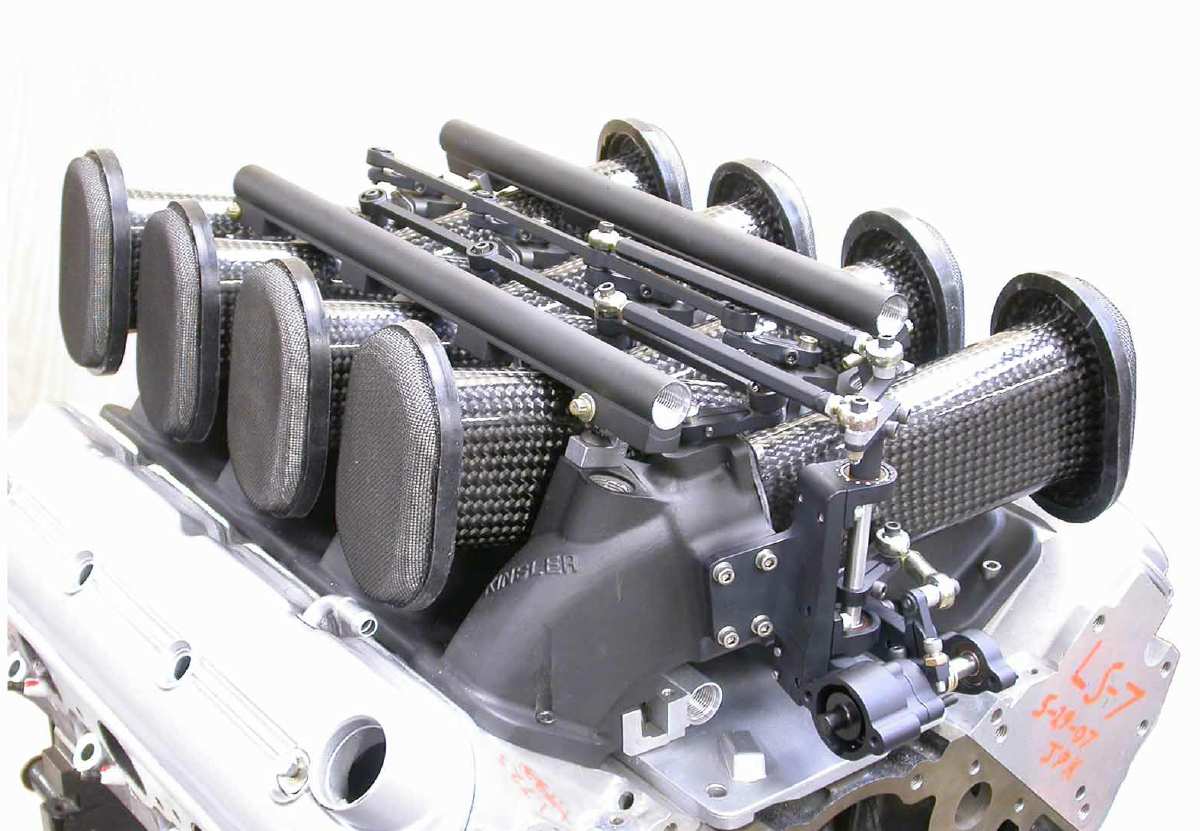
I like the looks Kinsler unit with aluminum ram tubes better, but the decreased airflow from smaller cross-sections would limit power production.
In the meantime, we've made quite a number of lightweight door hinges for these cars.
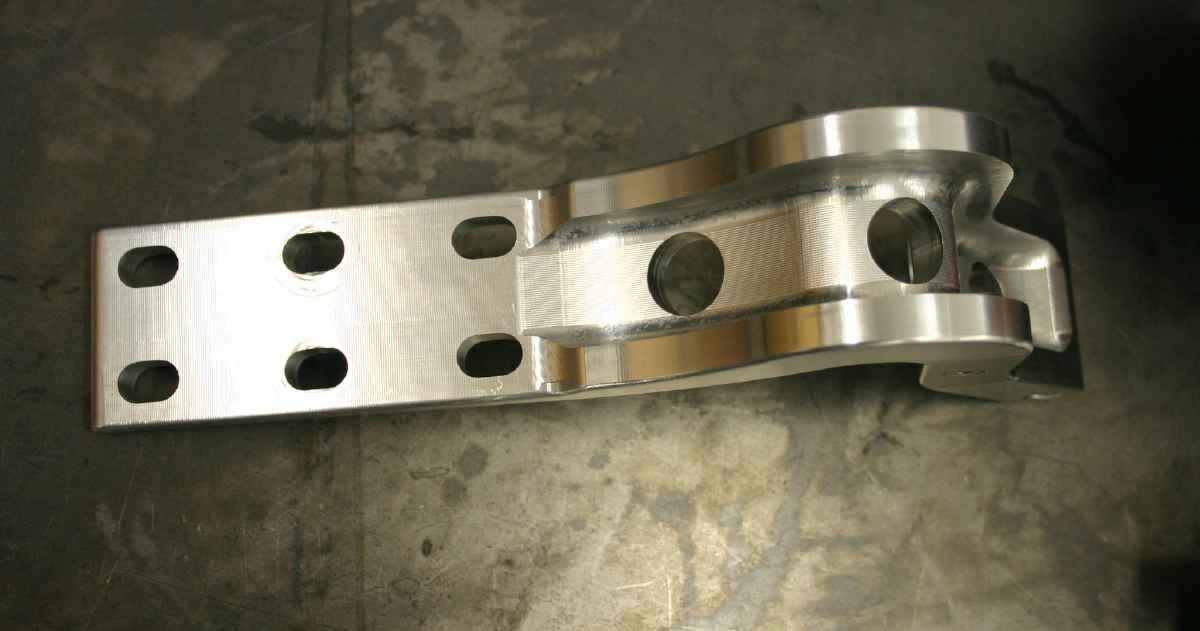
Below is a comparison of the lightweight steel hinges the car came with, vs. the new lightweight billet hinges.
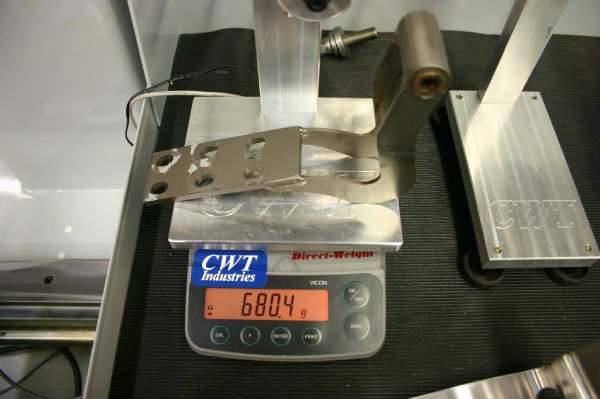
Weight-savings on the car will be about one pound for all four hinges. If you look closely, you can see the stainless steel wear plates inserted in the billet hinges to prevent wear from the door detents.

Aside from the weight loss, these hinges have added considerable rigidity to the doors. The bling-value is also way up there.
I'm building something that's a bit more elegant, but this hastily made bracket gets the shifter up closer to the steering wheel for more "convenient" gear selection.

Much better. Almost as good as my Honda's
12-19-11 Update
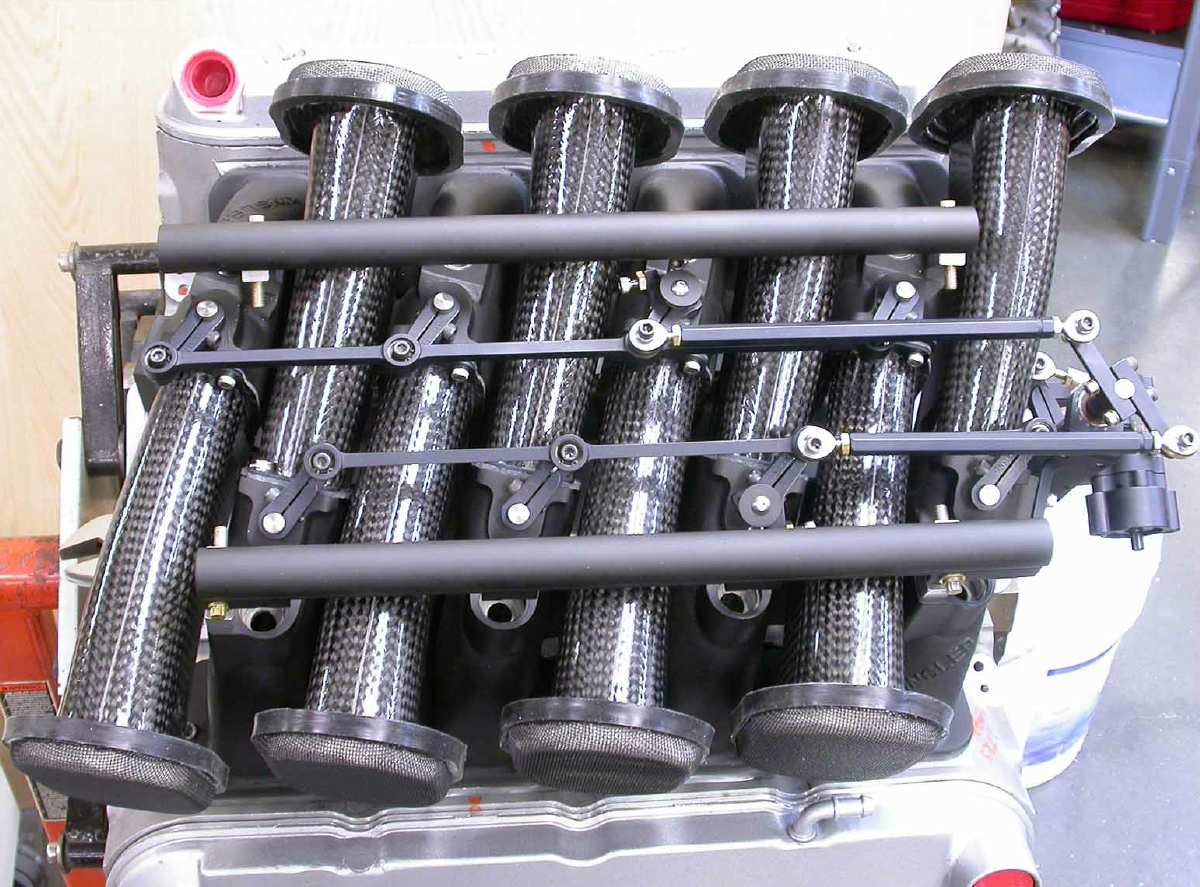
Injector air horns are not completed yet, but I received the Kinsler throttle bodies today.
Kinsler makes some outstanding componentry. Note the electric throttle set-up.

Bullet-proof throttle linkage. I opted for the top-mount injectors, so they spray straight down on the valve rather than making a curve. The rails below the throttle bodies are part of the vacuum accumulator system.
06-09-12 Update
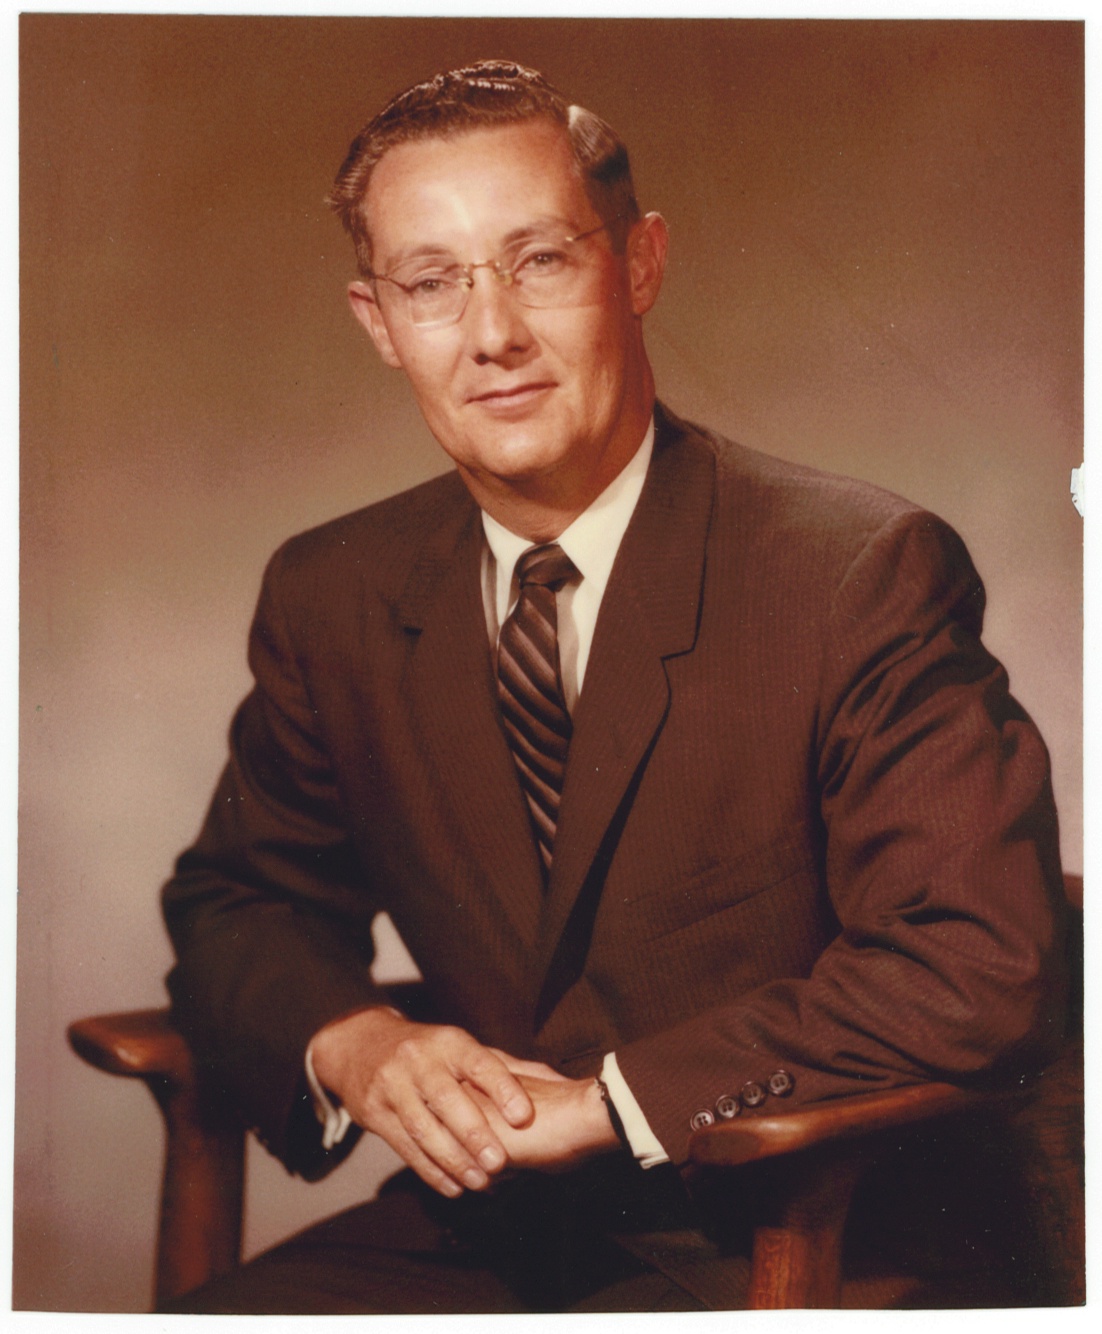
Dad passed away on June 20, 2011, so life hasn't been as much fun. I miss the heck out of him, especially when I'm working on or driving my GS. Dad lived quite a life, as one of the real pioneers in the aerospace industry. My Grand Sport is and always will be a tribute to him, as it kept him enthused for the last two years of his life. If you read about his achievements, you'll see that Dad's world was a little more complex than any of our 4-wheeled, earth-bound ones....
http://www.legacy.com/obituaries/dfw/obituary.aspx?n=robert-h-widmer&pid=152143694
Billion Dollar Secrets: http://video.google.com/videoplay?docid=-3975546396136405829
Updates on the GS
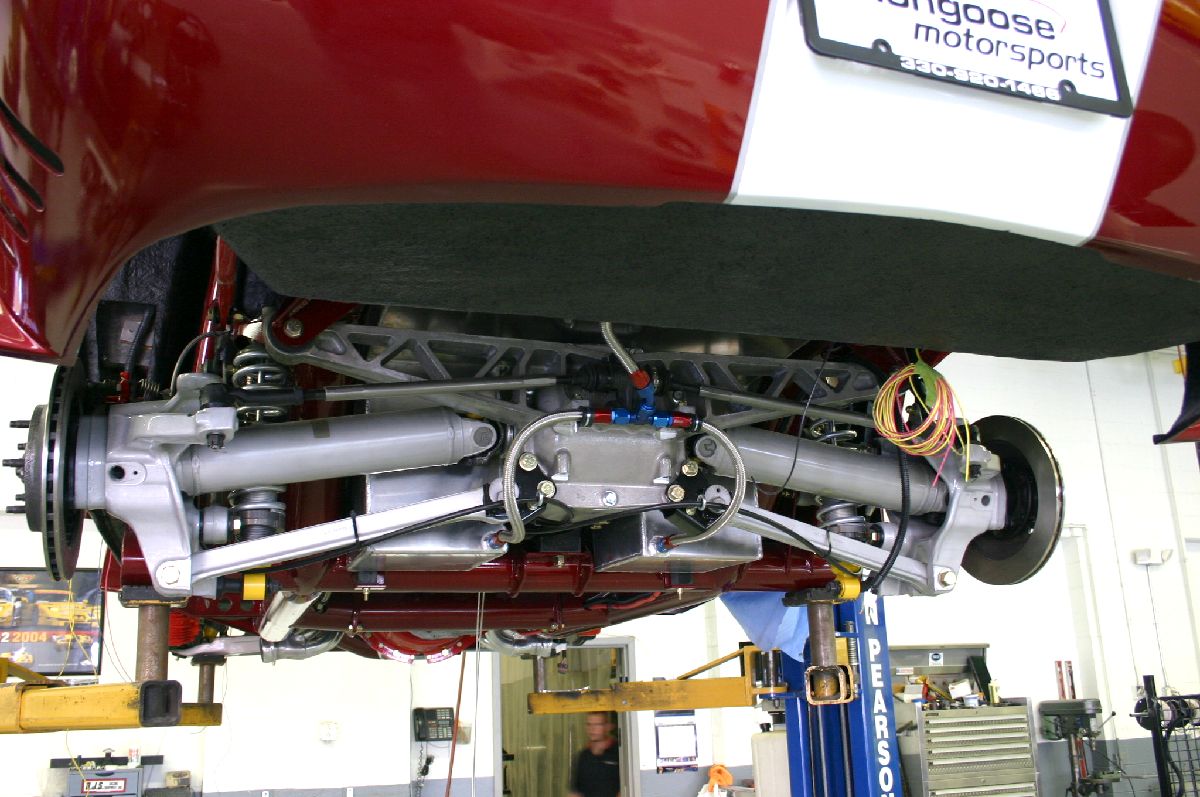
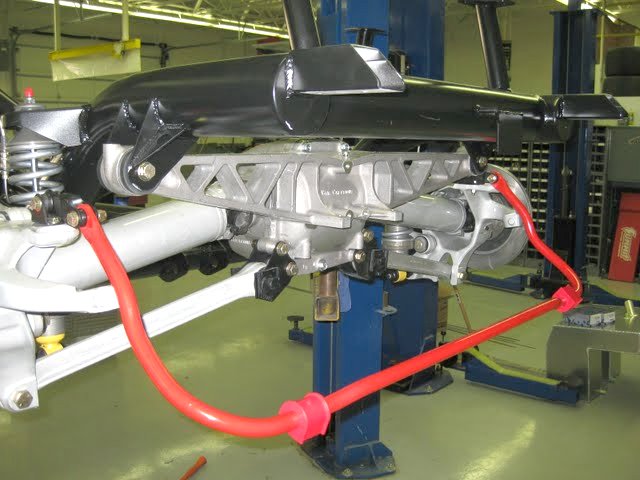
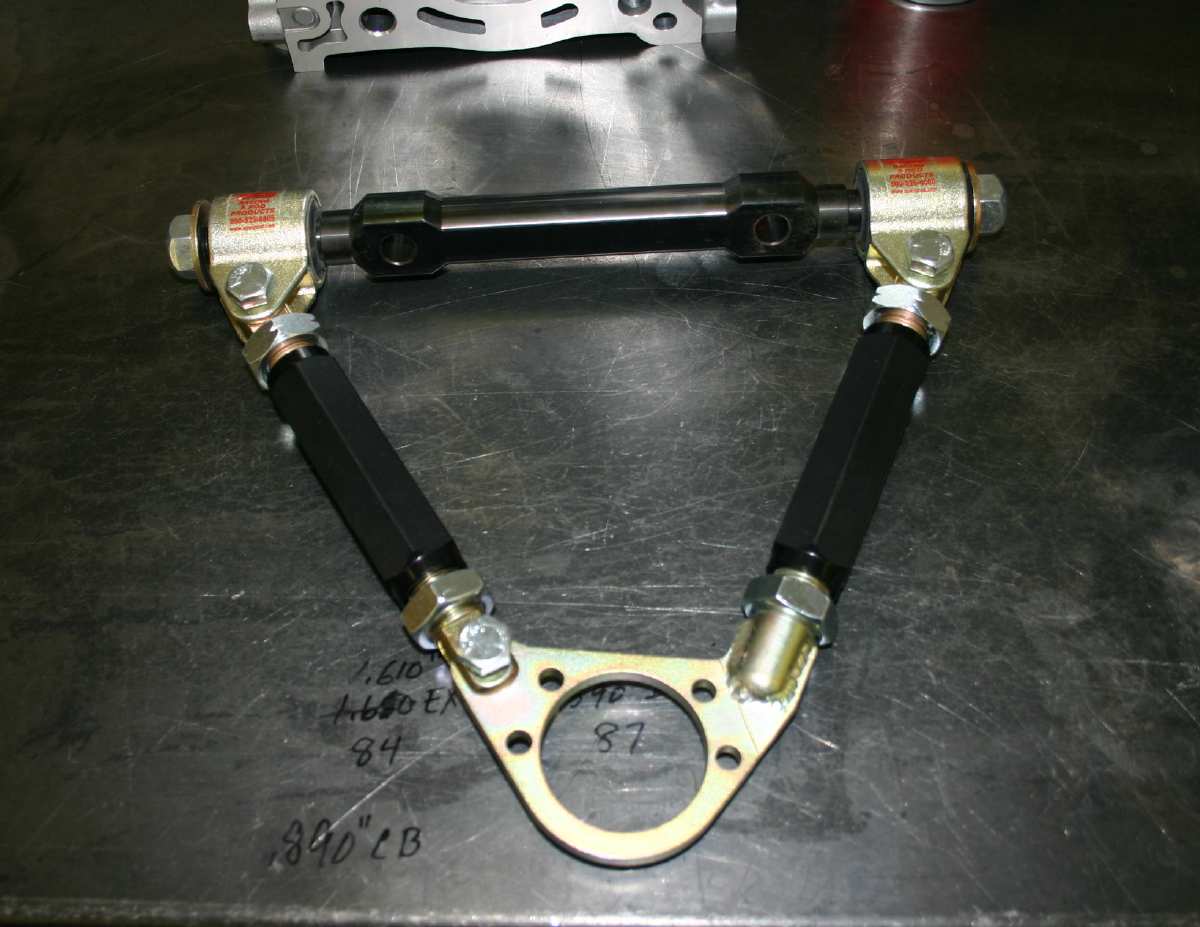
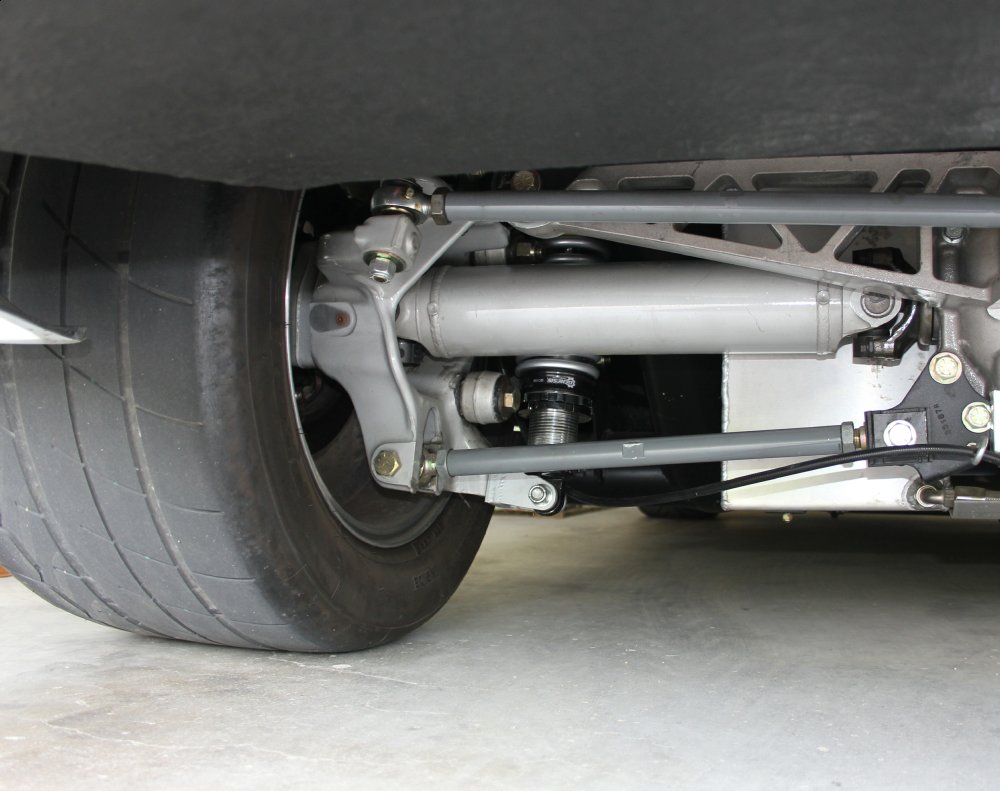
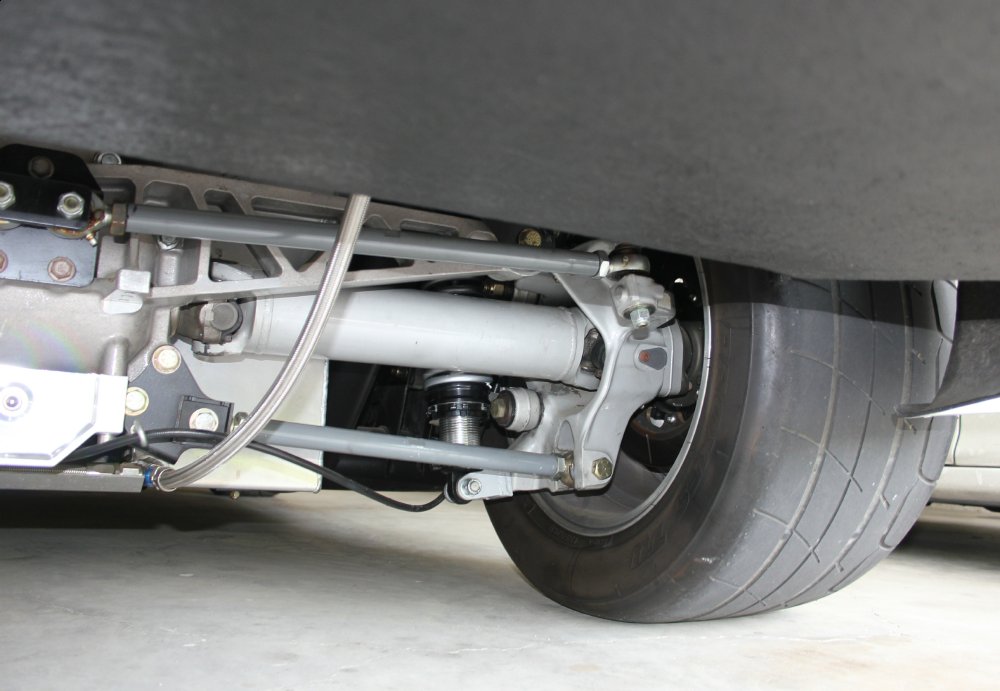
Recent upgrades on the car have consisted of work on the rear suspension, where we have swapped the OE Corvette rear suspension toe and camber links with fully-adjustable pieces.
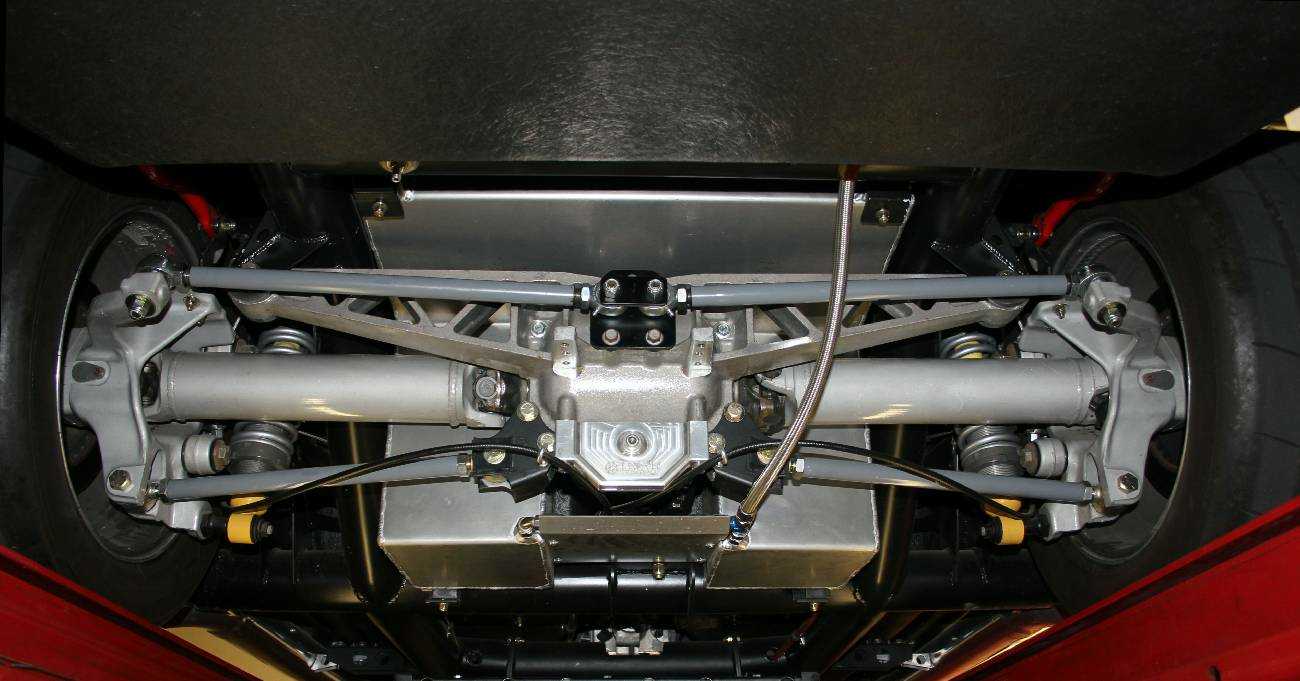
We have the front and rear camber set at 1.5 degrees front and rear now and the car is much more fun to drive. It's very predicable when you're applying throttle exiting turns, so I'm happy. The experts at Texas Track Works here in Fort Worth handle all of my alignment duties. They're the best in this part of the country.
Up Front
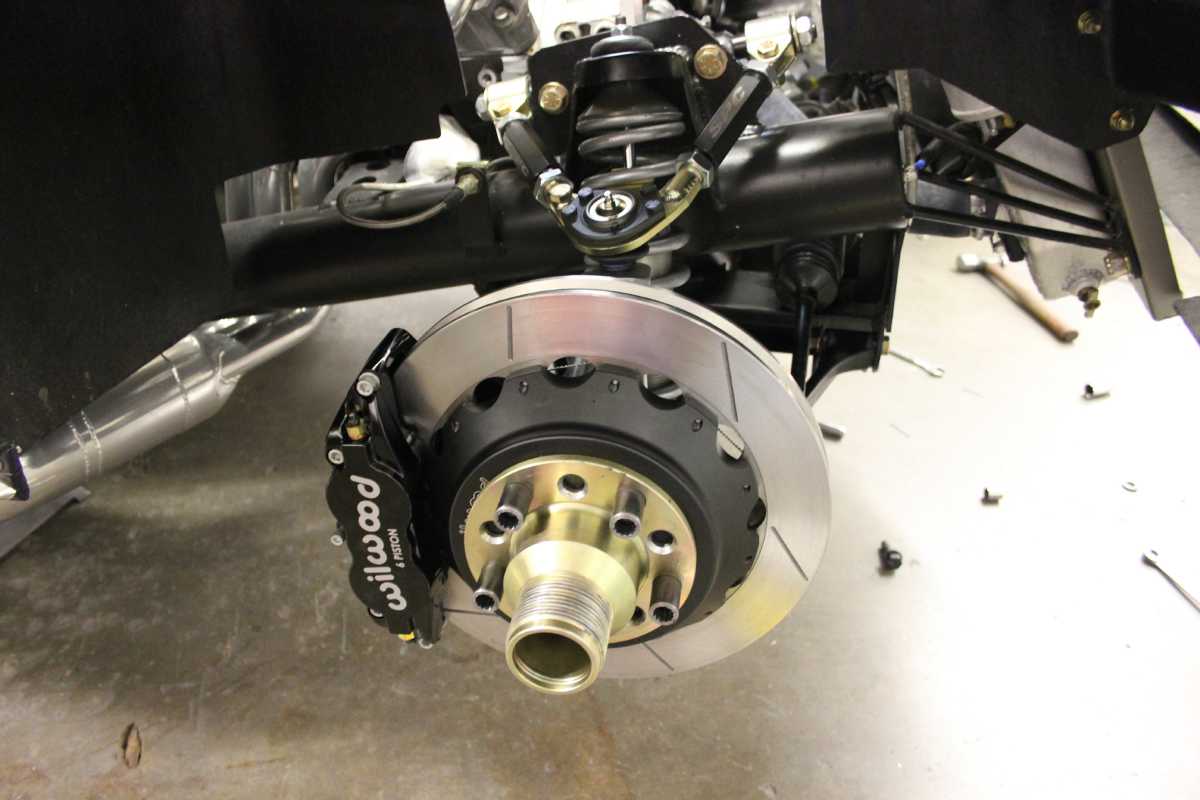
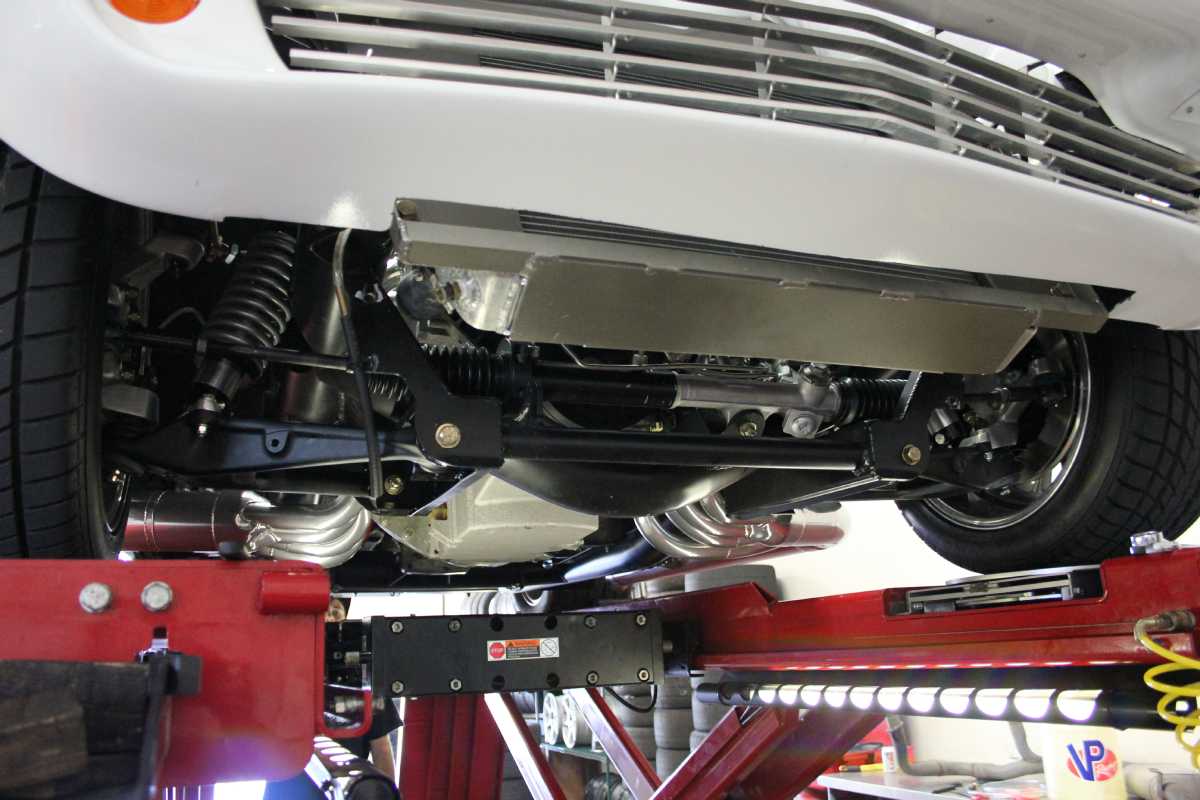
I have a set of Wilwood 6-piston calipers and lightweight rotor/hat assemblies on order. They are due here in a couple weeks. They will fit the earlier C4 spindles, so we're going to swap the early (narrower) front suspension components to the car once the brakes arrive.
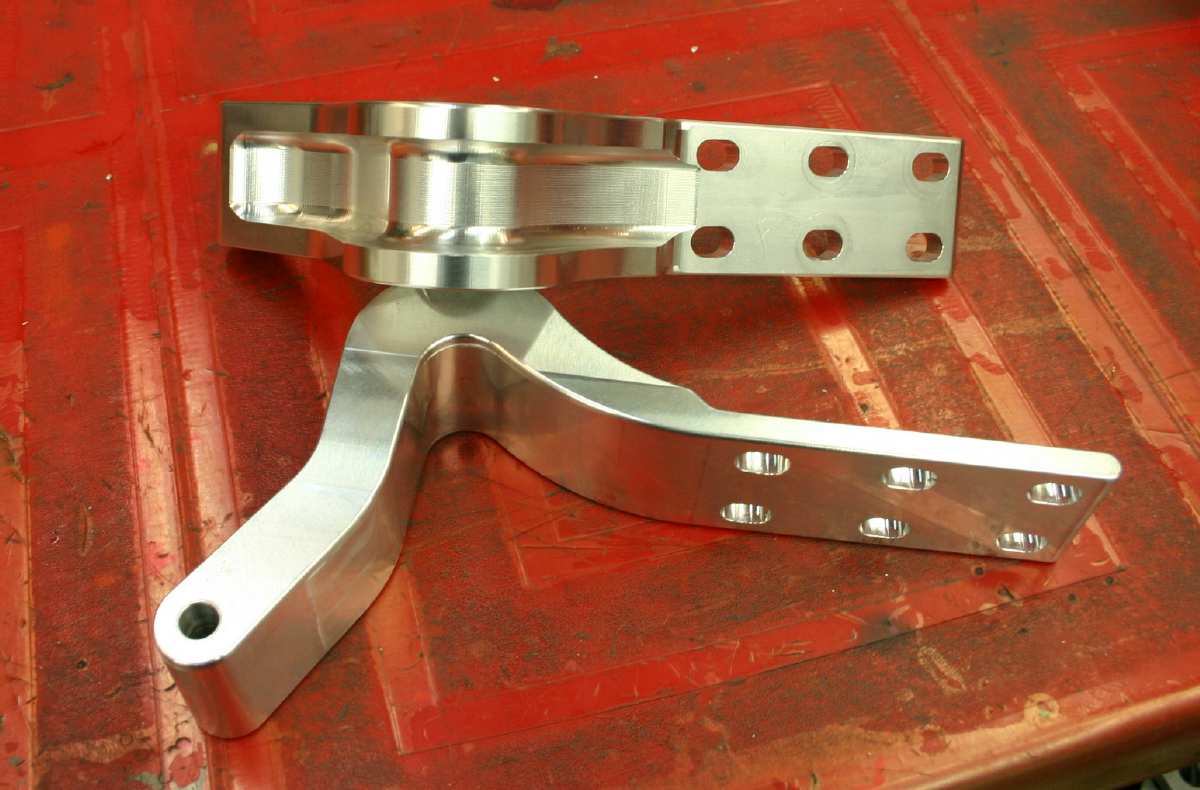
The car looks really good with the narrower tread-width up front, as the sidewall of the tires is the only part protruding from the fender flares.. Since the early lower control arms have no provision for a sturdy coil-over mount, we have fabricated some sturdy pieces that mount the shock at the correct angle. We made the prototypes from wood, and digitized them for replication from aluminum. See below:
I spent the better part of a day removing all the small dings and the parting flash from these '84 C4 front lower control arms. I still have to trim the "ears" back on the billet lower coil-over mounts. Next up for the control arms is some masking and shot-peening, which will be followed by assembly, and a coat of black paint to make them disappear under the front of the car.
Engine
I finally received cylinder heads for the "big" engine we're building. These heads are Horace Mast's finest with 280cc intake ports and flow-rates that will easily support the 700HP I'm looking for.
These heads are designed to incorporate the two additional head bolts per cylinder (on my RHS tall-deck block). Mast Motorsports casts the heads, so they are not GM pieces at all. I think they are the bargain of the century, as they cost no more than OE LS7 heads.
We couldn't resist setting the heads on the block and mocking up the Kinsler cross-ram injection set-up. I think that once the ram tubes are cleaned up and coated silver, they'll have just the right look.
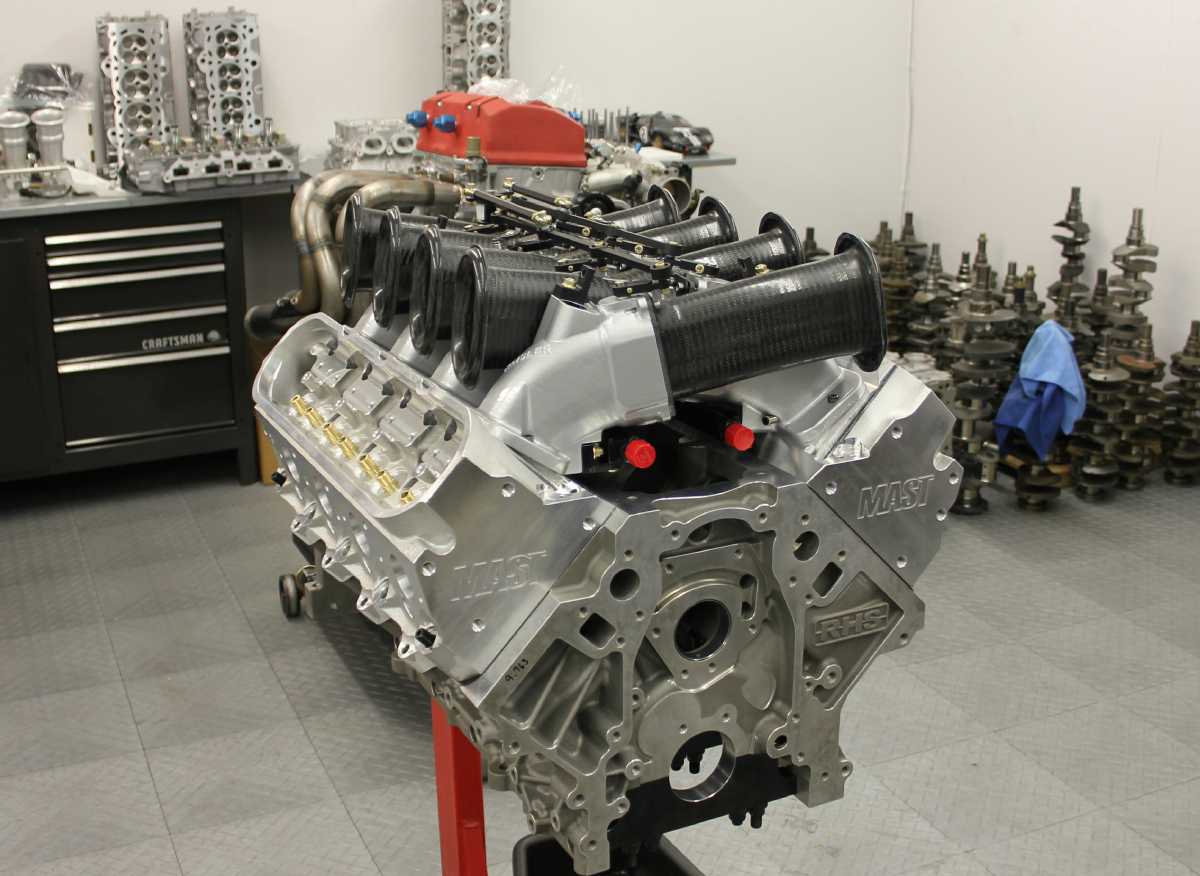
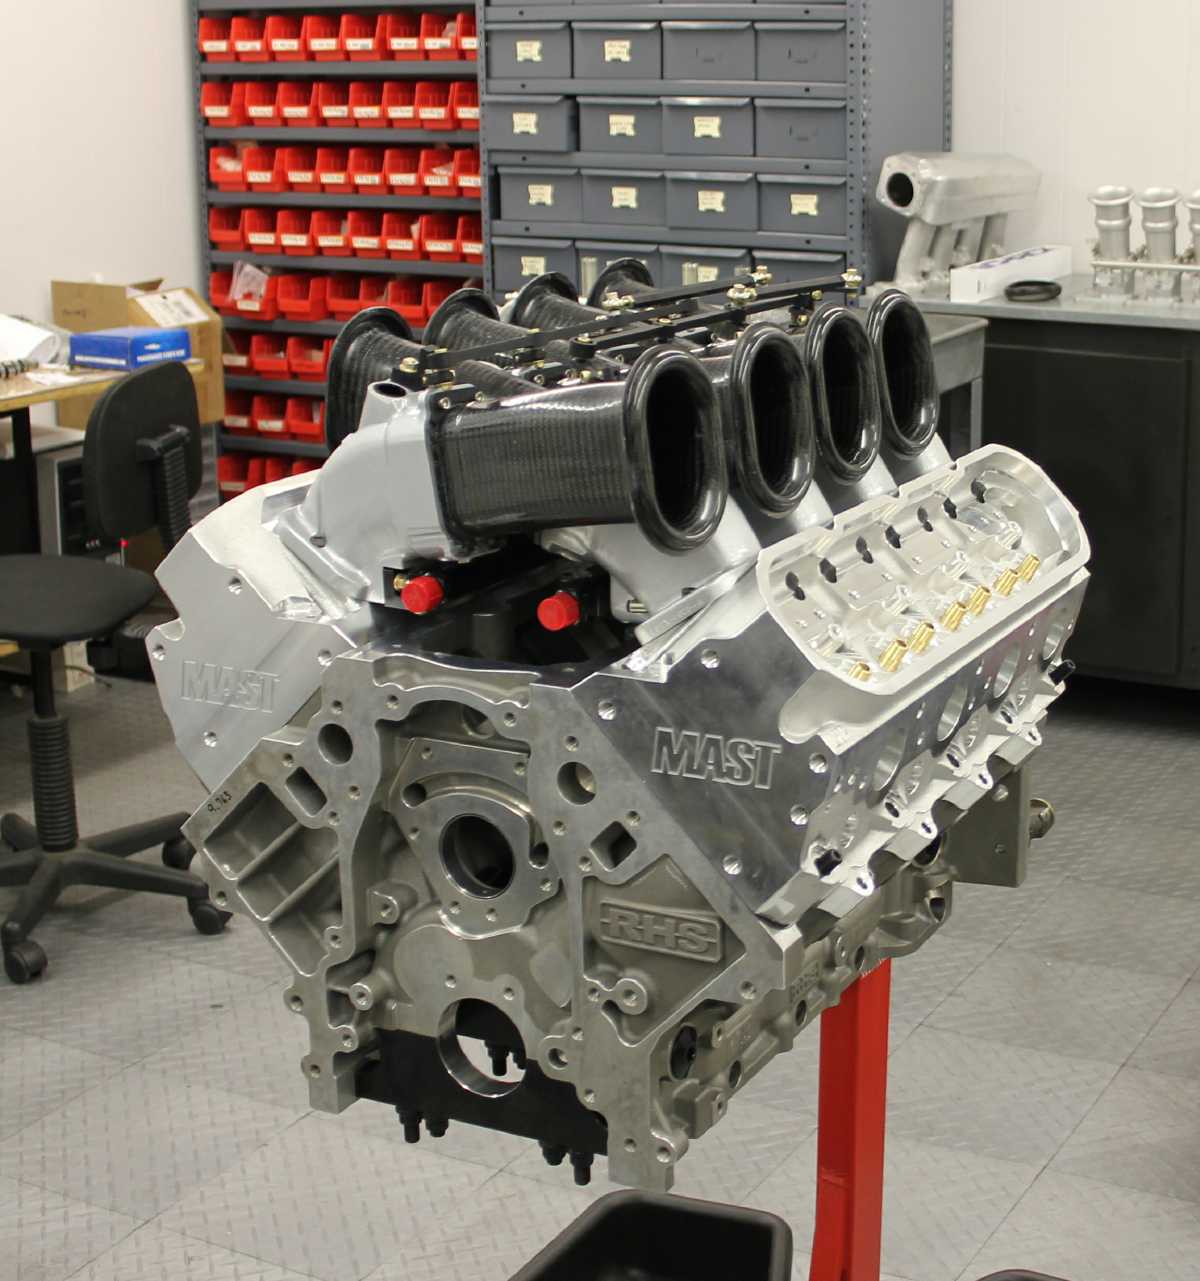
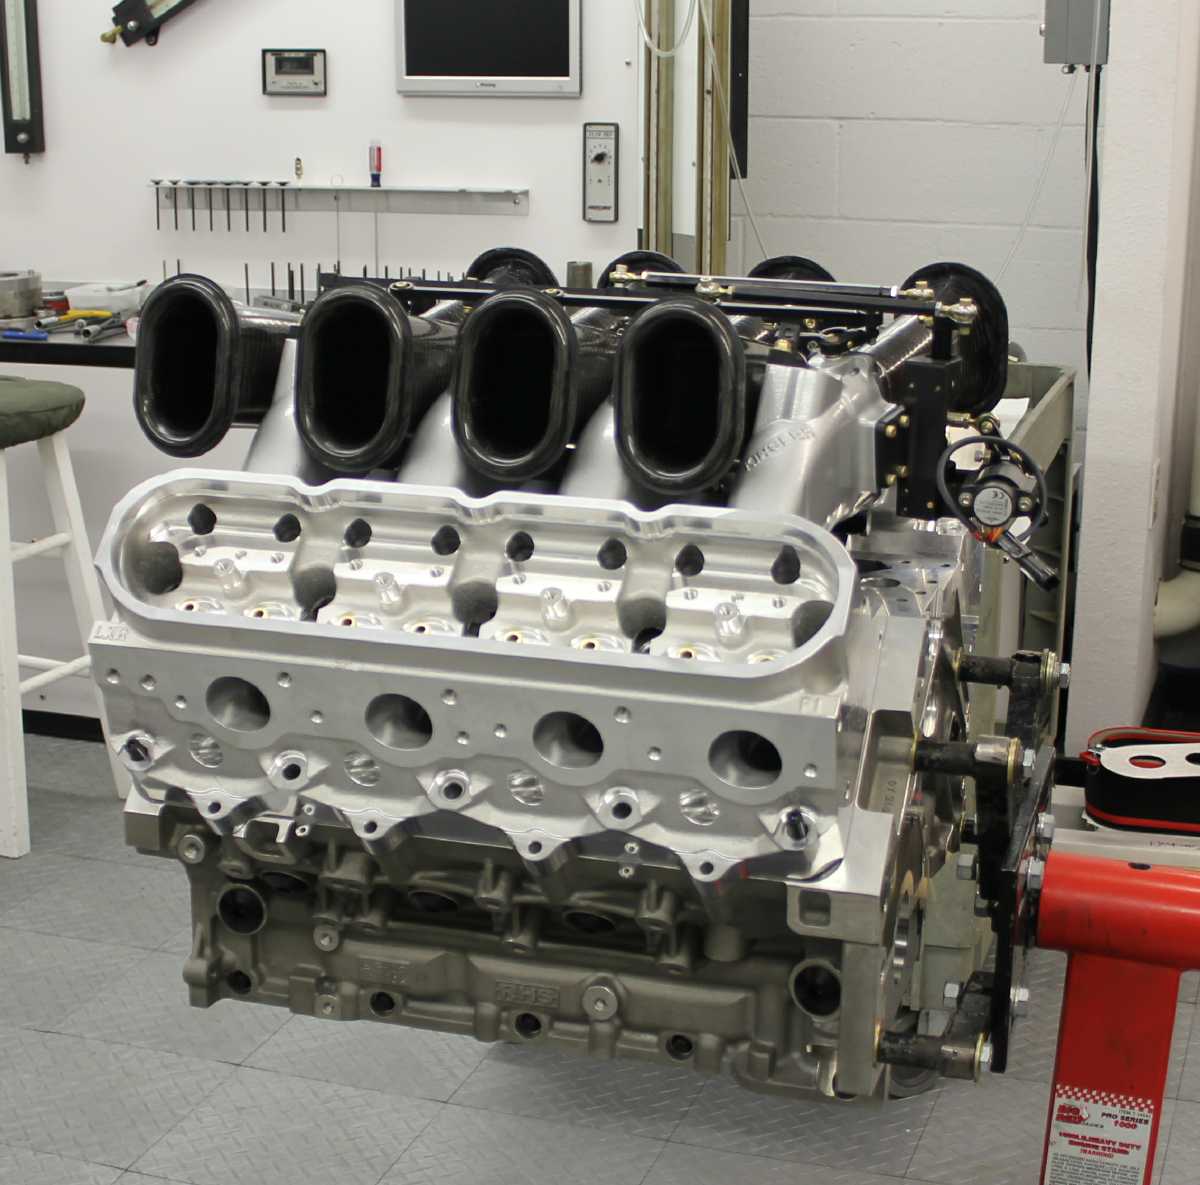
I still have to have a billet crank (and rods) made, we'll design the pistons and have Wiseco make them to our specs, and I'm thinking that I'll probably get a dry-sump system from ARE. The tall-deck block at 454cid, also necessitates new headers, so there's still a lot to do .....I figure another six to eight months with our current work load here at Endyn.
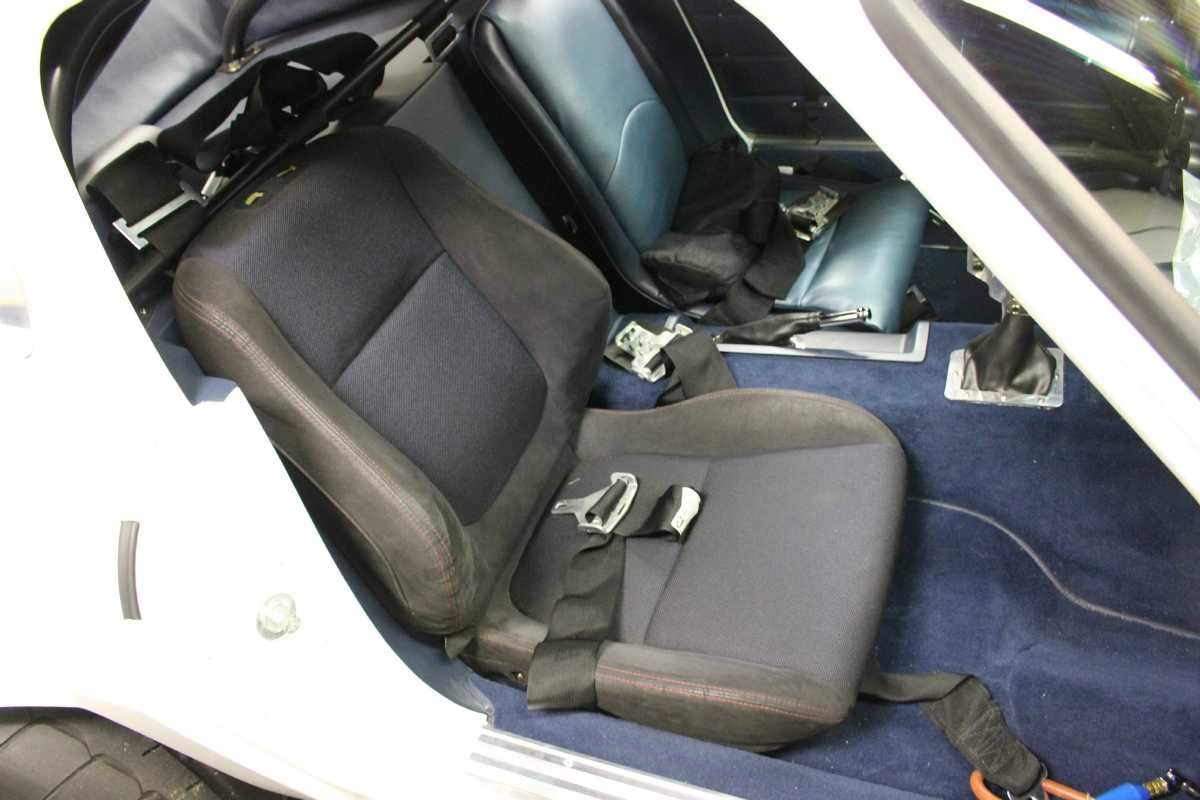
I've decided to use a set of these USDM Acura Integra Type R seats in the car. I own and drive a 1997 Integra Type R and I have always loved the seats. They hold you in place, but they aren't uncomfortably restrictive. I have to build some new seat-back brackets and mounts so they will fit in the GS (particularly on the narrow passenger-side). Once I have that completed, I will have them re-covered with some material that will match the GS seats. I'll likely use a suede for the outer portions and a knit for the inner (just as Honda did).
Wilwood brakes are supposed to arrive this week, but it'll likely be July 2-4 before I'll have time to install the suspension and brake pieces. I also obtained a rebuilt 2.0 ratio steering rack for the car, and the early 1984 tie-rods bolt right on in place of the longer ones, so it looks like there won't be much fabrication necessary to make the steering "fit".
The lower control arms have been shot-peened, the lower coil-over mounts are trimmed, and the uprights have been massaged to remove their forging flash (I got a little carried away and polished them too)..... Tomorrow, we'll install the new ball-joints, paint the LCA's black and bolt in the shock mounts. Everything should bolt right on the car, including the new Wilwood brakes, so hopefully it'll be rolling Saturday.
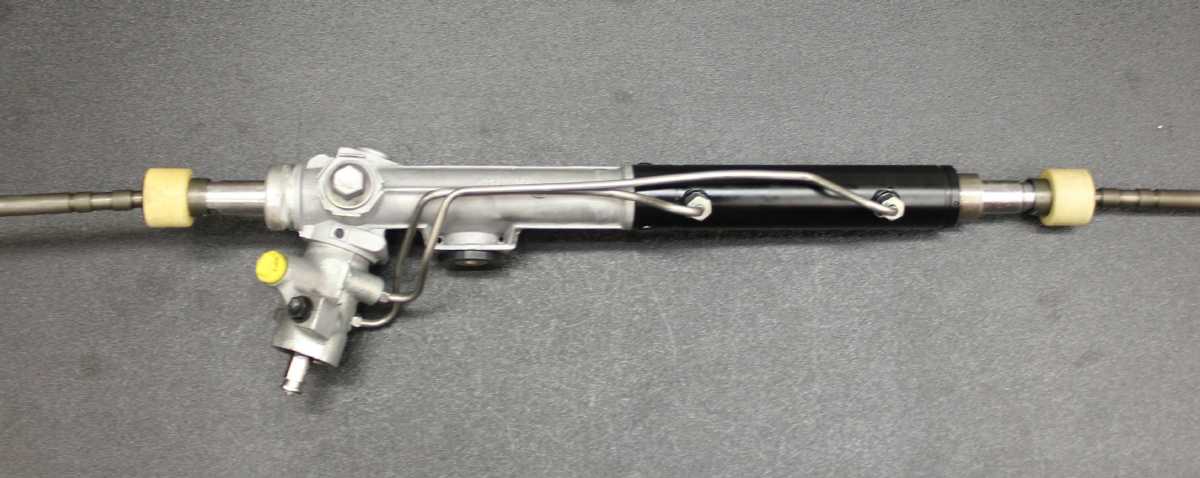

Note the difference in length between the early and late-model tie-rods. We rebuilt the Z51 2-turn lock-to-lock rack and installed the shorter links.
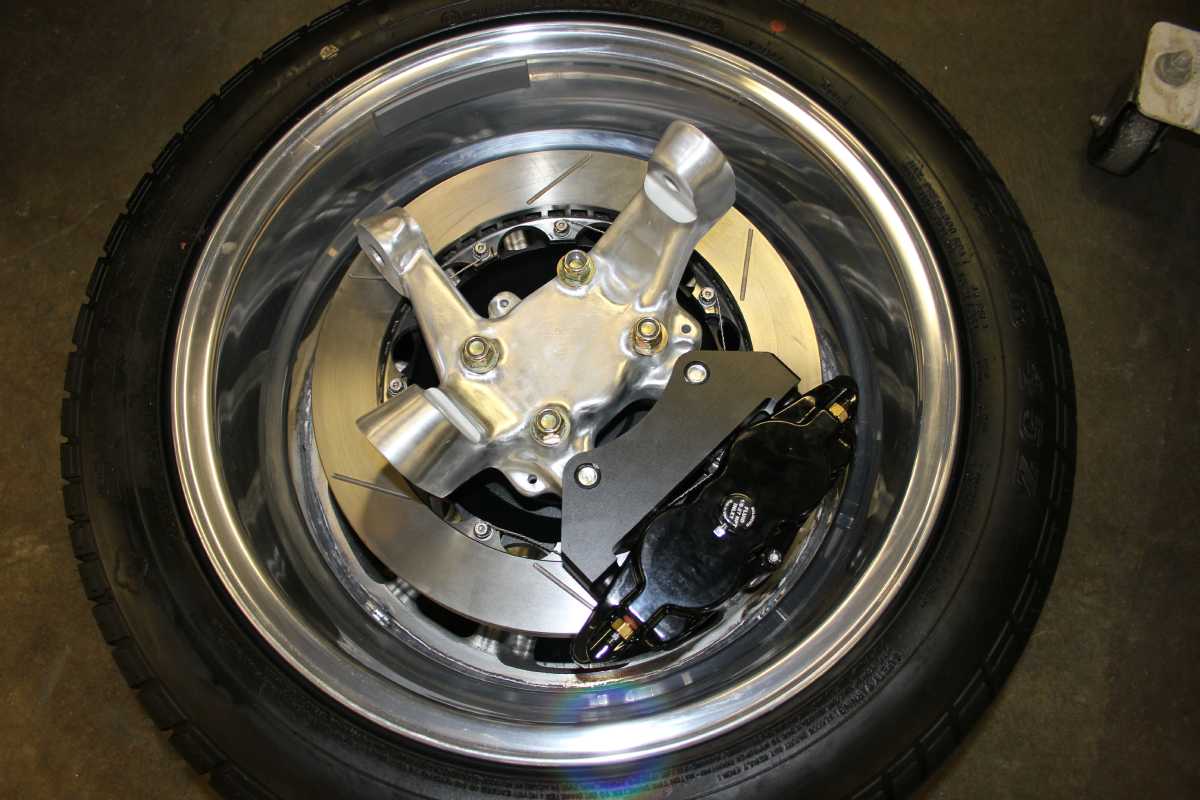
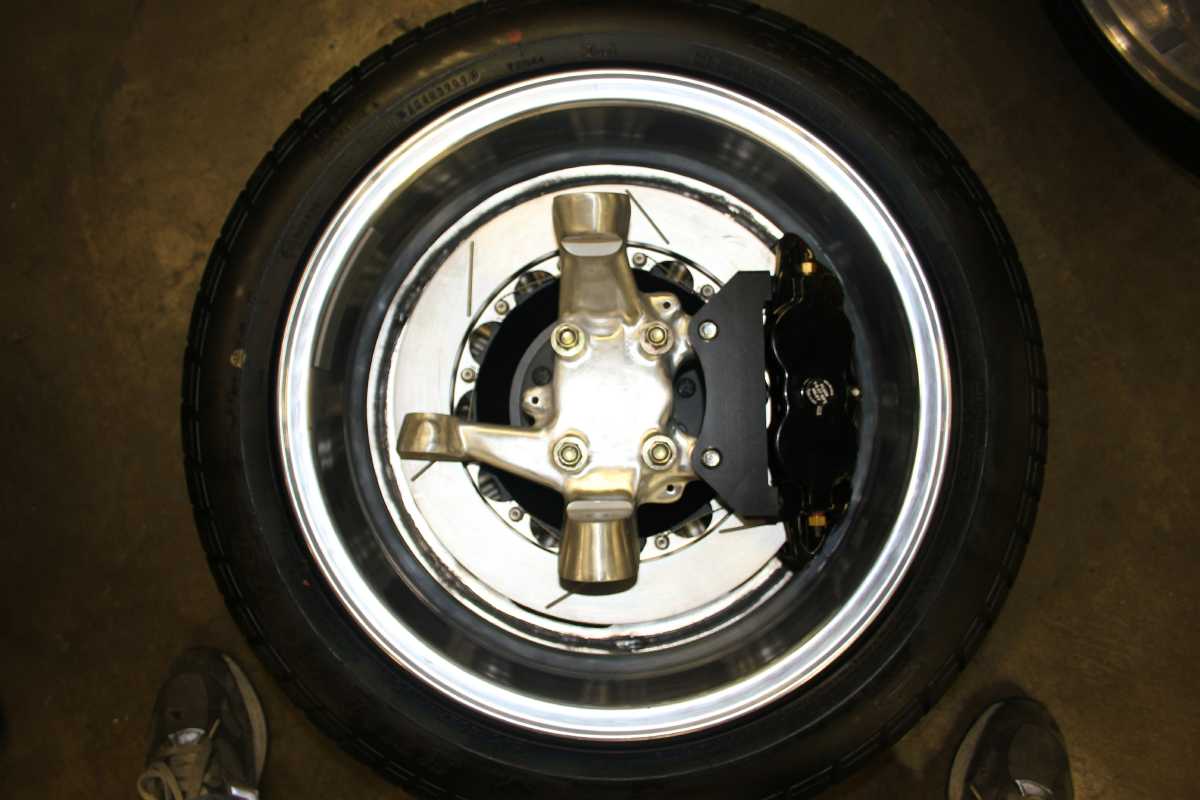
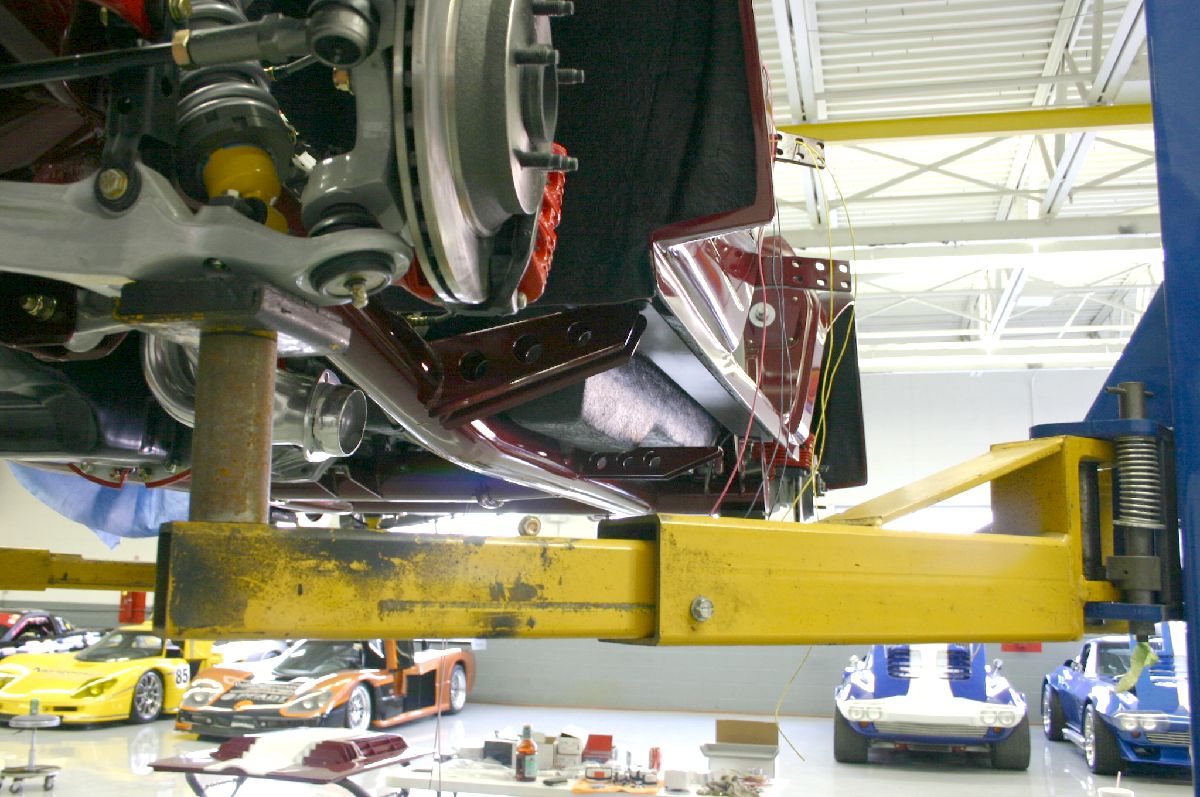
Lots of caliper clearance to the rim inside and there's close to an inch of clearance to the outside.
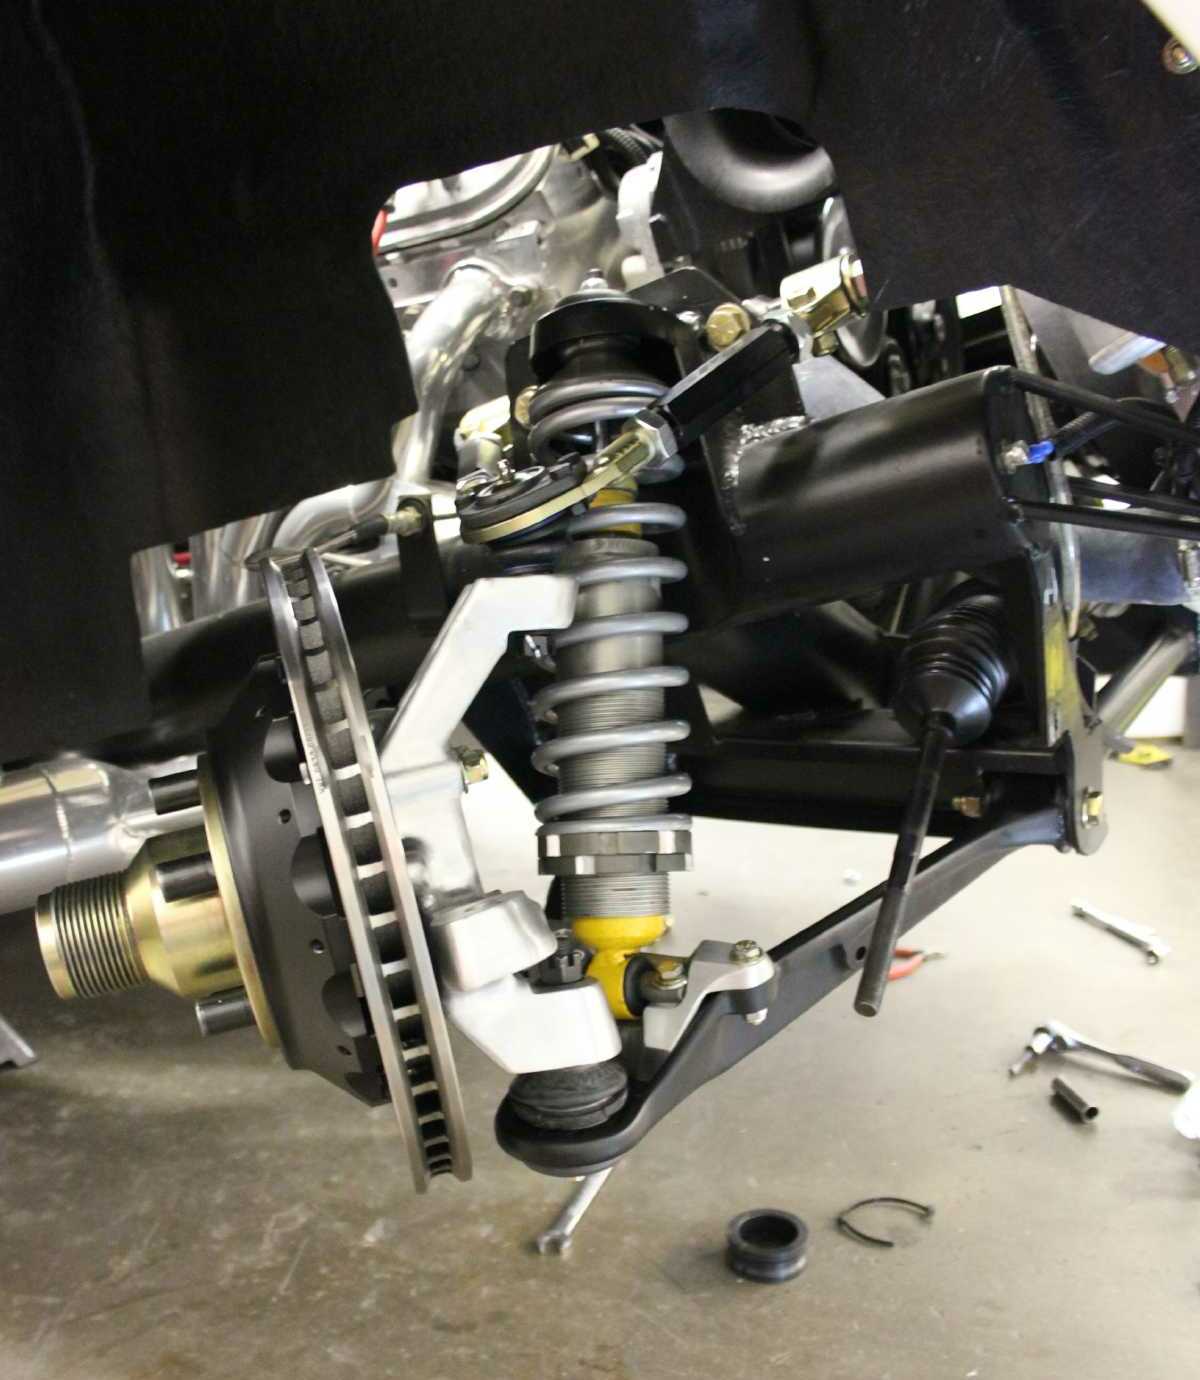
Going together nicely. Note that we machined more notches in the coil-over adjusting collars to facilitate adjustment when the car's on the ground.
Almost hate to cover it up with a wheel....
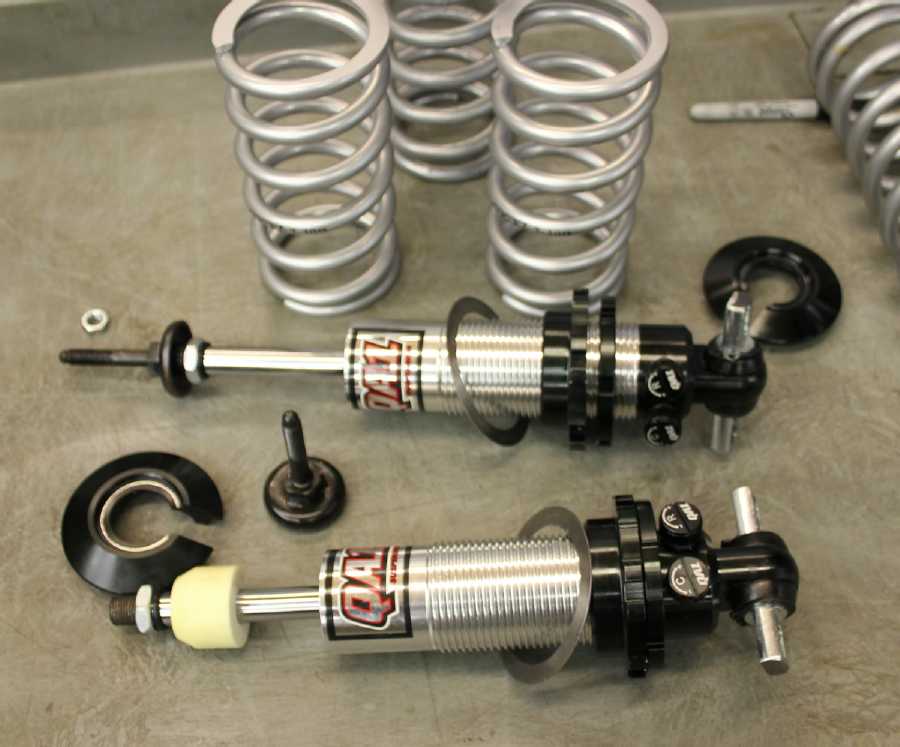
The standard issue coil-overs proved to be too tall to work with the new suspension, so I opted for a set of QA1 coil-overs with 9" 300PSI springs. These double-adjustable shocks fit the set-up perfectly.
Between the brakes, the shorter control arms and the shocks, I've lost right at 21lbs per side.
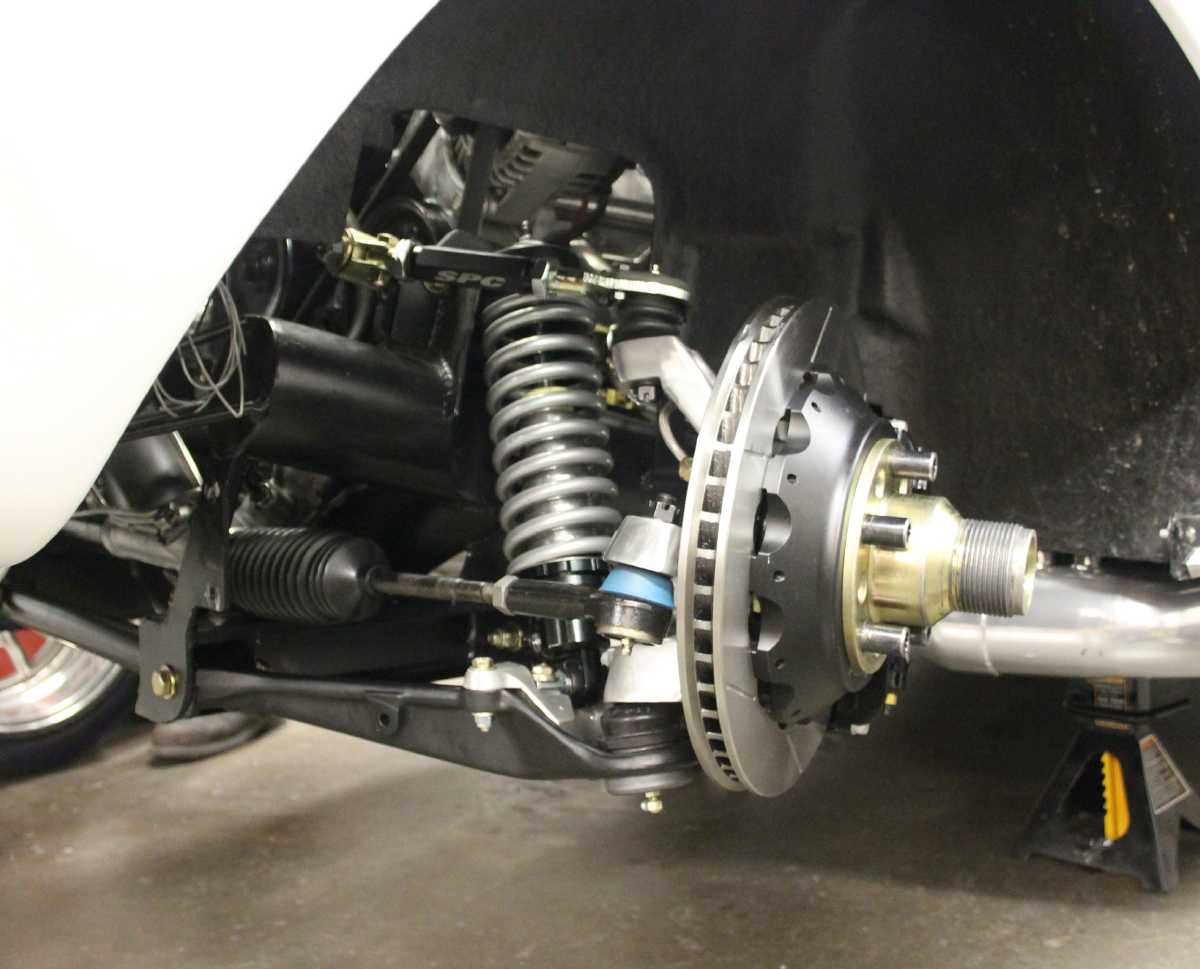
Once again, the crew at Texas Track Works did an excellent job aligning the car...and while it was on the rack, I had an opportunity to get a few pics of it's underside.
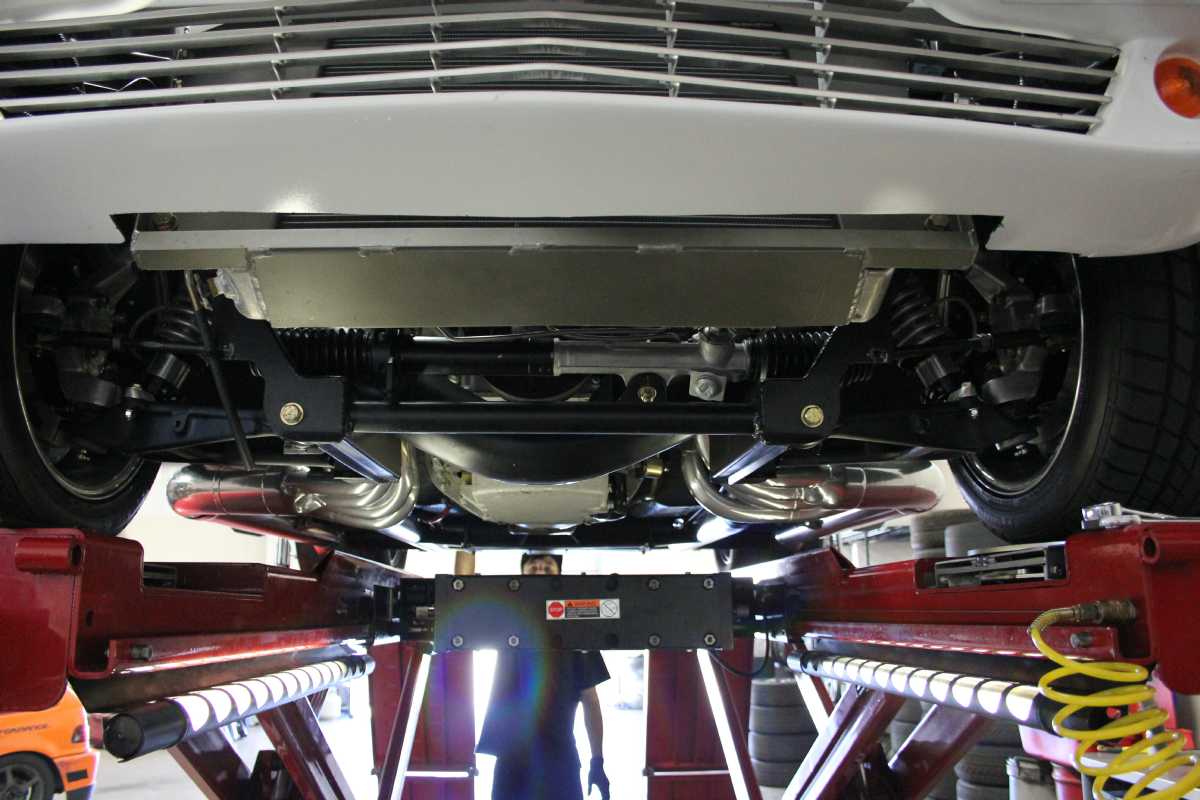

I couldn't be more pleased with the way the suspension mods have turned out. The tires have plenty of clearance, so I'm going to increase the front tire diameters by going with a 255-17 Toyo which is about .75" taller than what I have on there right now, but the best part is that they're very sticky. The Toyo's should be here in time for me to install them before getting it properly aligned by the crew at Texas Track Works next Friday.
We also had to bend a new front sway-bar to fit with the narrowed tread-width. I should have all of the custom-machined pieces finished up by the end of the week, so it'll go on next weekend right after the alignment. Next up are the white headlight covers, the new seats, the new engine, and removing the body, building the new headers and narrowing the rear tread-width....and I'm sure there'll be more after that.

After going round and round over the seat situation in the car, I elected to use the Acura Integra Type R seats. I have plenty of first-hand experience with them, as I sit in them every day going to and from work in my 1997 ITR. After selecting the materials, I went to Fuller's Auto Upholstery here in Fort Worth to have them recovered. Bob Fuller also did the interior in another area (white) Grand Sport that has been seen in shows over the years. We also CNC'd some lightweight brackets to mount the seats in the car, as the Honda bracketry made the seats too wide (especially for the narrow passenger-side). Our brackets also trimmed another 2.5lbs from the assembly weight....also making them 4.5lbs lighter than the seats that came with the car!
Driving the car home from the our shop Saturday, I was shocked at the difference the seats made in the car's drivability. Instead of hanging on to the steering wheel with my ass sliding around, there's a real feeling of connection with the car now. For the first time I was really able to hustle the car through curves and turns, so I'm happier than ever before. Now all I want is cooler weather!
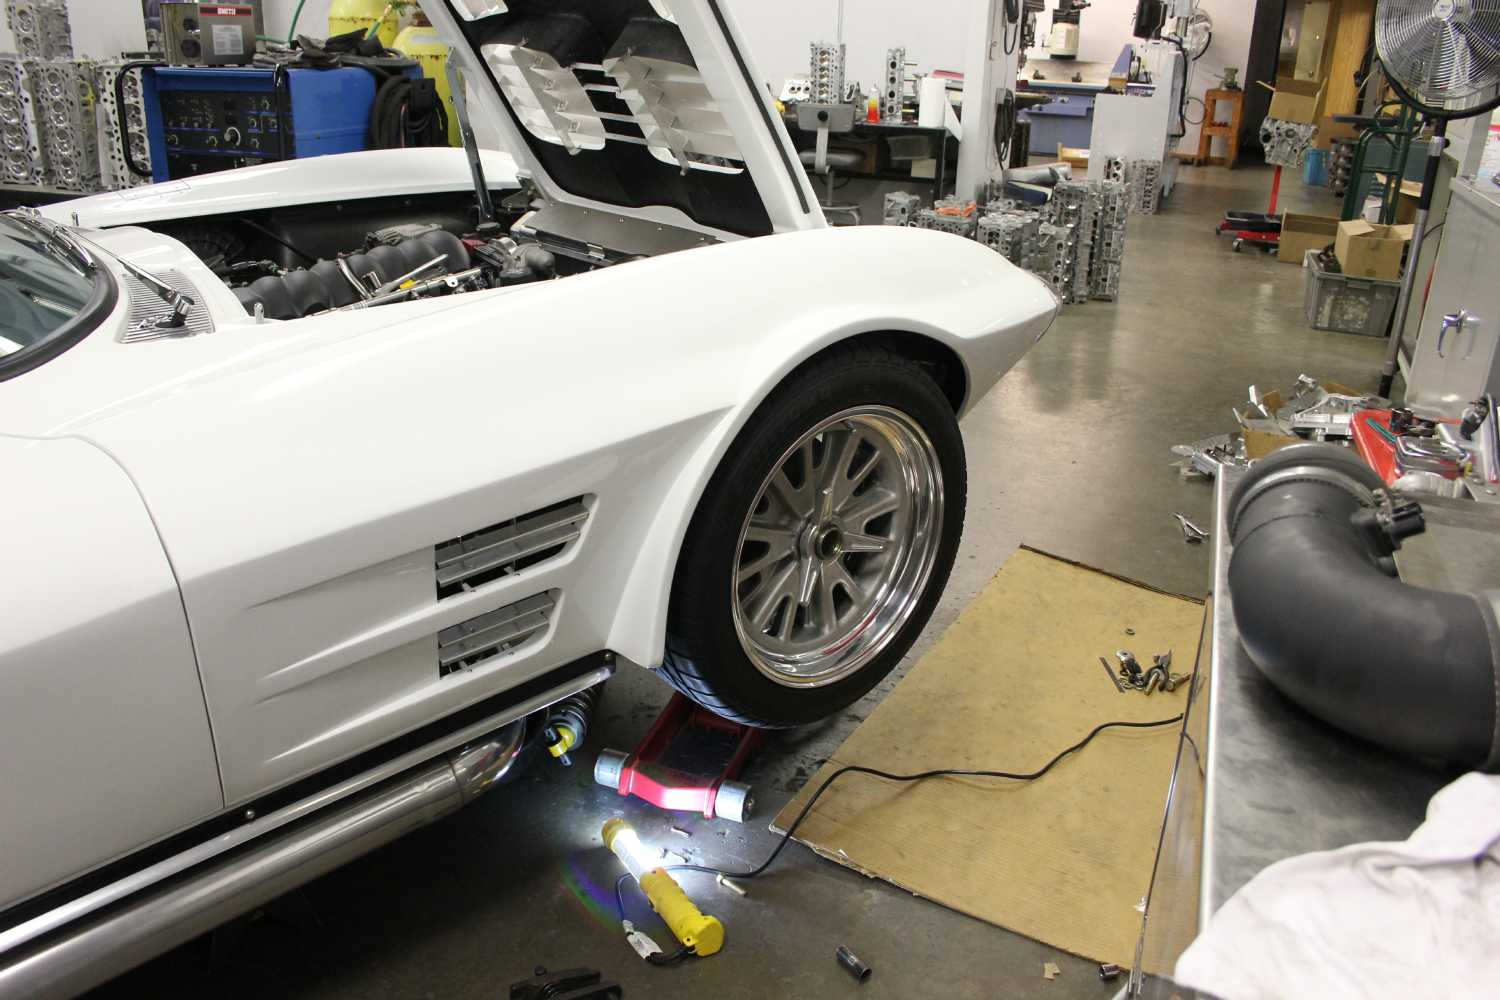
Next on the agenda was to swap the Sumitomo front tires for a new pair of Toyo 888's which are real gumballs (just like in the rear).

Great looking tires and under the fenders too. Next up was building the sway bar mounts and linkage.
Aside from fabricating the lightweight mounts for the lower control arms, we CNC'd the aluminum chassis mounts. Bob Butler (our CNC expert) just couldn't handle the stamped mounts, so I told him I'd utilize his, as long as they didn't weigh more...and they didn't! The car really likes the front bar. I thought the car handled well without it, but it's definitely corners on rails now. With the quick steer rack, it's handling is getting more like my Honda Civic (http://www.hotrod.com/featuredvehicles/22838_1989_honda_civic_si/) everyday, which is a good thing.
10-20-12
Drove the car to it's first car show Saturday morning. The show was put on by the Cowtown Corvette Club. I entered it in the "competition class" and I parked next to another Grand Sport (show car) from Fort Worth.
I'd heard about the "Chaparral" Grand Sport for years, but I'd never seen it, nor did I know the owner-builder (Dick Coup). While we were competitors of sorts, I really enjoyed meeting and talking to Dick. His car has been meticulously constructed from a D&D kit. Everything except the chassis is either chrome or polished aluminum. His doors have no more than 1/8" gaps anywhere you look, as do the hood and trunk, so the car is absolutely beautiful if you're into show cars.. The engine in Coup's car is a small-block Chevy with 45mm Weber's on a Moon manifold.
The fuel system has a spare pump that can be used if the primary pump fails.
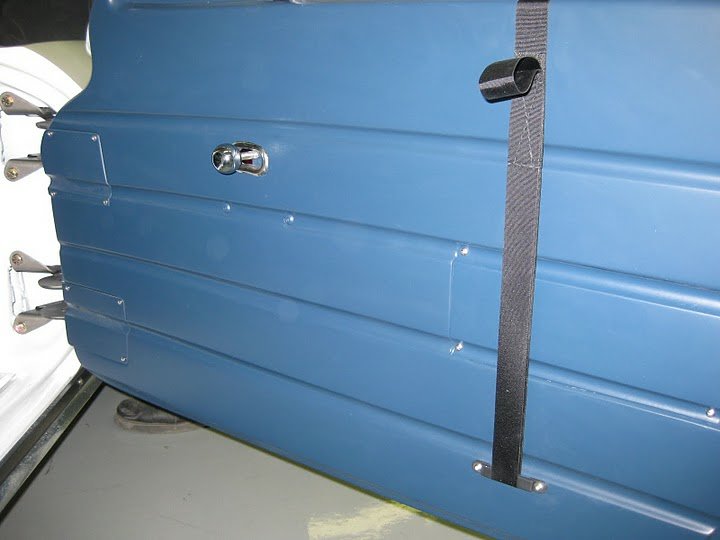
I do like the window strap arrangement, as it actually loops through the door.
I had a TCU football game that "required" my attendance Saturday afternoon, so we had to leave the show just as the awards were being presented. Dick offered to collect my winnings, and all I know right now is that one of us was the winner and the other finished second. Dick is planning to visit our business later this week, so we'll know the specifics when he arrives. All in all, the show was really nice. There were a LOT of Corvettes on display and a good time was had by all.
05-09-14
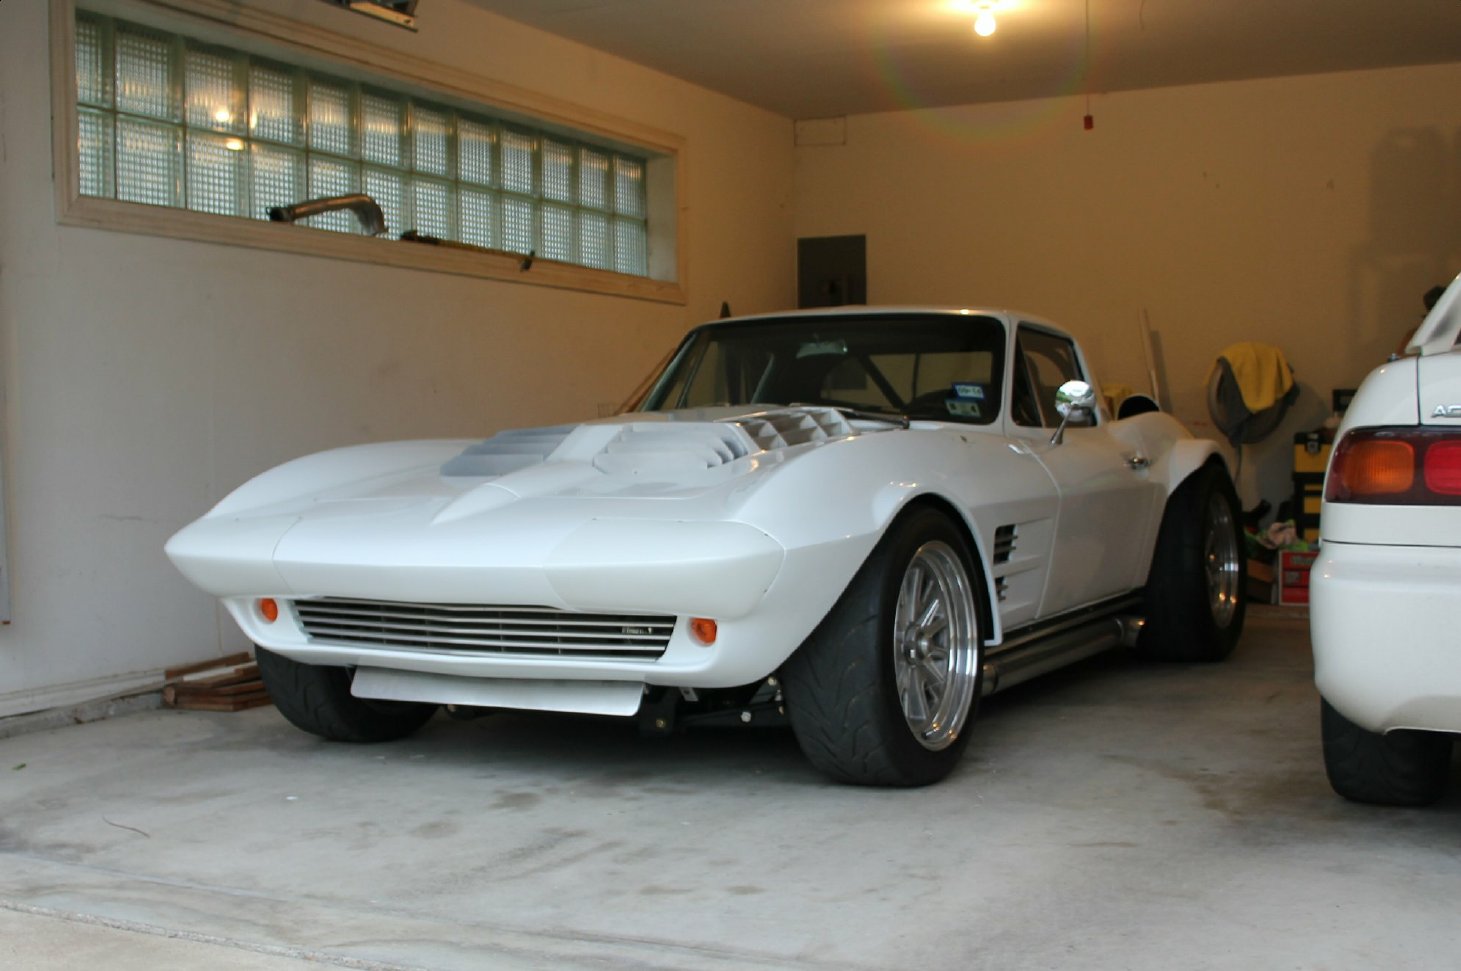
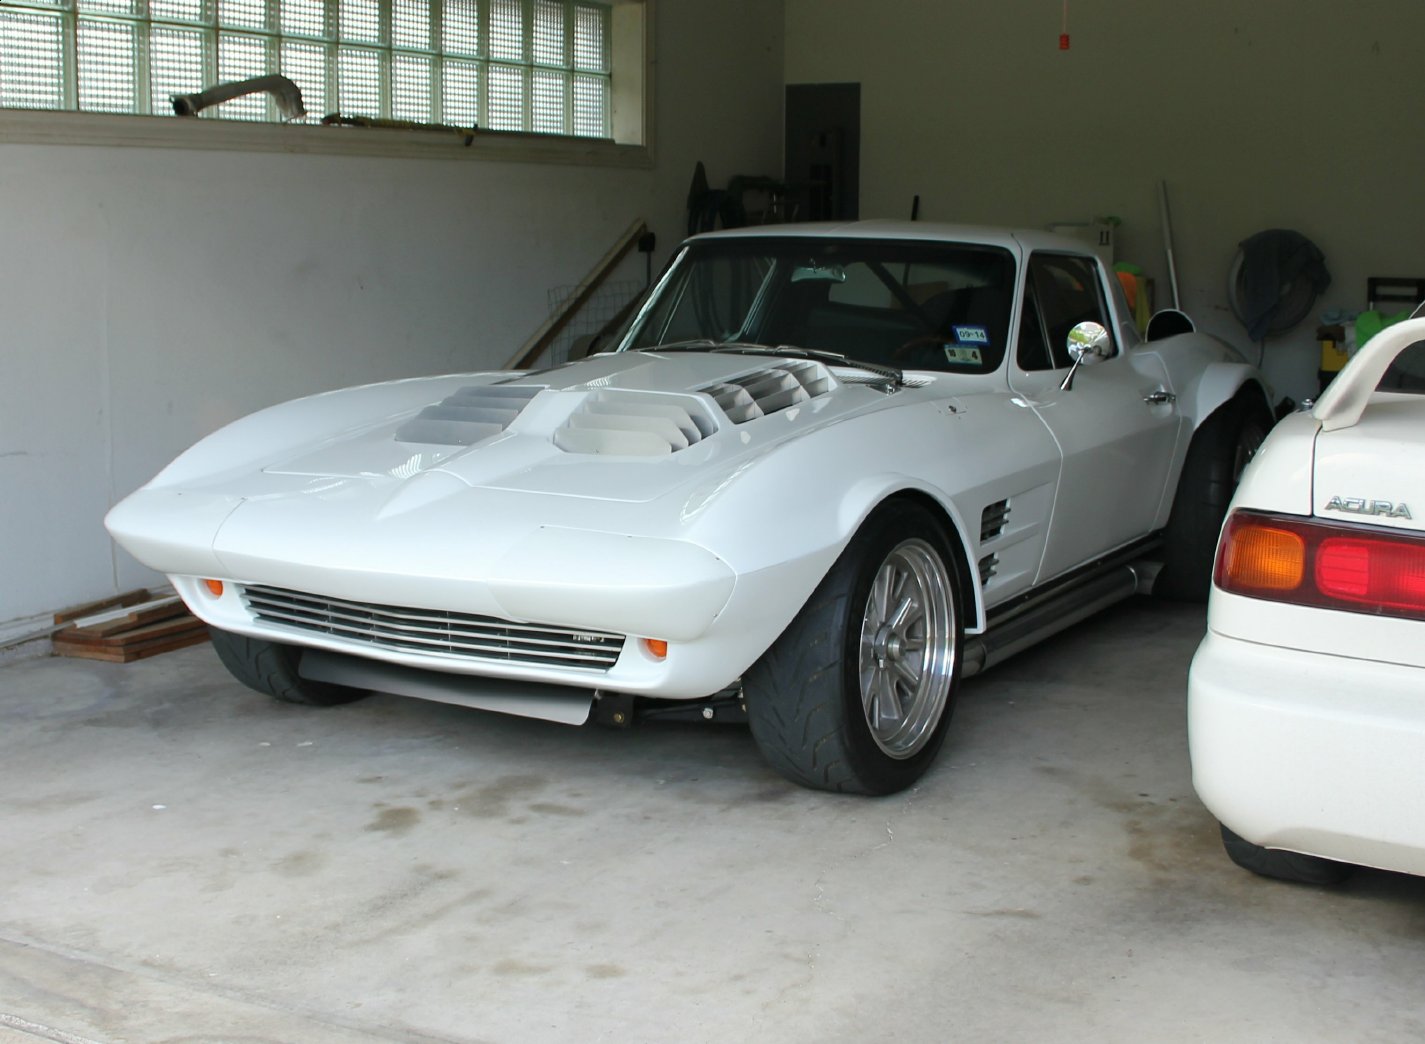
Two pictures of the car out front last Fall.
It's been quite a while since I've had an opportunity to update my Grand Sport project. Endyn has been busier than ever with cylinder head programs and engine-builds, leaving me little time for anything else. The long-time side effects of all the chemotherapy and radiation I've been through have made for lots of aches and pains. My schedule (4:00AM until 9:00PM six and seven days per week) has left me little time or energy to work on the car.
I have, however, made a few upgrades that have made the car much more enjoyable.
As many of you know, my 1989 Honda Civic is my all-time favorite car to drive. While big power and front-wheel-drive typically spell trouble, the combination of the car's Quaife differential, substantial tire size, great stopping power and handling, combined with shifter placement that's next to the steering wheel, make this car an absolute blast to drive. I call it my shifter kart on the street. The Grand Sport isn't any faster than the Civic, but it's just never been quite as comfortable to drive (fast). So, in order make shifting easier, I spent an afternoon making a new shift lever.
I think we heated and bent that piece of tubing at least 25 times before I was pleased with it's positioning. At any rate, I feel like I can hunker-down in the seat and drive in a much more spirited manner because now I never feel like I'm reaching for the shifter. Also CNC'd a new floor bezel, and had new blue leather boots made for the shifter and emergency brake handle.
Last year, we just decided to go to the Corvette car show above. I figured if we bothered to wash the car this time, we might improve on our 2nd place. My "clean" car handily won the Competition class this time around.
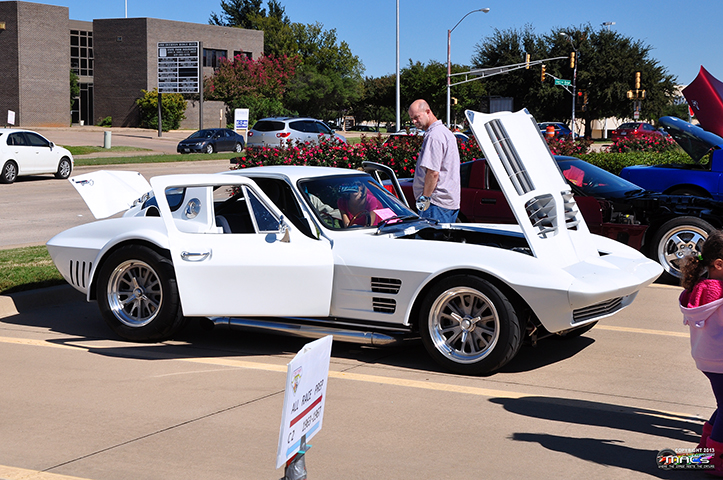
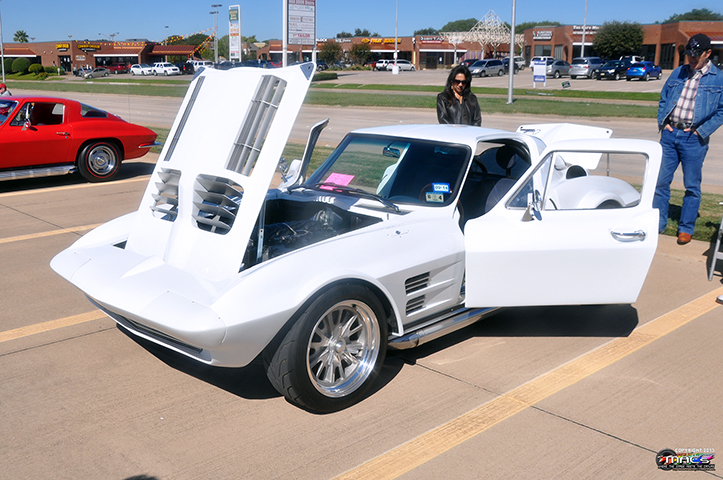
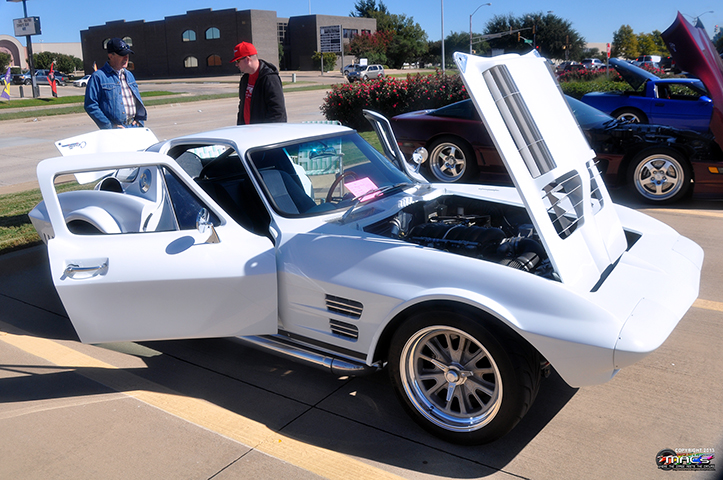

All of these pictures were taken by the Cowtown Corvette Club who sponsored the show. We were surprised that most of the people at the show thought the car was a trailer queen and never driven!
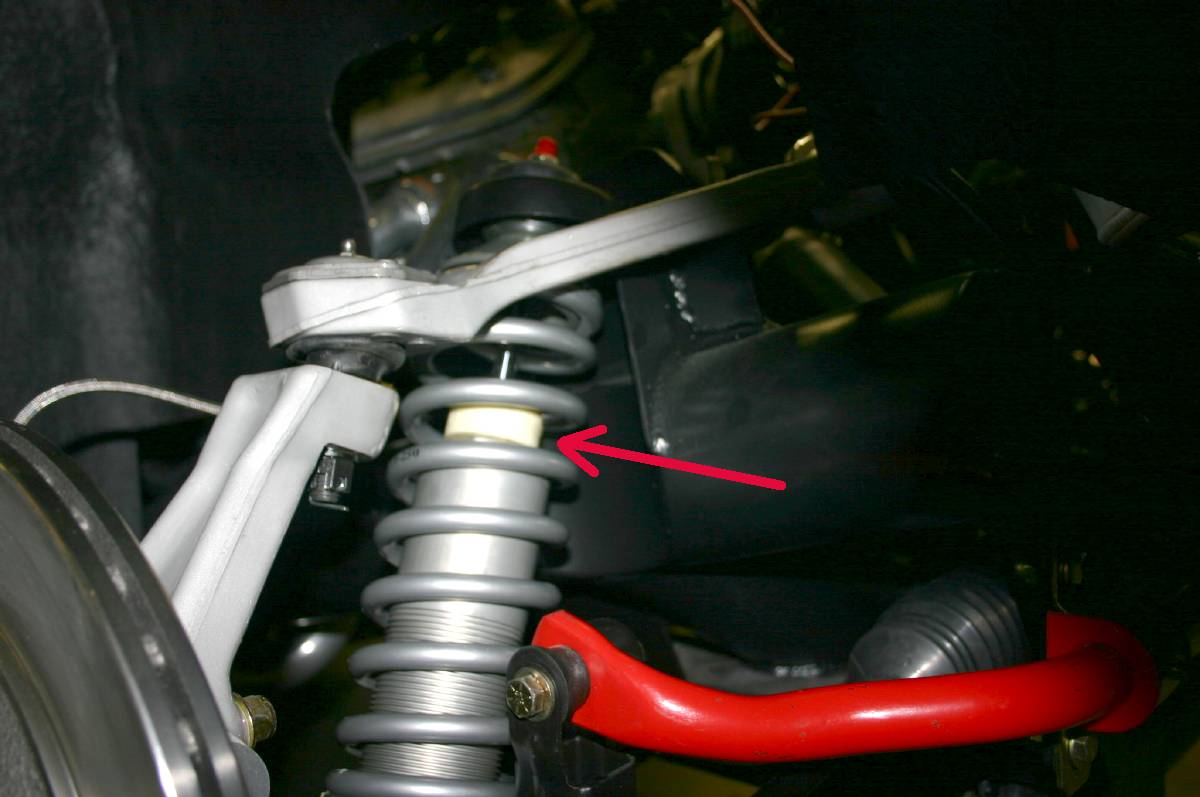
Back in December of 2012, I bought a set of double adjustable QA1 shocks to replace the Bilstein's that came on the car. In looking at the geometry of the shocks, it appeared that as-is, there was considerable side-loading on the rear shocks. The only solution to the problem was to rotate the lower shock mount 90°. I looked around on the internet and found a pair of aluminum lower shock mounts that would "fix" things, so I ordered a set. When they arrived, I felt that they were were a little bulky for my taste, so we made a set of mounts by welding some 1/4" steel together...and they fit and look much better. We also milled some mounts out of billet steel as well. You can see how they capture the head of the grade 8 attachment bolts....and yes, they are definitely overkill.
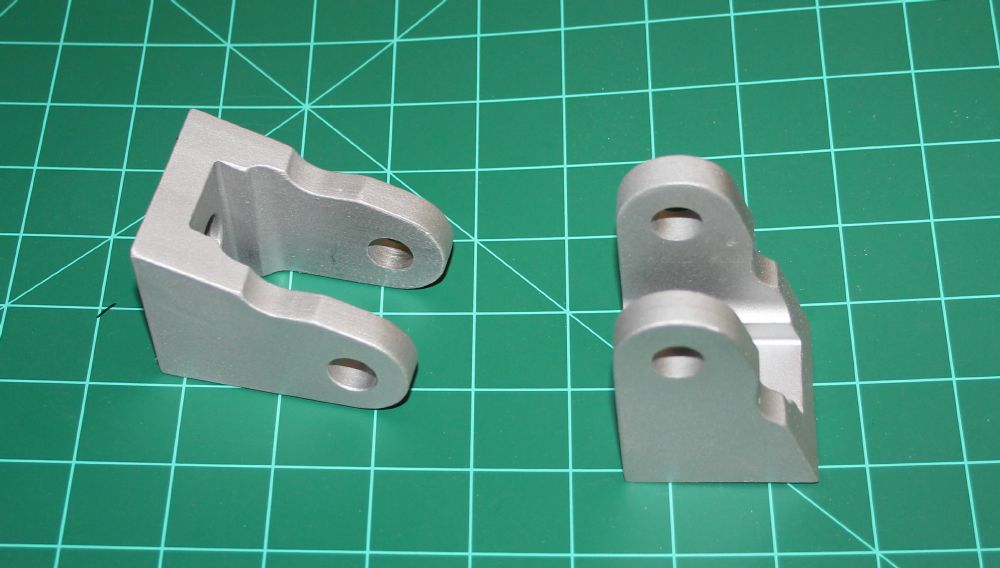
Here are a couple pics of the rear suspension with our original welded prototypes.
We also found that the urathane bushings in the ends of the lower-links used for camber adjustment had begun to "chunk", so we've replaced than with solid spherical joints. The handling and stability of the car are much improved. The double adjustable QA1 shocks and the increased 300 psi spring rates have really helped as well.
I've also had Classic Instruments make a matching fuel pressure gauge for the center post of the dash, however, I haven't had time to fit and install it yet.
I've just never liked the front spoilers that are commonly in use on GS replicas these days. Here's my first attempt at making one that looks period correct.
Believe it or not, the car actually runs cooler at highway speed with the spoiler.


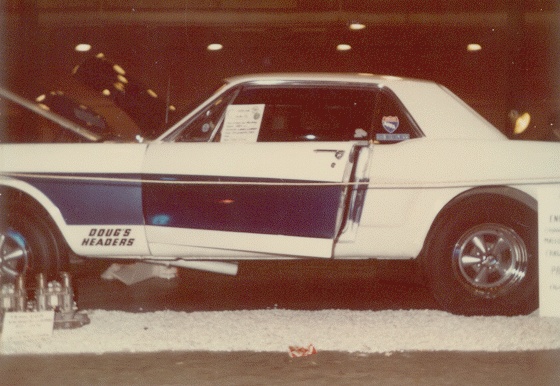
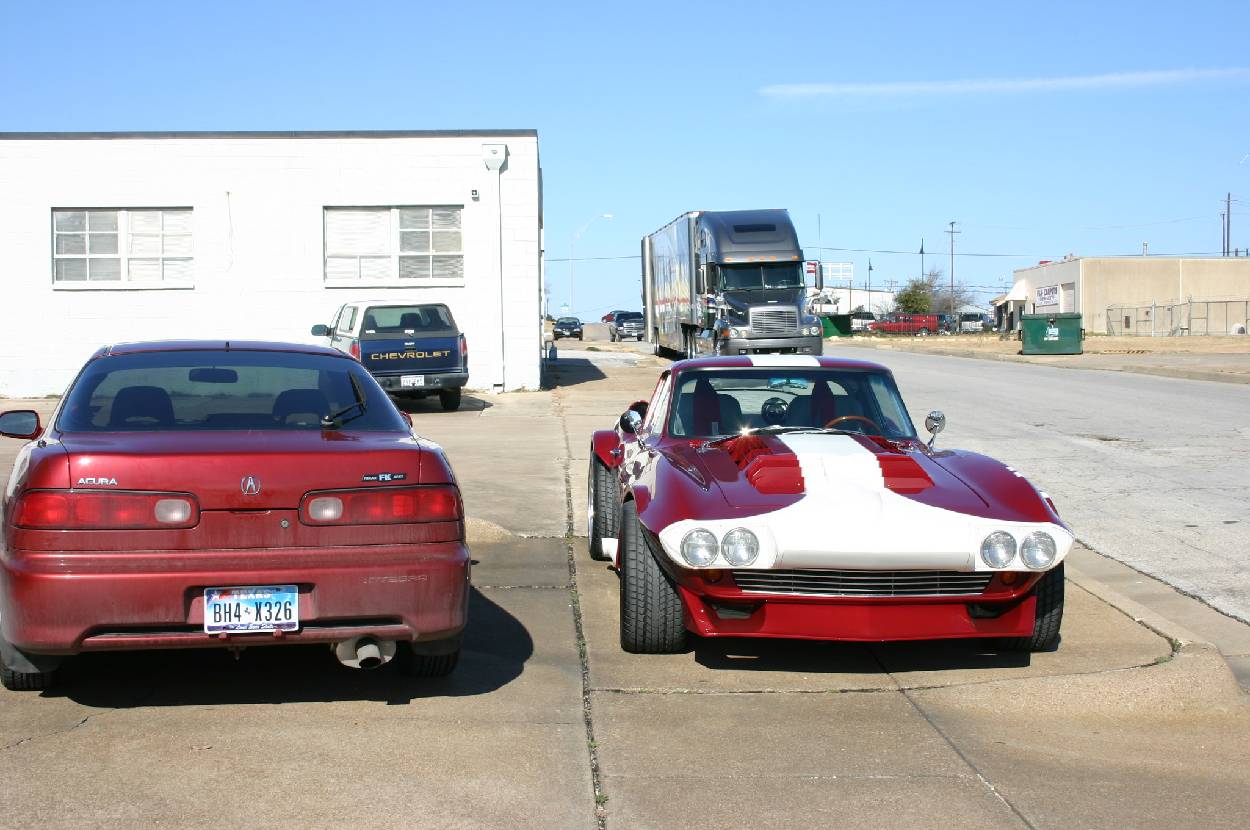
My only other car show experience back in 1968
Other GS Stuff
![]()